 |
| Just a reminder of the LHS game, not long after the start. (Pat is already looking longingly at the box of more French reserves) |
 |
| Intense activity round the main table in our second Waterloo game nicknamed "Le Woteef" scenario. |

You can see I have completely rebuilt what was the lower side of the table background border, and built it up even higher at the wider end. This is intended to accommodate the heights of Mont St Jean and allow a nice long slope to the far narrow end for the French to fight up. My maps are on the table to work from and you can see them in detail here

Now I built up the rough idea of the contours using polystyrene packing blocks, cardboard boxes and then layers of thick cardboard, occasionally cut or torn to make the shapes I needed.


Ok, so you spotted those odd shapes where you'd expect LHS farm to be? I found a big piece of grey polystyrene about an inch deep, and big enough for all the farm buildings, so thought it would make a good level base. Trouble is I had not allowed for contours and ended up packing it and then having to PVA glue it and then use 3 antique 7 pound weights to secure it while the glue dried.
You can see things slightly better in electric light:

Even then it was not level. However, if you look at the original LHS the slope is still evident, but all model buildings have horizontal bases, so I was going to have to compromise on this aspect too and fudge the final modelling detail to give the right impression, read on....
 |
| View of the La Haye Sainte area from the Lion Mound, in 2014. Elm tree crossroads at extreme left; orchard marked by the hedge line at right |
I love this bit. Get a pile of big sheets of white packing paper; bowl of slightly watered PVA glue; a wide brush, and put on rubber gloves. Then just build up a beautiful layer of papier mache effect that allows you to roll up bits of paper and pack up or round out wherever necessary and cover with another sheet, and so it goes on. It's sufficient to put only two or three sheets thick as the PVA makes it dry fairly hard and more layers will go on top anyway.


The following photos shows the dried contoured landscape which I have started to populate with crop fields.


Around that are beige felt sheets that I salvaged from an old cooker hood - they are unused filters. The pale yellow fluffy stuff is standard teddy bear fur, provided by Kevin, and probably proved the most realistic of all my attempts to represent trampled crops, once treated. In the distance there is dark brown stuff and that is also teddy bear fur bought by me on Ebay and was left over from the fun I had making a fur colback headgear for my Hussarette (full size) modelling, such as:
With "M":

and with "Ella":

Right, that's enough furrivolity for now - let's get back to serious miniature modelling!
We move on to some close ups of various treatments of surfaces. The basis for a lot of the muddy roads, rough crops and grasses is my own recipe "gunge". This is art not science so I can't give a formula. It is always an intuitive mixture of PVA glue, acrylic or other water-based paints, plaster type filler (with water to mix it), sawdust or wood shavings - size dependant on the task, and sometimes sand or very small stones.
Much more gunge and/or wash application and dry brushing later I had achieved an overall effect I was happy with.
From now on I was adding detail. First of all I didn't need to make any more trees as I had about 150 from which to choose from Waterloos 1 and 2 (see link above). So used the larger ones for the orchard and smaller ones on straight bases as the core of some hedge lines. The final hedges were a mixture of just bush or trees with bushy hedge material in between. I used the same techniques of paint, dry brush and commercial foliage clumps and scatter as in the earlier terrain.
 Above and below: the mound by the Elm Tree crossroads (Wellington is still there). This and most of the other sandy coloured soil had been coloured and flocked to be sympathetic to Kevin's basing style, of which these RHA guns are a good example.

 Above and below: The LHS orchard showing trees and hedges as well as some field effects and the paved chausee

We move on to some close ups of various treatments of surfaces. The basis for a lot of the muddy roads, rough crops and grasses is my own recipe "gunge". This is art not science so I can't give a formula. It is always an intuitive mixture of PVA glue, acrylic or other water-based paints, plaster type filler (with water to mix it), sawdust or wood shavings - size dependant on the task, and sometimes sand or very small stones.
 |
By the farm I decided to place a ploughed strip. This was formed by a rich brown carpet
offcut with a ribbed design, and I exploited the ribs by coating them with PVA and fine brown scatter.
This was my home made tea leaf scatter. One Summer I had collected and dried an
awful lot of used teabags. Although I dyed some this box is in the natural state, and a
sieve came in useful for giving a smoothish finish for the plough lines and the back garden soil.
At top right is my "gunge" mixture forming the base for the orchard
|
 |
| The ploughed area and back vegetable garden have been brushed with a wide soft brush to remove excess scatter. At left is the artificial grass given a base coat of PVA and paint. While adding PVA increases the expense it usually gives a reassuring hardness to surfaces when dry. At right is the corner of the LHS farm base. I gave it several coats of a ready made silicone filler with small bits of grit embedded in it. This was excess from coating the walls of our house on top of the 60mm of external polystyrene insulation so is extremely hard when dry (though this thickness took a few days to dry properly). A sand/grit/paint/PVA mixture would work instead. |
 |
| This is the sandpit area. Small tufts of rubber-backed doormat have been embedded in the wet gunge to give some definition to the transition between sand pit and crop field. Beyond that is the reused wallpaper chausee and the opposite sides of the artificial grass area and LHS back garden. |
 |
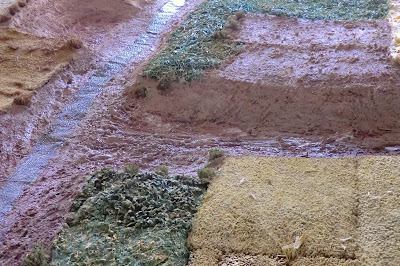
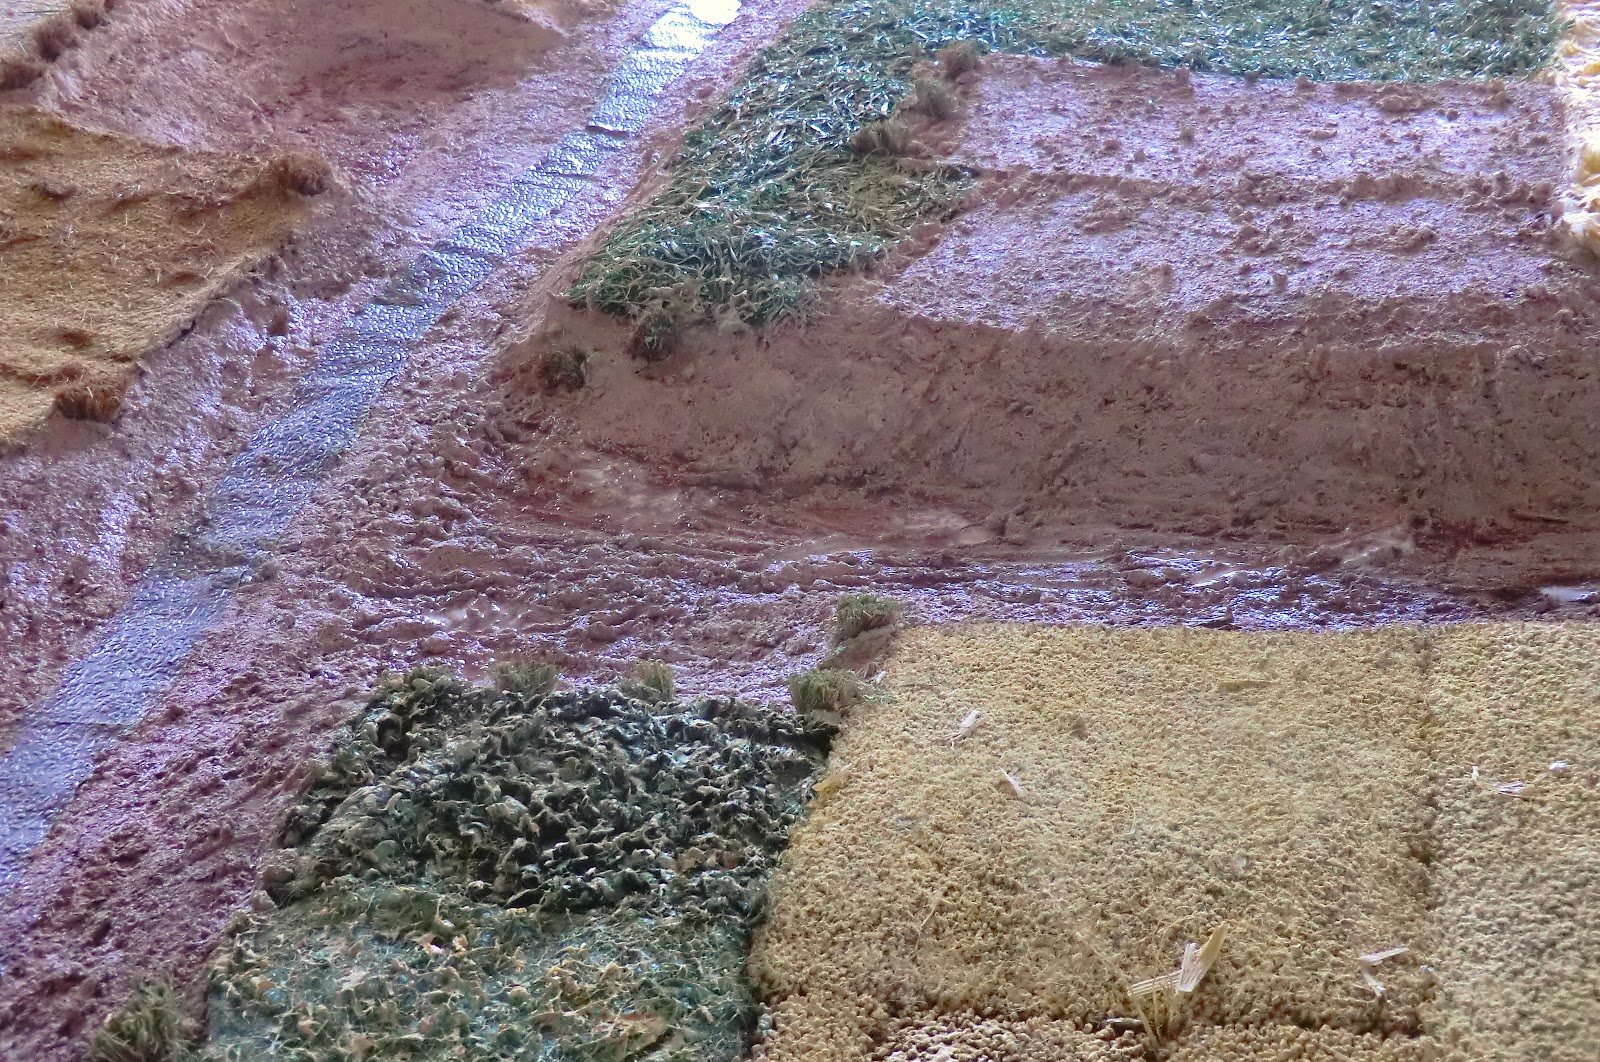
| The crossroads area with a close-up of the embossed wallpaper dry-brushed "cobbles" and gunge as the base for muddy tracks. At right is a bit of the brown teddy bear fur intensively treated with various greens and PVA which dries to suggest to me some green-leaved crop like "Brussels" sprouts or potatoes. To the right of that a yellow crop "carpet" has base coat and the other green is a thick fluffy felt that started life as a drainage liner for a hanging basket. |
 |
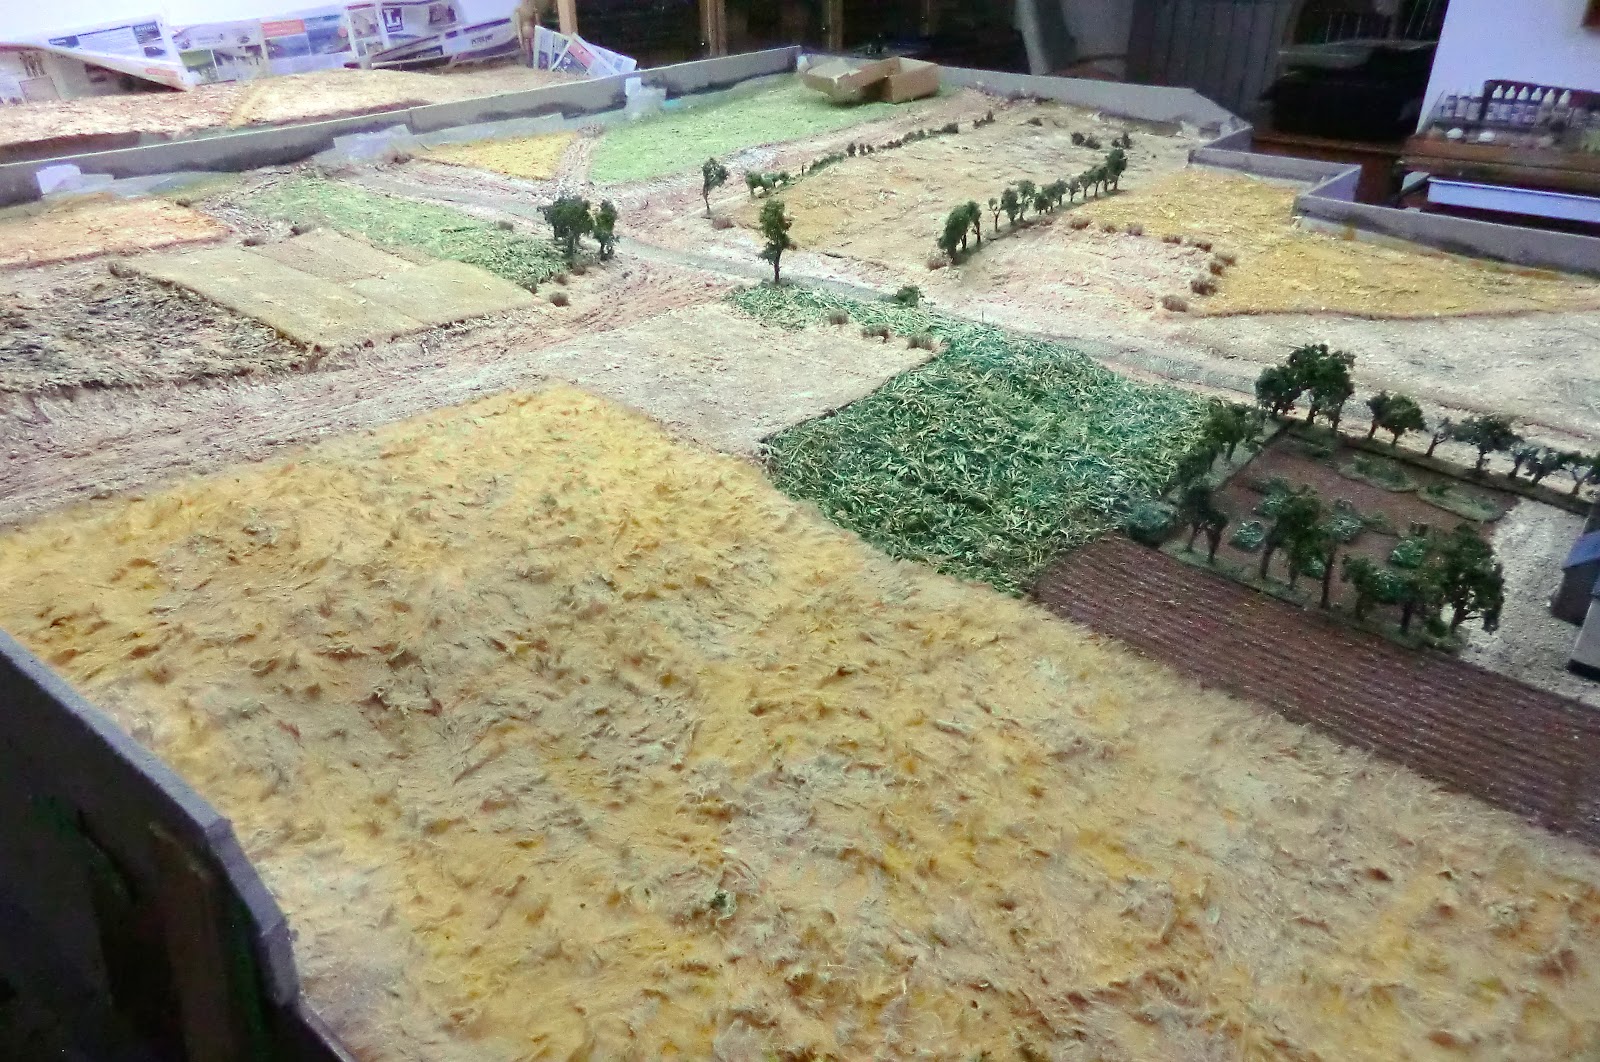
| A general view at this stage. So far none of the beige carpet has any treatment but all the roads and tracks have gunge surfaces roughed up and poked with a stick to make wheel ruts and puddles |
 |
| This field has been covered with offcut bristles from doormat all mixed up with PVA and paint. It proved a moderately good looking crushed crops effect. |
 |
| This one was fairly disastrous. Same technique but with plastic spines cut from an old broom. Not only were they too long but they did not take the paint at all well, hence the original blue-grey colour is still present. Needed a lot more work to blend it in. Across the road is the orchard base where I have left patches non-gunged and painted them as earth. |
 |
| Beyond the orchard I tried wood shavings salvaged from our carpenters' work on the house OK effect except these were too long, I should have found a way to cut them down before mixing |
 |
| Behind the Mont St Jean crest the right hand field is also large wood shavings. At top left is the brown teddy bear fur field on which I had to use many layers of paint/PVA/filler as it proved so absorbent. Got there in the end but I would not recommend dark brown teddy bear fur for this...stick to making fur hats with it (so I can't resist showing another of the girls, sorry). |
 |
| "Yara" looking suitably fierce; she took her acting seriously |
 |
| Above and below: Now I applied a wash of acrylic burnt umber over all the potential earth areas, and applied PVA to run naturally into the ruts to make puddles; eventually they would dry glossy. Above right is the base coat green gunge for a field on the rear slope of MSJ which I was rendering as trampled grass. Most of the green mentioned earlier was now hard enough to give several dry brushing coats of yellow/cream highlights. |
Much more gunge and/or wash application and dry brushing later I had achieved an overall effect I was happy with.
 |
 |
| I had got the cream coloured base for LHS farm reasonably level and stained it to tone down the colour. The Hovels buildings were put in place (but only the walled sections were stuck down). In the foreground you can see that the paint/PVA treatment had hardened off the yellow teddy bear fur and enabled dry brushing highlights to give it quite a realistic look. |
 |
| I've begun to add trees particularly in the orchard and along where the hedges will go. Right at the back you can see the "extra bit". That's not in its correct place merely being worked on in a convenient area. |
 |
| I had to extend the extra bit from the last game to 7 feet long and build up the sides to conform to the slope of the main terrain. I used the same technique and here it is at the PVA and paper stage. |
 |
| And now indoors having the base coat gunge, this time sprinkled with a roughly correct size of wood shavings. I then pressed them down into the sticky gunge and shook off the excess when dry. They were then painted and dry brushed till I was happy with the match to the main table. With such big plain areas offset from the main action I needed a constant point of reference for players and umpires, so built in a slanting single-figure-wide path which matched across to the main table. |
From now on I was adding detail. First of all I didn't need to make any more trees as I had about 150 from which to choose from Waterloos 1 and 2 (see link above). So used the larger ones for the orchard and smaller ones on straight bases as the core of some hedge lines. The final hedges were a mixture of just bush or trees with bushy hedge material in between. I used the same techniques of paint, dry brush and commercial foliage clumps and scatter as in the earlier terrain.
 |
| A couple of the bags of clump foliage I shredded up to stick on the hedge cores. |
I evidently finished my photo recording of the process at this stage, knowing that I had shown the techniques in the earlier posts. So I will finish off with some more photos of the game in progress, choosing some in which the terrain details come across best.
 |
| 1st Light Battalion KGL and RHA limbers around the rutted crossroads (part of my "cabbage patch" has become some big bushes!) |


 |
| More trees and hedges at the rear of LHS . For the vegetable plots I used small pieces of flocked wood and sisal string grass effects that I already had by me from many years ago. You can also see the highlighted ploughed area at right and the artificial grass in foreground |
 |
| A good view of the crossroads and sunken road cresting Mont St Jean with their lining of hedges. I made cavalry base width gaps at certain points as apparently Wellington had ordered such access points to facilitate mounted support. |
 |
| Last but not least, the painted backdrop. I left this until the very last thing after I'd done the terrain as I was not sure how to blend it in till that stage. Bearing in mind that in our scenario everything off field was said to be shrouded in smoke I opted to do the whole thing as smoke filled grey sky. I painted it all with white gesso and then blended acrylic colours in gently while it was still not dry. Other effects were painted on after drying such as the multi- coloured shell bursts, which some viewers have already commented on - many thanks. (This photo by Kevin East). |
So I hope this has been interesting or useful, please let me know. Feel free to ask any questions via the Comments box below.
Most impressive pictures...
ReplyDeleteBlooming fantastic! Gorgeous. And the terrain isn't bad either.
ReplyDeleteA visual feast!
ReplyDeleteI swear that Yara's top button is smiling!
ReplyDeleteBrilliant Chris - with this kind of a tutorial even a duffer like me can have a good go of terrain making. I did get particularly excited during the post though on several occasions (well three to be truthful) and had to sit down so will go over the lot again tonight with a single malt ...purely for medicinal purposes! Thanks for posting mate.
ReplyDeleteA lot or work but well worth it because that looks stunning.
ReplyDeleteBrilliant stuff Chris! No need to apoligise for the extra photos and please feel free to add more!
ReplyDeleteThank you all for your kind comments. So pleased that several of you like the ...er...surprise geographical features too. And Murdock, it wan't just her top button that was smiling that day....
ReplyDelete;)
DeleteYes Yara appears quite serious, very regimental one might say.
ReplyDeleteBut seriously, our society seems to have rather worn out superlatives but this post is another great post in a series of great posts about a great event.
Thanks Ross. Even if there are no more superlatives I hope folks will still follow this blog as there is lots more to come on Waterloo at 1:3 and just let us know if you enjoy it, that's enough.
ReplyDeleteStunning build, lots of hard graft into producing that. Well done buddy!
ReplyDeleteWow breathtaking terrain. Lot of work but definitivly worth it.
ReplyDeleteThanks for the Husarettes....I am still searching for the regiment they belong to.