"Never......in the field of human wargaming........has so much.....been achieved.......in Turn One... .....by so few!......"
(Paraphrasing Sir Winston Churchill and Dillon Browne)
The Challenge
1. Come up with a day long game for four experienced players as a post lockdown release of wargaming energy. (this game was in mid June 2021)
2. Base it on a variation of the Brampton hills, rivers and roads terrain described here
3. Use as many of Paul B's beautiful Minden Austrians and Prussians as possible and make Austrian General Sincere in charge on one side and Prinz Heinrich on the other. Include figures from my own collection too especially my new lockdown-painted French infantry.
 |
| Paul was keen for his classic Stadden staff vignette to be C-in C |
The Answer
I've got to admit that I had not come across FML Sincere before so had to flip through my reference books to find both him and some of the regiments that I knew Paul had painted but had never graced a wargames table before. I found him at the battle of Torgau in November 1760, but as only one of many subordinate Generals, so I had to come up with an independent mixed command and role. Scouring the map of surrounding territory there was nothing that fitted my tasked configuration of rivers and hills so, with apologies to residents or those very familiar with the Torgau area, what resulted was more "Imagination" than "What-if", but please indulge me.
Historically the Austrian army had encamped on high ground West of Torgau fortress. Frederick II decided to take most of his army on a wide westerly outflanking march while a lesser force pinned the Austrians to their location without engaging till he was ready in position. Several columns of Prussians set out the day before and arrived in position; the Austrians turned to face and, to cut a long story short, the Prussians won the day but only just, and a bit by a fluke of the terrain.
This is the photo map of the terrain I cooked up for General Sincere to try his luck against Prinz Heinrich (Paul's other leader vignette)
 |
| Prussians are in position around the Auden Hugeln and the Austrians approach from the North |
Here is a map showing the Prussian plan. It calls for a major left hook across the Wildenbach stream while the right wing marks time awaiting what the Austrians have to offer. Dismounted Uhlans defend Nieder Audenhain and a brigade of Kurassiers lurks nearby to lead a counter attack when necessary. Both flanks will be covered by medium artillery in the redoubts. Martin had control of the left flank up to the central blue line, and Dillon everything to the right of it.

Below is the Austrian plan. They would gain Victory Points for cutting off Prinz Heinrich's columns by taking the bridges at Mockrenna and Nieder Audenhain as well as inflicting serious losses on the Prussians. Contesting the three crossings of the Wildenbach is also vital and I did start them off with two small bridgeheads to get things going. Hence Kevin's plan calls for serious attacks all along the front with the weight of heavy cavalry at the centre right intending to converge with a quick advance by the troops on the extreme right. This was the Austrian trump card as the Prussians did not know the Austrians had Grenzers and Dragoons deployed in the woods at Zone B. Paul B controlled everything from Wildenhain village to its right (West) and Kevin everything to the left (East). In my game the Austrians are trying to get the drop on the Prussian strategic aims so have the Initiative as the designated Attacker.

At this point I have to confess one of the reasons I've been so long in posting is how difficult this game is to present coherently. I deliberately allowed the armies to be close at the start and both having attacking objectives....and I got what I asked for! It was full on from the first action and never really let up till going home time. So to go across the table move by move would be tedious and difficult to follow. Instead I'll give a quick summary and then what I will try to do is present it by sections of battlefield in photos. Inevitably there will be omissions and overlaps but please bear with me and just enjoy the pictures!
|
Kevin and Paul look pretty happy after their |

Overall conduct of the game
 |
| Dillon and Martin pose behind the Prussian army at the start |
The Freikorps Hussars pulled out successfully from the hilltop but were eventually seen off by infantry fire. Now on the Grafenberg St Ignon's Dragoons threatened the oncoming Prussian Hussars and Dragoons from on high and stopped them short. Then the Austrians took the initiative to charge down on the von Reusch Hussars and broke them, later taking on the Winkenstein Dragoons behind. Cavalry battles are rarely one sided so this hung in the balance for a while until the Prussians gave way and made room for Elmendorff's Austrian infantry to power on past the Grafendorf hamlet. The Austrian Dragoons were also pretty exhausted.
 |
| A general view of the table which you may care to compare with the two maps above |
In the Austrian centre-right Paul had arranged a big attack by all of the "Dashing" Bettoni's four Kurassier units. Opposite, Martin moved first and advanced forward still in column of march but Paul got a double move and crashed into the leading two Prussian infantry battalions. They held for a while, long enough for the other battalions to either form line or get out of the way. The outcome was that this totally wrecked any plans for a Prussian advance here and Bettonis's regiments fell back, reformed and attacked again when possible to keep all the Prussian infantry back beyond Wildenhain and Grafendorf. They even dragged some of Dillon's central infantry into the mix. For his part Martin edged his somewhat battered battalions, under cover of the artillery in the redoubt, over the Mockrenberg with the ultimately vain aim to recapture Mockrenna bridge. By the end the Austrians had this entire flank wrapped up and both sides recoiled to heal their wounds or withdraw from the scene.
 |
| I was there too! |
Kevin planned a thrust in the central part of the Austrian line across the Wildenbach stream past Wildenhain to create panic in the Prussian column. It did not quite work out that way. Combined Austrian infantry work swept the Freikorps battalion out of Wildenhain but they never made more progress as Dillon brought up a line regiment to occupy the woods opposite and kept up an effective fire all day from there. Instead Kevin pushed forward towards the Auden Hills redoubt backed up by his own artillery. It proved a bloody contest with several Austrian battalions repulsed leaving only the Bavarian regiment intact and on the flank of what remained of the Prussian line. It's probably fair to say this battalion did much on its own to prevent any further advance by the Prussians in this area.
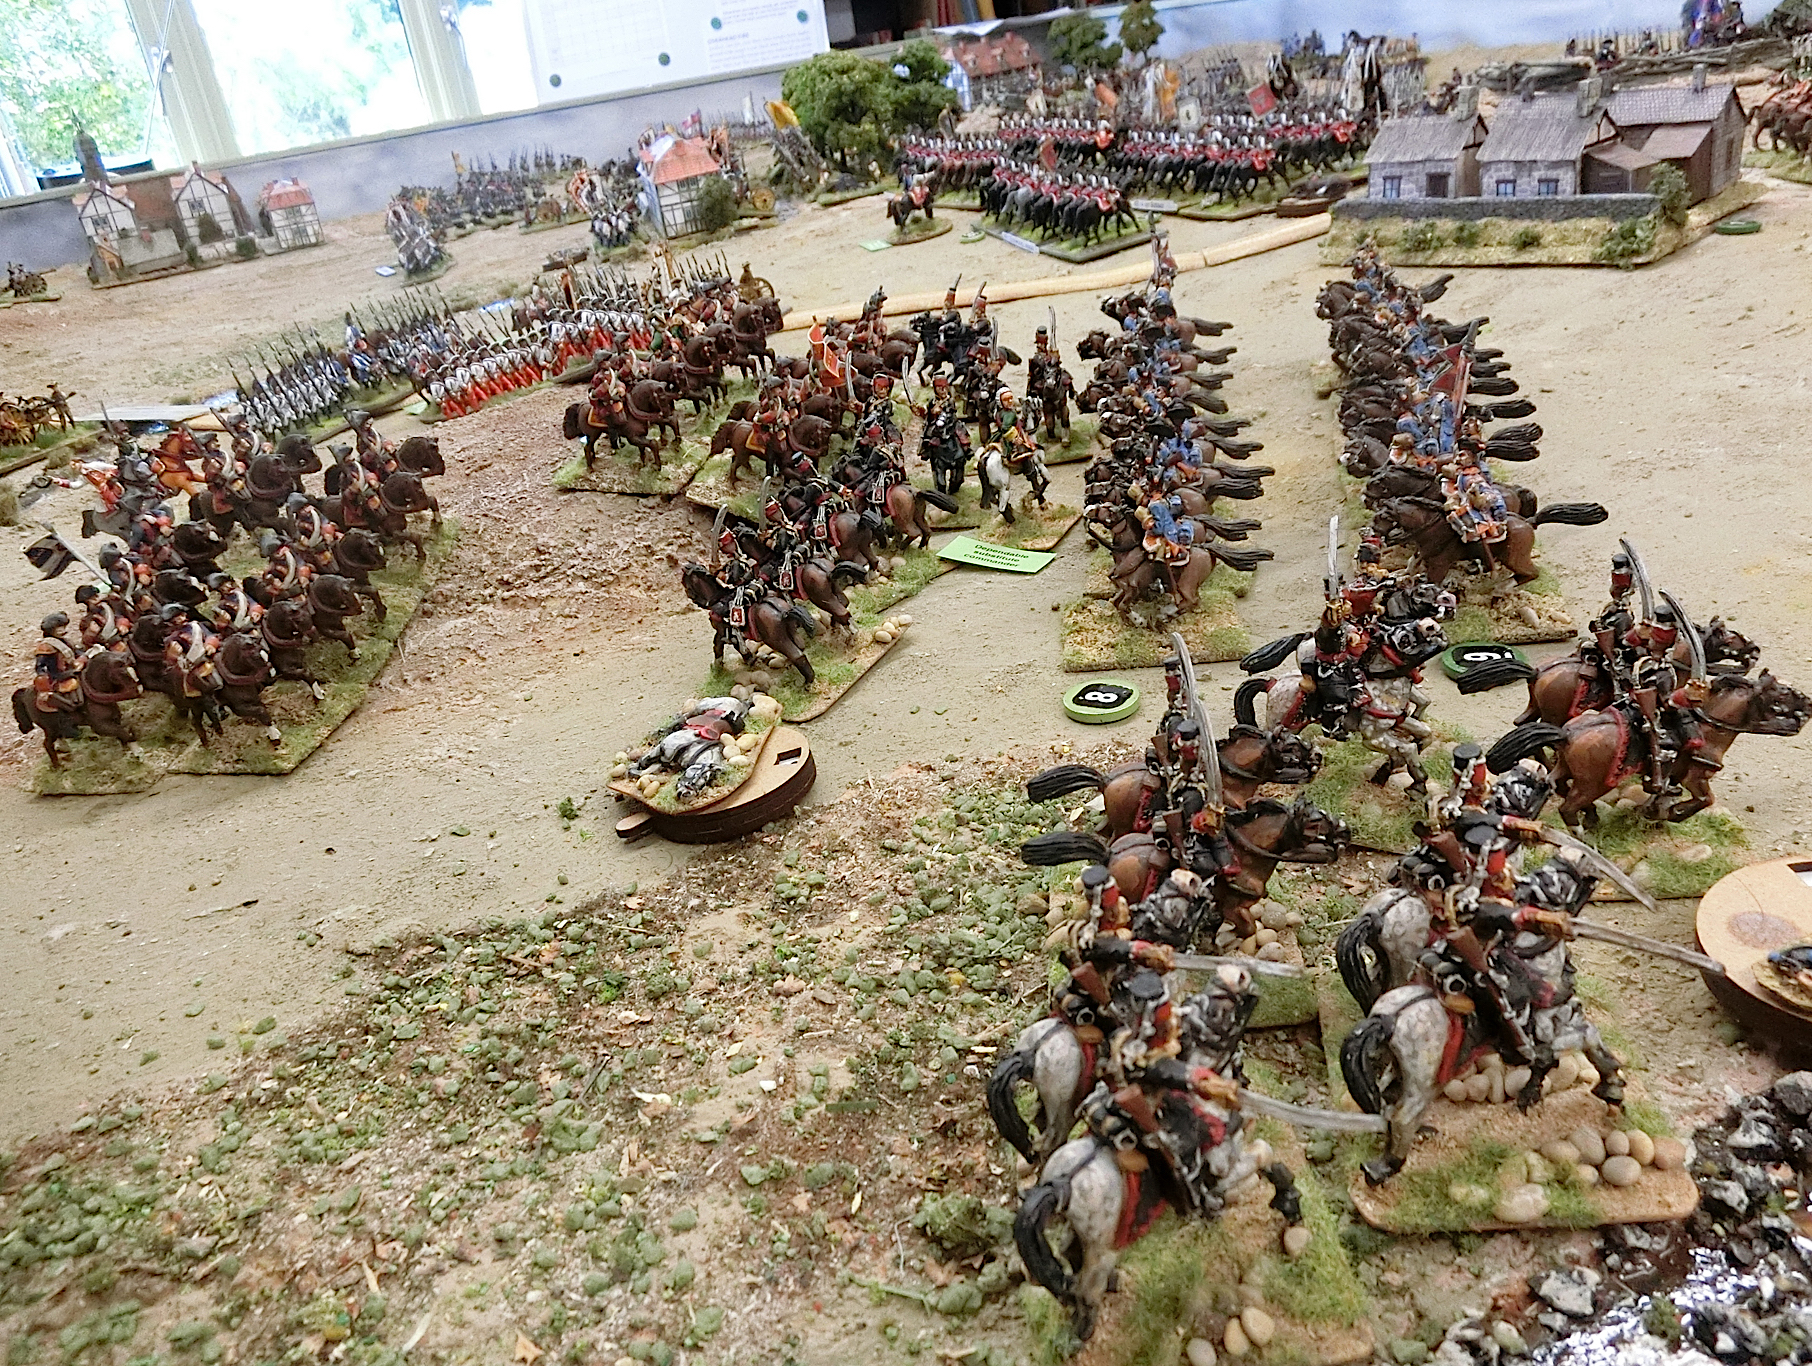
Kevin's left flank infantry brigade, that of Brink, urged on by Sincere's staff vignette, got a double move and leaped into action against Nieder Audenhain. They swept away the Prussian Light battery and discovered the village defended by a regiment of dismounted lancers. At that point Dillon attacked with his Kurassier brigade. Brink's infantry were able to turn to face and this was the start of a battle of attrition as successive infantry battalions were engaged by successive waves of Kurassiers. Units on both sides got either shot up and repulsed or ridden down and scattered. Poor Sincere got killed in the confusion by artillery fire from the redoubt; rather than lose the lovely vignette model we relabelled it as "Dithering". Eventually Kevin's reserve Hussar regiment came up from behind Oder Audenhain town and prevented the victorious Kurassiers sweeping away Brink's men. Although the Hussars were forced to retreat they did see off the last exhausted regiment of Aschersleben's Kurassiers. So on this extreme left flank it was a sort of draw but with the Austrians completely failing to gain their objective of the Nieder Audenhain river crossing and the Prussians not having got anywhere near the Wildenbach stream, let alone Oder Audenhain.
So for the Conclusion see the end of this report.
____________________________________________________________________________
The battle told in pictures
The Austrian Right Flank - gaining the Mockrenna Bridge
 |
| St Ignon's Austrian Dragoons can't quite make it to attack the Freikorps Hussars in one move |
 |
| Martin brings Kleist's Prussian cavalry out of Mockrenna town towards the Grafenberg |
 |
| St Ignon attacks the von Reusch Hussars downhill....... |
 |
| ....while a lucky initiative roll enables the Grenzers to sneak into Mockrenna wood |
 |
| In the distance the displaced Freikorps Hussars front up to Austrian infantry fire....... |
 |
| ......but wish they hadn't |
 |
| One wing of von Reusch Hussars on the run..... |
 |
| ...and the other crumbles too |
 |
| Paul follows up with the attack by the Austrian Dragoons |
 |
| Each side suffers a setback but still carries on with an intact unit |
 |
| The Grenzers have consolidated by Mockrenna bridge and long range skirmish fire will dissuade Martin's weakened Prussian infantry from getting any closer. |
 |
| The final situation on this flank sees Martin's troops in disarray. Some Prussian Dragoons recover in the woods but erroneously are lined up with the Grenzers! Elmendorff's infantry have come past Grafendorf and look like the new owners of Mockrenna town and bridge, but they still have a Prussian-occupied village on their left flank. |
____________________________________________________________________________________
The Austrian Right Centre - Attacks by the Kurassier Brigade
 |
| Martin's 6 battalions of the von Kanitz brigade move forward in column thinking they are safe enough....... |
 |
| ......but are hit by Bettoni's double move charge and don't have enough time or initiative dice to change formation |
 |
| A gratuitous photo, just because I love it, of von Elmendorff's brigade moving up behind the Kurassiers. Minden figures beautifully presented by Paul B |
 |
| Another view of the initial clash |
 |
| The two pinned columns are surprisingly fighting on and giving time for 3 of the other battalions to move out to their left over the Mockrenberg |
 |
| The largest Kurassier regiment breaks another Prussian battalion killing von Kanitz in the process, but is itself forced to withdraw |
 |
| Another Kurassier regiment has drawn in a fusilier battalion from the neighbouring brigade of Colonel Roebel |
 |
| But Martin had done a good job of getting the rest of the Kanitz brigade out of the way and thus preserving its dignity |
 |
| The Fusiliers rout their opponents but they are also exhausted in the process |
 |
| The wider pictures show two Kurassier regiments have reformed and are ready for the fray again |
 |
| The view from within the Austrian ranks |
 |
| As Paul surveys his achievement it becomes evident that any forward attempt here by the Prussians has been completely thwarted....... |
 |
| .....so following success the Kurassiers advance again, initially forcing the Freikorps light infantry to evade...... |
 |
| .....and making it difficult for the Prussians to reform |
 |
| The big regiment had retreated right back to reform and recover Hit Points |
 |
| But those Prussian infantry still had a sting and both the weak cavalry regiments were "Done For" by close range musketry |
 |
| Nevertheless the successive attacks had cleared the front of Prussians and they had got nowhere near achieving any objectives |
_____________________________________________________________________________________
The Austrian Centre Left - Exhibitions of reckless bravery!
 |
| Kevin tried at once to improve his small bridgehead by advancing General Migazzi's infantry, but the Prussians were coming forward to meet him in the confined space between Wildenhain wood and the redoubt hill. In the face of the cannon fire it was a brave act by both sides |
 |
| Migazzi's lead battalion was repulsed leaving the Bavarian Holnstein regiment looking isolated |
 |
| A wider view shows the complex configuration that had developed. What would you do? Migazzi's flank looks secure with the capture of Wildenhain....but is it? |
 |
| No! A Hessian battalion has occupied the woods opposite and would stay there for the rest of the game. |

 |
| Nothing daunted the Bavarians right wheel under canister fire into the flank of Hessian musketeers and fusiliers; they have covering fire from an Austrian battery across the stream |
 |
| What it looks like for the Hessians on the receiving end and already weakened by artillery fire |
 |
| The musketeers were put to flight and passing through the fusiliers they went too! But a large battalion of Grenadiers is coming up..... |

 |
| With this unexpected setback Dillon considers his options |
 |
| A counter attack in line frightens off the Bavarians who have done a great job |
 |
| The view from behind the Auden Hill redoubt. Grenadiers at left distance. Prinz Heinrich at right and the ammunition train guard at left foreground. |
 |
| Overview of the musketry battle going on in Wildenhain |
 |
| Artillery fire and Grenadier musketry pushes the Austrian infantry back where it came from. Though note how the Austrian Kurassiers have isolated what remains of this active portion of Roebel's brigade. |
 |
| A nice overview of the whole proceedings at about this point |
 |
| The Grenadiers and the other Hessian battalion in the woods are appearing to bottle up any further Austrian advance..... or is it vice versa? |
 |
| The ever-dynamic Kevin is renewing his attack |
 |
| Too good to omit this photo - Austrian figures in PB's collection at the other end of Kevin's tape measure |
 |
| Above and below: two views of more Austrian heroics in front of that redoubt! |
 |
| After this salvo the Prussian ammo supply is finished and they may need that ammunition train |
 |
| The last photo on this part of the table shows that the Austrians are content they have fulfilled their objective to disrupt the Prussian advance and it's not worth losing more men. |
_____________________________________________________________________________________
The Austrian Left Flank - Prussian Kurassiers blunt the attack
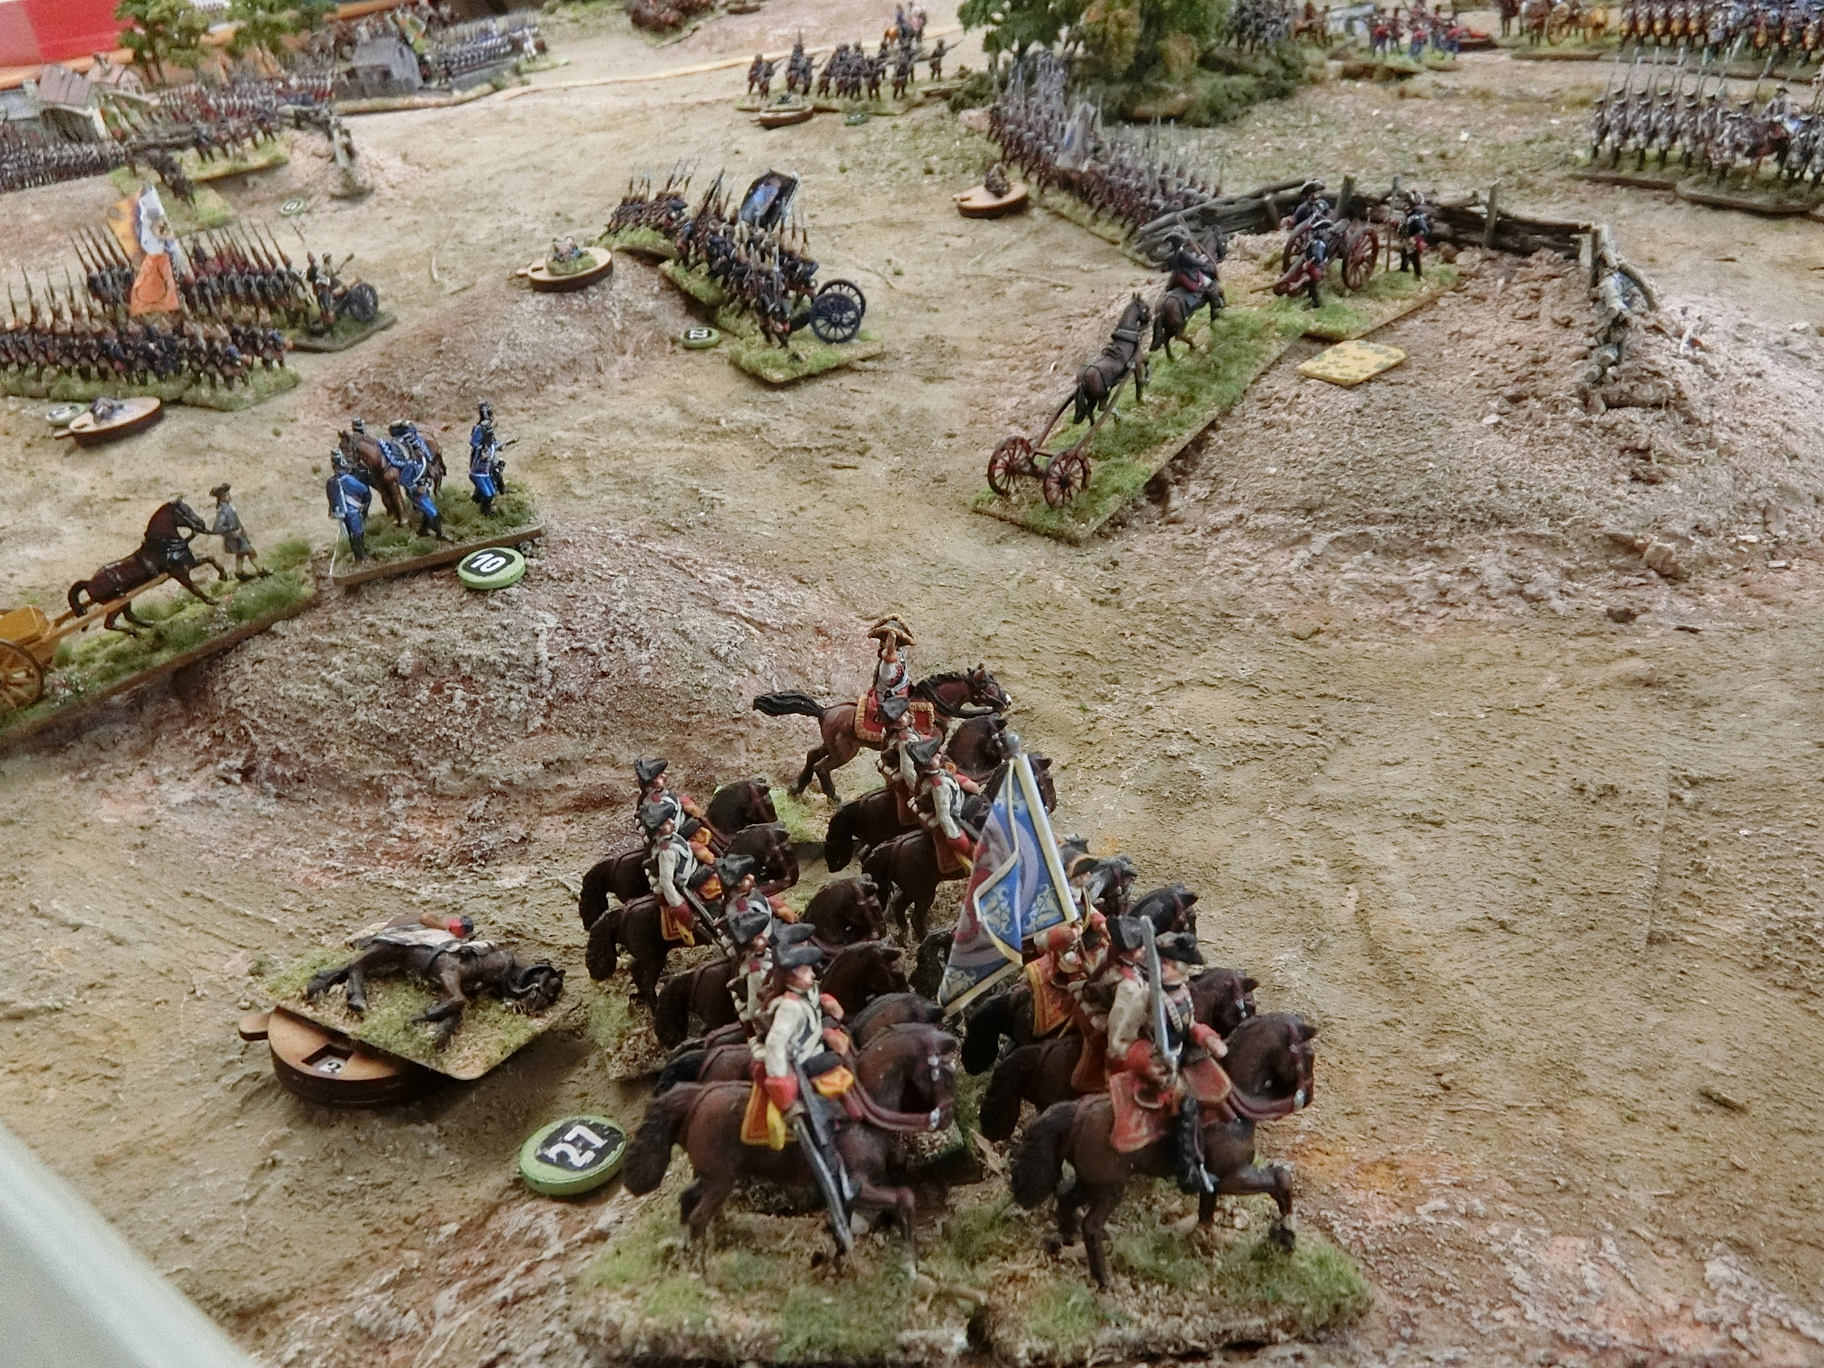
 |
| A double move and General Sincere's support help Major-General Brink get close to Nieder Audenhain. The Hainault Grenadiers are angled back en potence to protect this flank from the cavalry. Note the Austrian medium artillery is well placed to give "crossing fire" if those Kurassiers attack |
 |
| They do! |
 |
| The result is that one wing of the regiment is broken but the Grenadiers have suffered 4 Hits and must retreat |
 |
| That looming hand is just above where the plucky Prussian Light battery met its demise in the face of overwhelming numbers |
 |
| Dillon inspects with interest as Kevin withdraws the battalion which had attacked the village and been repulsed with Kurassiers also on its flank |
 |
| A close up as Prinz Heinrich (at right) tries not to notice that one of his Kurassier squadrons is fleeing! |
 |
| Now the surviving squadron of the Friedrich von Brandenburg Kurassiers hits the next Austrian battalion in flank. Two down and three to go! |
 |
| Feeling a bit out-horsed on this flank Kevin brings the Nadasdy Hussars out from behind Ober Audenhain |
 |
| .....as another battalion scurries back and the Kurassiers follow up, hitting the next one frontally |
 |
| A wider view which shows elements of Brink's brigade streaming back to reform |
 |
| Somewhere in all this the General Sincere vignette got too near a unit suffering Hits and Dillon's double six then counted him as a casualty |
 |
| It's all good natured fun and the protagonists still have a laugh |
 |
| The Nadasdy Hussars, (a large unit) takes on the standard size Kurassier regiment which has been weakened by artillery fire......... |
 |
| .....beats it and follows on to the next one |
 |
| The recovering regiment awaits the outcome |
 |
| The Hussars had overreached themselves, as is often the way with cavalry charges, and their opponents followed up their countercharge onto the infantry. But with 3 Hits already it did not bode well for them |
 |
| Sensibly withdrawing back to Prinz Heinrich's acclaim........ |
 |
| ........as they had left the Austrian battalion broken, and the entire Brink's brigade now trying to reform further back than they started |

My brief observations for what they are worth, starting on the Austrian left.
Lots more photos I couldn't find room for but here are a couple more of the players in action. I always love to see the thoughtful moments, the banter and candid inter-actions when I can snap them.
 |
| Just looked at these two wondering about a caption and realised it could apply to either side! "Now he's fallen into my trap!" |

A wonderfully staged and described game, Chris! You and your guests managed to combine the best of the Grants with the old Wargames Holiday Centre under Peter Gilder. Great stuff! What materials do you use to create the sides of the table with the gray-blue backgrounds, please? I'd like to try something similar here.
ReplyDeleteBest Regards,
Stokes
What a super compliment, thank you Stokes. Being compared to Grant and Gilder is as much as I could ever ask! When we have full weekends with 4 players staying over it is like a Holiday centre here I think. That particular background is simply done with white and a couple of grey cans of matt spray paint on a large stiff paper cut to fit the shape of the panels. They could be made of anything from hardboard to mdf or wood but in fact I used a very large grey pinboard material redundant from my last house. It is screwed in at a few strategic places and the corners held with small metal brackets. It's all topped off for neatness with a plastic mullion strip left over from the window installation (See a couple of the photos - it is across the middle of the panes). I always try to use reclaimed materials when I can and always persuade the workmen to leave any useful leftovers! Email me if you need any advice more specific to your situation
DeleteThank you, Chris! That is a huge help. Much appreciated.
DeleteBest Regards,
Stokes
You are very welcome, Stokes. Your Grand Duchy of Stollen blog was one of the first great inspirations for my 18th Century interests so its the least I can do.
DeleteAn excellent post Chris, fantastic SYW eye candy. I will drool over these later tonight you have made my year by posting these. Hopefully see you at the "Cotswold gaming day"
ReplyDeleteWillz Harley.
Gosh, making the year of the Spencer-Smith King, WoW! thanks. Yes I will see you at CWD in Northleach in October
DeleteChris,
ReplyDeleteExcellent report and a wealth of superb photos which I will go through again tonight at a more leisurely pace.
A very interesting scenario and one which generated all the action you could ever want in one days gaming.
Well done to you all
Thank you Graham. Unlike when you left me your command fighting for its life at the Battle of Abrantes I was fortunate just to umpire this lot so maybe my tiredness was less than the players. We played from about 10 am till 6.30 pm with a short sandwich lunch on the terrace so yes it was a full day.
DeleteVery inspirational. Our group here in Christchurch New Zealand have adopted these rules (starting with the simplified version ‘Post of Honour’) for our SYW games which I will adapt for marlburian and ACW periods which I think can be done.
ReplyDeleteI love the look of your game, with tightly packed line infantry and cavalry in large units capturing the essence of this colourful period of history.
Chris I'm so glad it inspires. Never tried Post of Honour and could not see the need as we find Honours of War is very simple and we can remember most things apart from the Combat chart itself. I would recommend Keith's HoW book to any SYW wargamer though and it is not expensive, at least not in the UK. As for tightly packed you are right, Paul has his base spacing perfect for that effect, thank you.
DeleteA real joy to look at, such superb figures and top notch table. I will spend some time poring over the photos tonight when I have a bit more time to really indulge myself. Well done to all, totally brilliant!!
ReplyDeleteThanks Donnie, you are always a very appreciative supporter of this blog and I hope you find the time to really give this post a good long look and maybe comment again if you have any new thoughts on it
DeleteHad time to really give the pictures a bit of time and read the report, it is everything you would ever want from a game, the table, the terrain, the buildings, the figures, all just perfection, time well spent for me!!
DeleteThat's great praise thank you Donnie, and it makes my time well spent too when readers comment as enthusiastically as those on here!
DeleteLovely Stuff Chris. Thanks for posting. I wonder if I need a bigger table...
ReplyDeleteThanks Doug, yes you always need a bigger table! For my next 18th Century report it will be on the extended 12 x 6 version
DeleteChris your post has bought back many happy memories of a glorious day wargaming. Wonderful looking game , lovely terrain , brilliantly painted figures all topped off by great company and a convivial host.
ReplyDeleteWho could ask for anything more….. well apart from a rub of good luck a few favourable dice rolls and a commander who knows how to lead. An unlucky day for the Prussians but such is war.
A terrific days gaming that will stick in the memory for years to come.
Thanks so much for your comment Martin and for your company on that day and evening. You certainly had more than your fair share of bad luck. It's not often that an early double move by the enemy can have such far reaching consequences throughout the day and I felt sorry for you. If it hasn't come out sufficiently in my account I must pay tribute to you now for your constant good natured demeanour whenever I've been gaming with you and whatever the results. Thank you.
DeleteFantastic game Chris, Love the terrain & figures! What more could you ask for with everyone having a great game. Very impressed with the overall flow of the battle. Still in lockdown here so missing F2F gaming but doing lots of painting. Cheers Greg
ReplyDeleteThank you Greg for joining in on the comments, always good to hear from you. Glad you liked the narrative, it was difficult to know how to present it coherently, I hope I have succeeded. Sorry to hear you are in lockdown now in Sydney, it is hard to know how we can all have the confidence to get out of this.
Delete....and what's not to like about Austrian cuirassiers led by a 'dashing' commander? An excellent write-up with loads of beautiful supporting photos, well done Chris. We had a full-on day wargaming, which comes across throughout your narrative. A truly enjoyable SYW game shared with amicable wargamers hosted in the heart of the Cotswolds. Thank you Chris for all your hard work preparing and umpiring this game - a memorable day had by all. Regards. Paul B
ReplyDeleteSo glad you came Paul and your armies contributed fabulously to a great day. A lot of skill and judgement allied to good luck when you needed it, I think that's what we all would wish for in a successful game. Cheers CG
DeleteThanks for the excellent game report on Auden Im glad that the river didnt act as a block on the action, and starting close is always good . Beautiful terrain and lovely backdrops ! Great photos particularly of the cavalry melee and Austrian grenadiers. a half way or final map would have been good. Many thanks !
ReplyDeleteGood to hear from you Graham and glad you got a lot out of it. If you had any idea how much time and effort it is doing a blog and doing maps and trying to keep a handle on a game this intense you would not be so cheeky as to ask for more!! Good job I know you so well! :-) Hope you are keeping well these days.
DeleteGraham. Just looked back and remembered we ran down the time to the limit and there is no final overall photo because Paul had to clear up his figures in haste and it was all hands to the boxes! As it was we got told off by the landlady at The Butchers Arms for being late for our meal!
DeleteWonderful as always! Love the maps too; very useful complement to all the splendid pictures. Thank you.
ReplyDeleteAll the best,
David.
Thanks, as ever, David for your enthusiastic support. I was very lucky for this one that both commanders gave me a detailed and legible picture of their dispositions and plans in advance; I am not always that fortunate in my players' commitment. All credit to Dillon and Kevin for that, and to me and Photoshop for the original photo map!
DeleteI'm glad the players were so helpful! Good to see the Austrians do so well against those wicked Prussians, too. ;-) If you don't mind my asking, what camera do you use for the photography, by the way?
DeleteAll the best,
David.
I don't mind at all but my answer is a pretty simple one. For about the last 15 years I have been using small CASIO Exilim digital cameras, upgrading every few years. This is a point and shoot camera I can use with one hand if I like and turn it easily in any angle, but use two hands mostly to keep it steady, no tripod or neck strap. I have it set to standard mid range focus for most shots but can alter to a macro focus by two clicks for the occasional close-in special picture. It has a wide field which encompasses a lot of the table but also a powerful zoom if required to catch a bit of action that is currently too blocked off by players! I try not to use that much as definition is degraded. I have good all over lighting given by 3 x LED strip lights over the table as well as two windows during daylight. I hardly ever use flash as it gives distorted impressions for wargames by darkening the background. The current one is getting a bit old now but still worthy and I think it cost between £200 and £300 on line. I hope that helps. Cheers CG
DeleteThanks, Chris. Very helpful. You get good results with them! :-)
ReplyDeleteAll the best,
David.