I'm a very lucky man. Guy Barlow and Ken Marshall have been plotting with me (to keep us a bit sane during lockdown since last October's Battle of Ellenbach ) on what to do this year. Rules for post lockdown get togethers were unclear till late February so we planned a cautious approach at first. We settled on a weekend in late May for the three of us to have a game on each day but we'd use the same hills, road and river basics of a sculpted battlefield and just change the add-ons - buildings, woods etc. The aim was to minimise the time taken to change the scene to give more gaming time (Oh, well to be honest, I mean more time for a leisurely dinner and drinks at the The Butchers Arms which will be fully open by then!)
 |
| Our eventual battlefield for The Battle of Brampton |
Guy was first in with a great suggestion to try a "what if?" scenario based on the idea that Prince Charlie's rebel, sorry loyal Jacobite, Army marched out of Carlisle to meet an approaching Government force under General Wade somewhere near the village of Brampton in late November 1745. He characterised the little town as being in a moorland of undulating hills with some "scrubby trees" and the odd farm. Not much to go on but all I needed to get the creative juices flowing. I checked Google maps round Brampton for some clues and ground level photos and found there were some rivers and streams there but I had to use imagination to place the hills to be useful to us in a game. So I came up with this sketch map. Apologies to any readers who know the area - but this is 276 years ago - that's my excuse!
 |
| Plan for the 8 foot x 6 foot table |
I was looking forward to the opportunity to make a winter battlefield that was basic moorland, yet I knew I'd have to use it for a Central European game or two as well. I had some good brown hills I made years ago from polystyrene and certainly they would save me the time and mess of making new ones but the colour would be wrong. So I used their shapes as the basis to work on the sketch and after Guy approved it I set to work.
 |
| Choosing from my stock of brown hills |
I was trying to take advantage of some fine Spring weather we had in the Cotswolds in April so my idea was to use the outdoor space to flatten lots of pre-loved cardboard packing boxes and glue them together with PVA, strengthened underneath by some simple wooden batons glued in place, and all weighted down to stop warping, or blowing away till it was sufficiently dry to store in the garage overnight. I will let the photos tell the step by step construction
 |
My driveway is a nice place to "work" with native logs and
antique weights. All the materials would have been sent to recycling
if I hadn't used them, I didn't buy anything but the glue. |
 |
This shows a cross section - wooden batten at edge supporting 2 or 3
overlapping layers of cardboard smoothed out with brown packing paper
stuck with PVA glue in my usual papier mache style. |
 |
| I measured a rough grid from the map and drew in the features to scale with marker pen. Then added the hills to show where they go. Ex Falklands War shell case used as a weight now (courtesy of my nephew Mark, ex Royal Anglia Regiment) |
 |
| Now using thin acrylic paint to secure the locations |
 |
| I used my markings to show where to raise the edges of the streams slightly with rolled up paper or small pieces of cardboard. When they were dry I mixed up some gunge to apply to the stream sides and where the hills meet the board, in order to smooth the transitions of surfaces. |
 |
| As usual my gunge is made up of varying quantities of dry plastering/filler powder; sawdust and/or sand or similar texture: water; acrylic paint (from the cheap big pots for schools or end-of-line decorators paint deals); PVA glue. Then applied to taste with old brushes of various sizes. |
 |
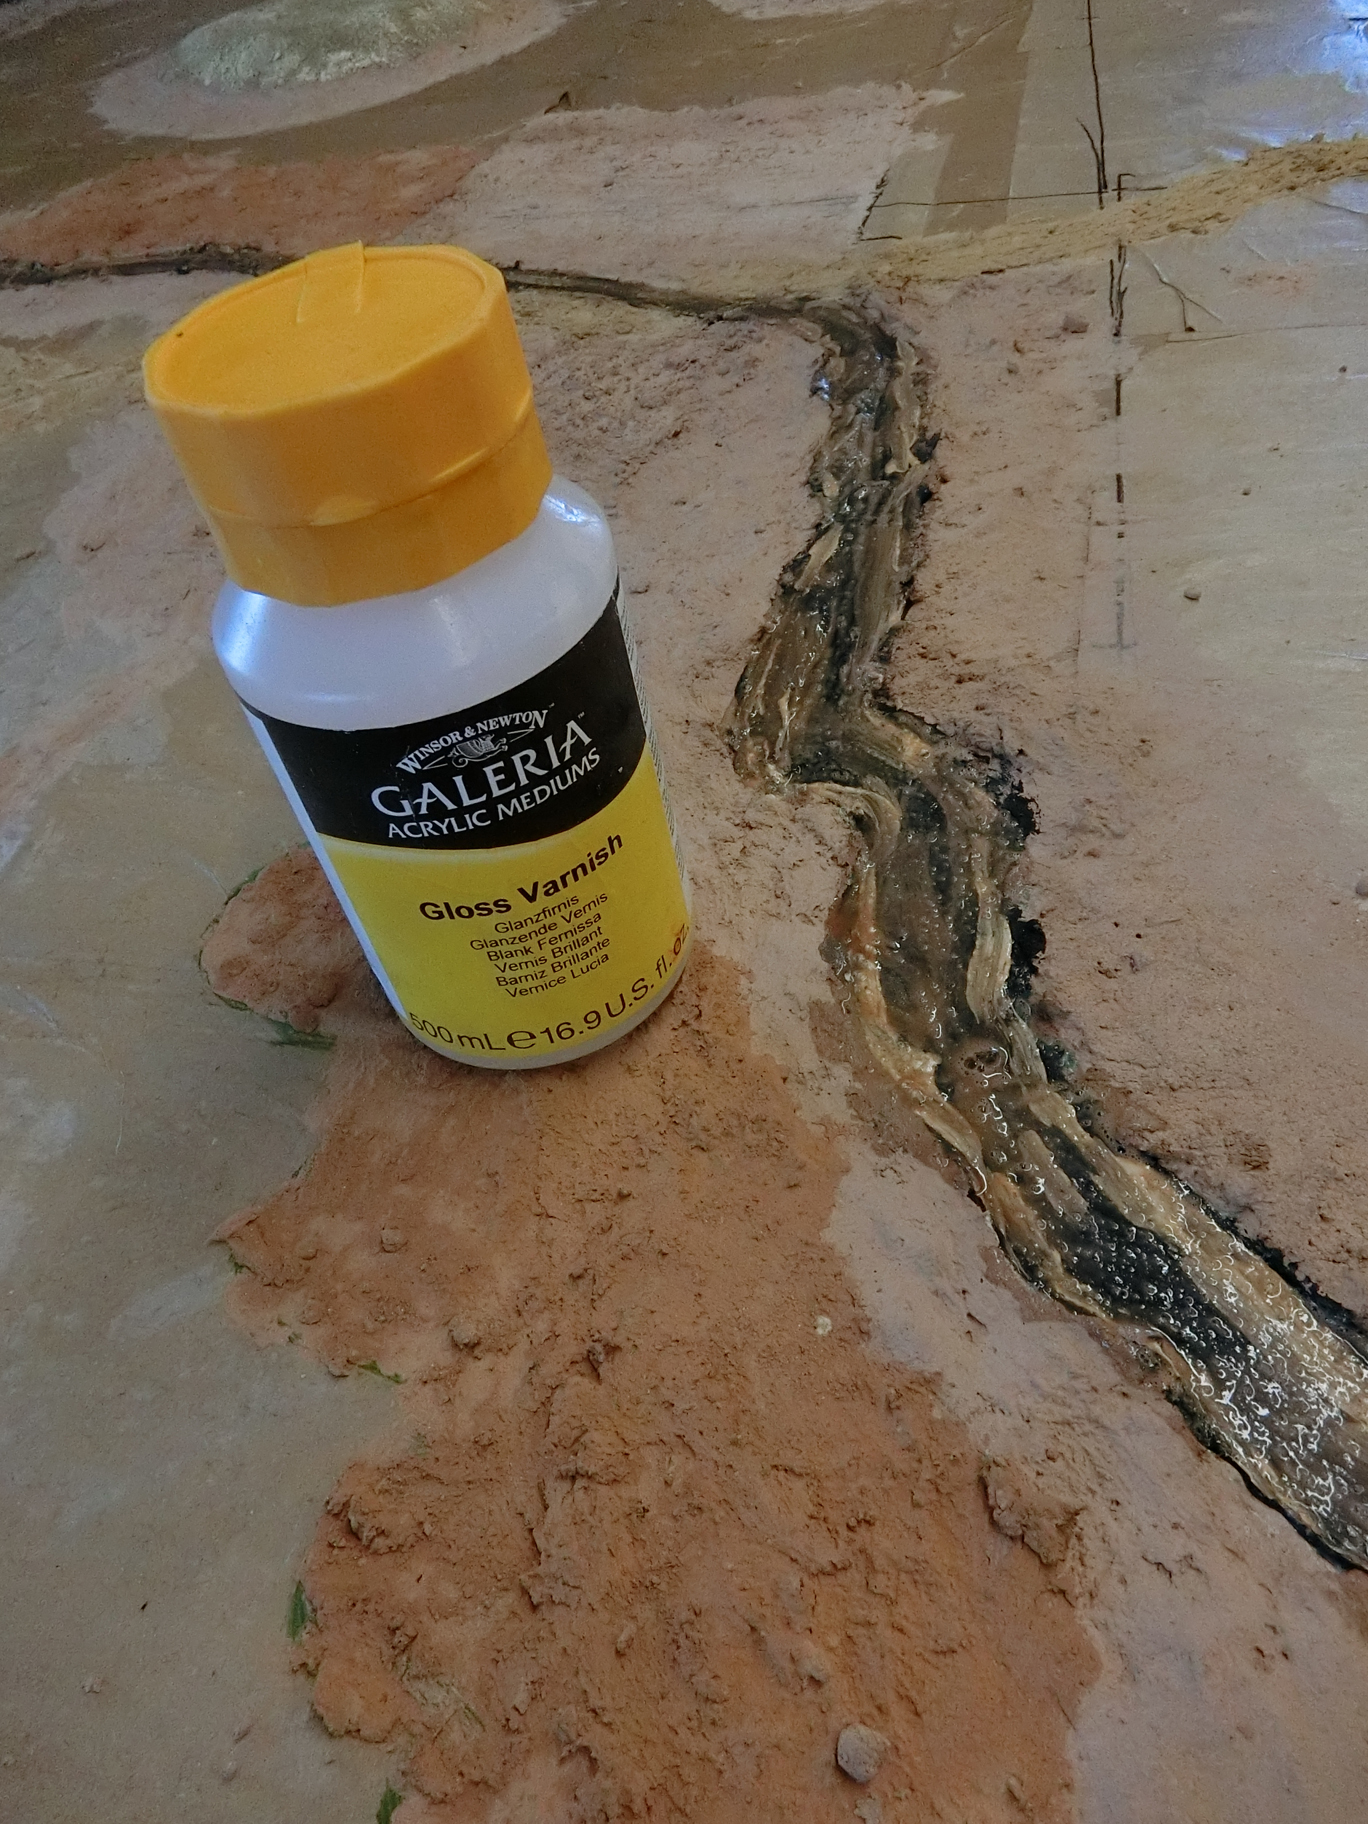
| I also did the roads, tracks and wooded areas with similar mixtures of slightly different colours. The recesses marking the water courses were painted with sloshy dark acrylic paint mixes and light highlights - remember this is English Winter moorland - no blue refections on this day of drizzle in November 1745. |
 |
Later a coat of Acrylic Gloss Varnish on the water.
The first of about 4 or 5 coats laid over successive days |
 |
| While the gunge was drying off I went along the roads with two coffee stirrers to leave wagon ruts. When dry they were scraped back down with a neat Surform tool. The same scraper can be used to get rid of any awkward irregularities over the whole surface. |
 |
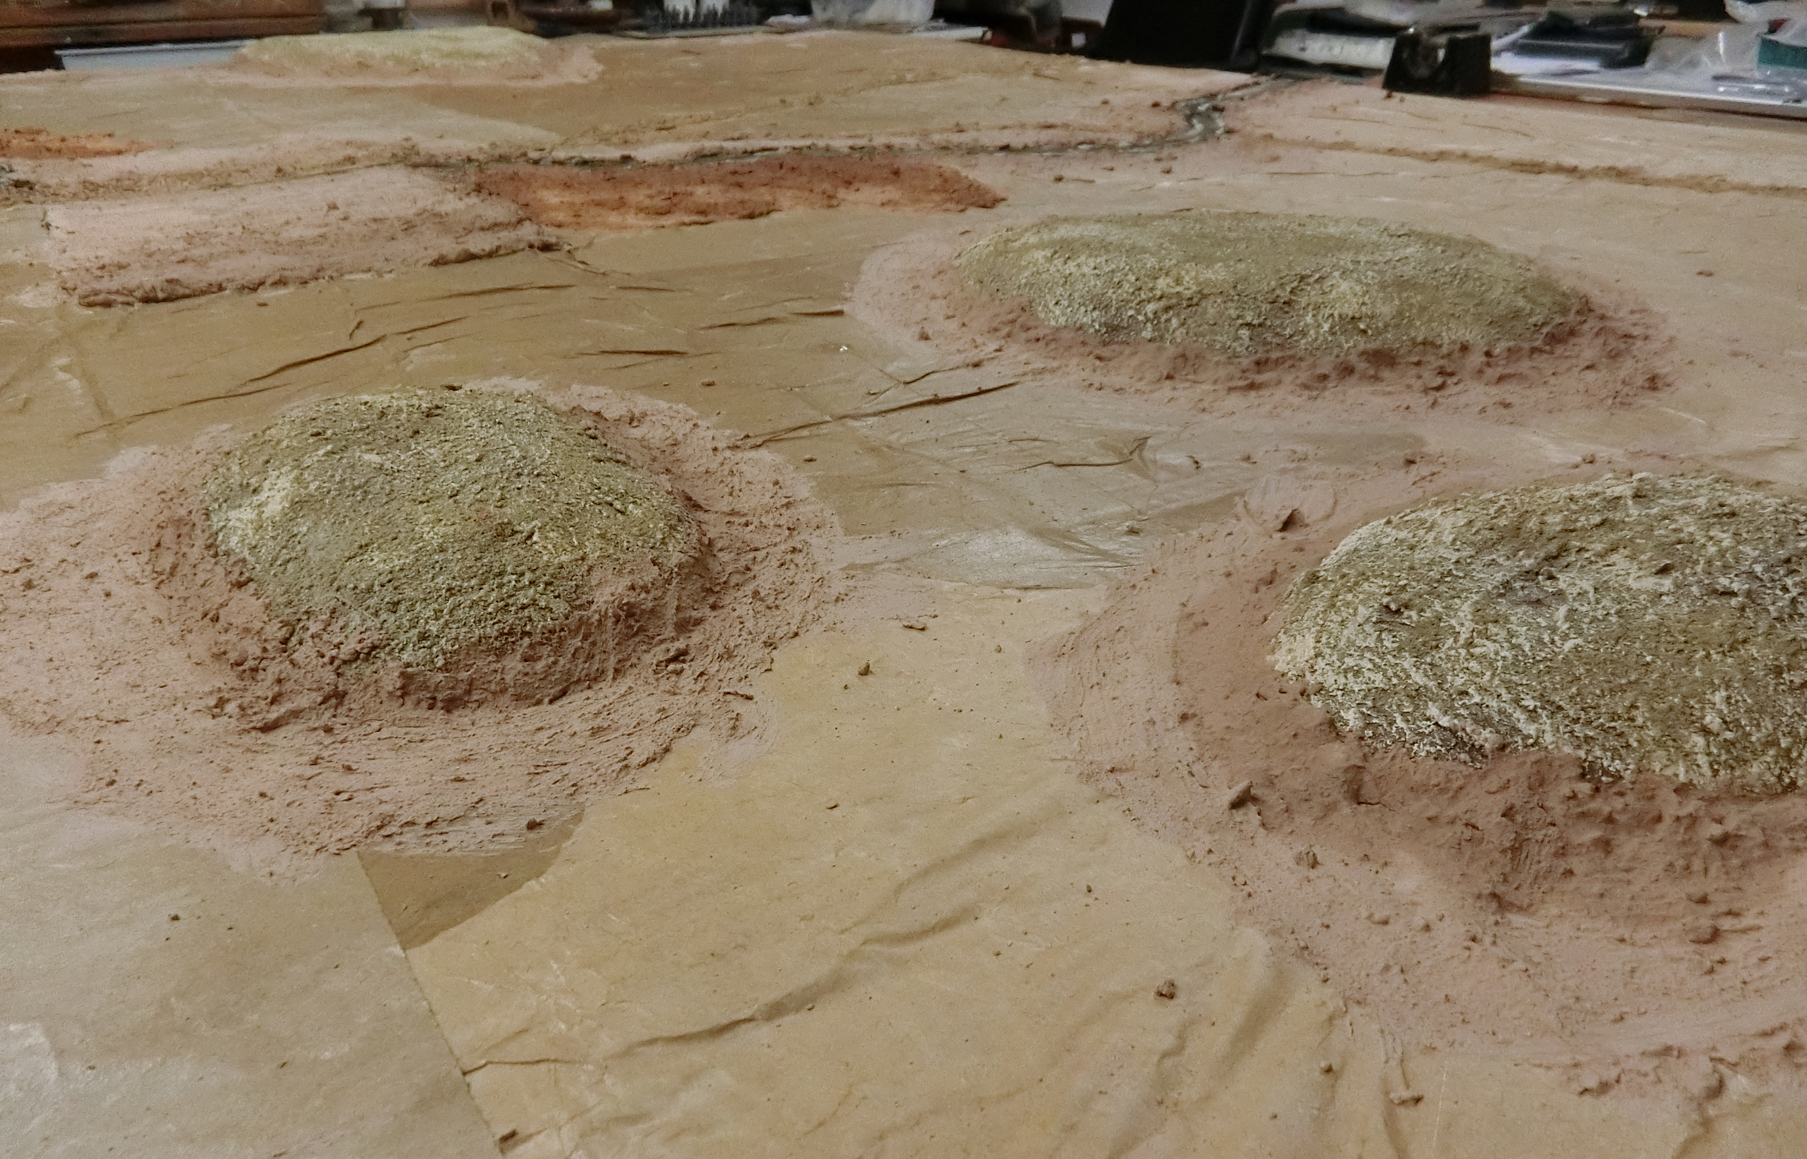
| Now the big, slightly tedious, task of mixing a suitable gunge for the overall moorland. I opted for a dull green, which had a Winter feel but would also be acceptable for the Continental settings in brighter weather. The old toothbrush is to stipple large swathes of it while wet to create extra texture. |
 |
Smoother patches, much scraped, for the bases
of Built Up Areas (BUAs) |
 |
| Over half covered now. I use an old plastic kitchen sieve to grade the sawdust or other crumbly bits of texture |
 |
| All covered and you can see the rough toothbrush-stippled effects, particularly at bottom left where it is still a bit wetter and darker. I have blended the brown hills in to be less obtrusive. |
 |
| Now the detailed areas need attention |
 |
Very useful marsh tuffs from such as Warlord Games
bring the Marshy Beck to live up to its name |
 |
A mixture of sawdust and commercial woodland floor scatter
helps to mark out the woods...... |
 |
.....and dried tea leaves for the more organised farmyard "mud".
Multiple shades of commercial foliage scatter on the banks help
bring the beck alive |
 |
Quarry Beck got an extra special helping of small stones,
dry brushed with off-white highlights. You can see my standard
green board still intact under this special moorland one |
 |
Difficult artistic choices now. This is a yellow ochre acrylic dry brush
mixture for selected areas, but I also added lighter highlights
of different sympathetic tones all over the surface to unite the features
and help cover irregularities |
 |
| The hills have come out a browner shade, which is good for game purposes and still fit in to the overall effect |
 |
These three photos help you get down nearer the water level. It's at this point I try hard not to
imagine I'm following the charming Julia Bradbury on one of her TV Pennine hikes! |
 |
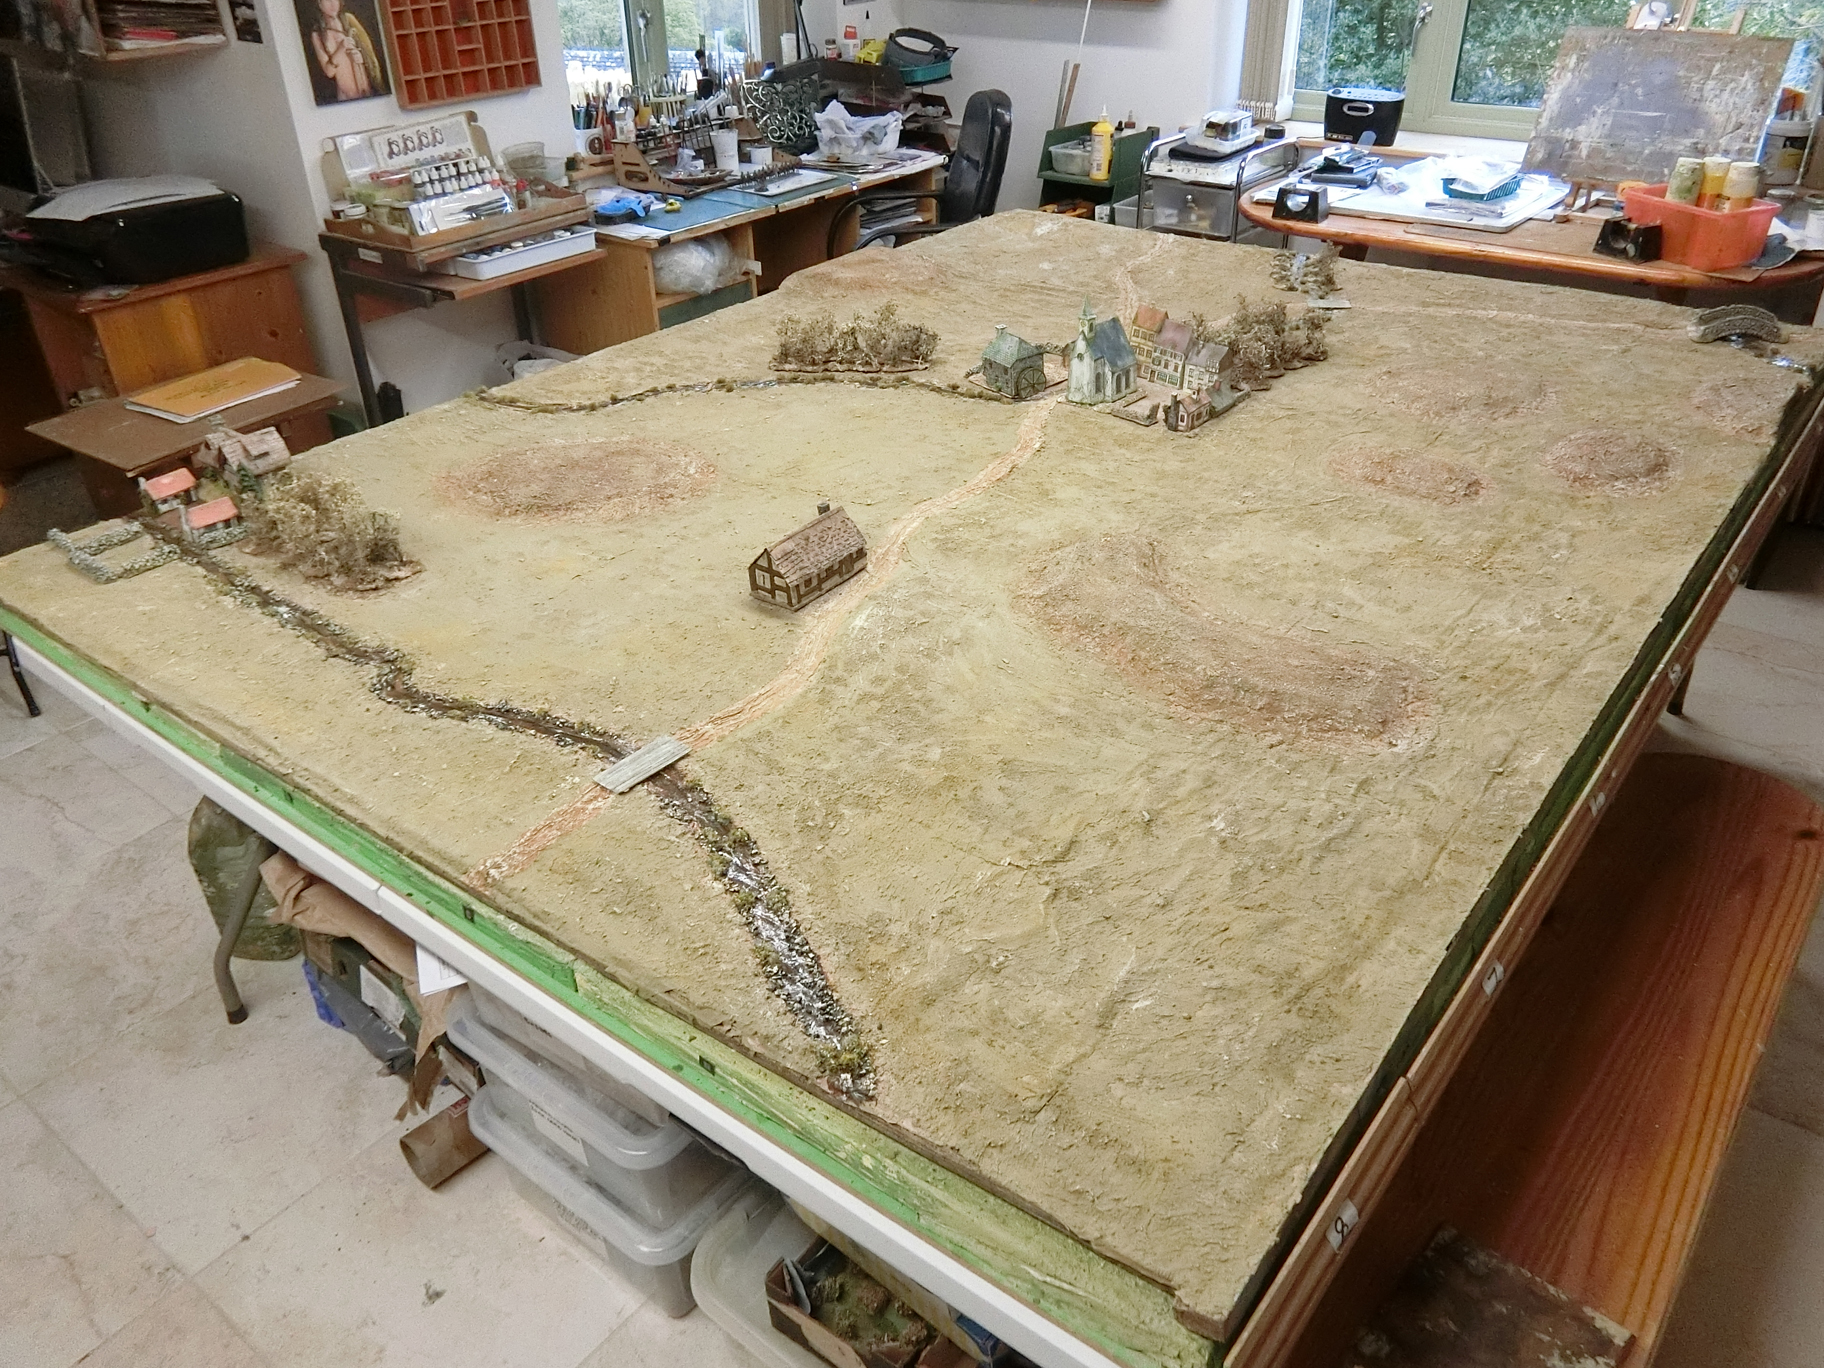
| Above and below: The finished terrain with trees and buildings added |
 |
| The buildings are just out of the toy box for the sake of illustration, most will be replaced by Guy's own Scottish-style crofts. The trees I made specially, more on them later. |
 |
| I had now got far enough to take some birds eye view photos for Guy to use as our player map. Really looking forward to it, he has made me the Jacobite player and I can't say more at the moment, Ken may be watching! |
 |
| Guy's border country stone cottages will look the perfect thing on the day. |
In the next post I will be showing how I'm converting this basic terrain for Ken's Imagi-nations SYW game and how I did the trees for both different terrains.
Please leave a comment and let me know if any of this is of use, thank you.
Chris
PS> I joked about Julia Bradbury but a bit of idle curiosity led me to this JB Cumbria walk - mind you that is Summer in the northern hills - brrrr!


Chris,
ReplyDeleteThat is a marvelous terrain board; the water is done especially well. It would be an absolute treat to play a game on it. I’m envious.
Thank you for the tutorial. It’s very clear and the photos are extremely helpful.
Thank you for sharing.
Bill
Thank you Bill and I'm sure it would be a treat for me to entertain you.
DeleteA very interesting and inspiring tutorial on how you made your game board. However, I clicked the link to The Butchers Arms and I really want to go THERE. 😎🍺
ReplyDeleteThanks Jim, I'm know you would enjoy our local 18th century pub - please make sure it is on your bucket list to come to Oakridge some day you would be a very welcome guest.
DeleteFantastic post. Excellent tutorial and with an exquisite end product. Bravo!
ReplyDeleteThanks so much Paul.
DeleteBrilliant looking table Chris and a really interesting and edifying 'how to'. It's great to see how relatively easily you make these terrain wonders. The streams are sensational and look to be flowing for sure!
ReplyDeleteRegards, James
James, well as I imply it is hardly hard work but it does need some staying power and determination as well as the space to spread out while working and for things to dry properly before the varying stages. I'm very lucky in that respect. I shall get three day-long games out of it (at least) so worth the effort.
DeleteThat was an outstanding tutorial, Chris. Thanks for sharing that.
ReplyDeleteEric
Glad you enjoyed it Eric, thanks for stopping by.
DeleteChris,
ReplyDeleteExtremely informative I have to admit I hadn’t realised you used cardboard for the baseboard, extremely effective and resourceful. Lots learnt from this. Looking forward to the tree building.😃
Graham thank you very much I'm glad it is useful. Yes I always try to recycle the kind of material we all seem to gather if we buy things on line, or buy the larger electrical or household goods. Also the less you spend on the basic materials the easier it is to just take apart and then dump the residue and reuse the creative or most useful bits. I've made a lot of the hills and ridges you have played on (in the Vestisle campaign) with cardboard as a basis rather than too much polystyrene.
DeleteChris this looks really good , great tutorial. I learnt a lot, very environmental friendly and with 3 womean in the house we get through a lot of cardboard.When an earth did you find a day to lay the terrain out , we have had nothing but rain or high winds for weeks ?
ReplyDeleteHi Martin, thanks for looking and for your appreciation. Yes the early stage when I needed space and good drying weather was back in April before it got so bad. I'm glad I did not procrastinate.
DeleteMy word I enjoyed that,start to finish. Great stuff!
ReplyDeleteThanks a lot Bezzo, I'm working on the next part now.
DeleteMarvellous terrain again Chris and an excellent how to tutorial. I'm sure that it will provide for another good gaming experience.
ReplyDeleteThanks very much Tony, I feel sure you are right - some good company expected to help me.
DeleteSuper tutorial Chris, I learned a lot. A very enjoyable read.
ReplyDeleteGreat to hear Donnie, thank you
DeleteThose have to be some of most thoroughly complete tutorials I ever read. Thanks so much for them. The tree one I plan on using soon.
ReplyDeleteThank you very much for the compliment and I hope you will tell us how it goes. If you have any problem or question you think emailing me might answer then it's chrisgregg173@gmail.com
DeleteOnly just spotted this Chris, what a great effort, and inspirational stuff.
ReplyDeleteThank you very much Doug, at least this sort of blog post doesn't go out of date
Delete