It includes a rather lazy looking stream and I was asked by one of the members to do a "how I did it" so I thought putting that on my blog might be of interest to a wider audience.
Some of you will have seen this stream before as it has featured in a couple of my games earlier this year and I'll have to ask your indulgence as I made it back in April and I'm having to rely on photos taken at the time as a memory jogger on the process.
It all started when Kevin devised a map for Test game 2 and I got to thinking about how to do the stream as I was a bit disenchanted with the home made one I had been using, on and off, for about 20 years. I had in store some hardboard strips I had prepared years ago and never got round to doing anything with them.
First of all I laid these down on the table to make them approximately fit Kevin's map. There is a little branch making a millrace.
You can imagine that they were once a single piece of hardboard marked into lengths and cut out. Then with a very sharp craft knife the sides were chamfered to leave about an inch wide flat top and sides sloping down to table level.
Now I'm going through a phase of being irritated by joins in terrain so I decided I wanted to minimise that this time by sticking the pieces together and then reinforcing the joins underneath with masking tape. Then I lightly glued them down onto paper to prevent paint spills on my table top. When it was finished I hoped to remove it as intact as possible and place on top of a books-and-cloth terrain.
 |
| Basic undercoat with any cheap water based household paint in some earthy colour |
 |
| When dry I painted the flat course of the stream with a rich brown acrylic |
 |
| Before the brown had dried completely I went over it with a deep green (tube above, effect below) |
 |
| And again while wet, highlights of acrylic white to emphasise the water flow Below is the branch for the mill in close up |
 |
| Get a nice even shine that reflects the light |
 |
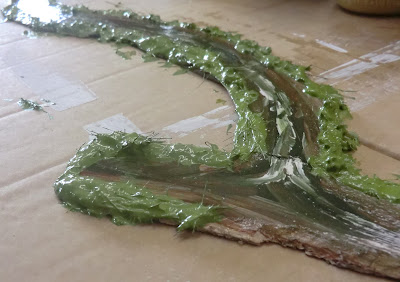
| Acrylic Large grain structure gel, some texture - in this case a pot of cheap green granules bought at Hobbycraft, and paints of your choice, all put on with an old brush |
 |
| Be careful to keep your hard earned glossy water reasonably clear of the mixture |
 |
| I can't remember if this photo is of a lighter colour or just better lighting! I think it is different as it leads into the next process....... |
 |
| Some time ago I had scrapped an artificial Christmas tree. I used a lot of it for fir trees (now long sold) but had evidently kept a lot of the trimmings. |
Because my stream originated in pieces it was relatively easy to use a sharp knife to cut it at strategic places for moving, and I've since cut it again so it's more like your conventional river sections, allowing some flexibility. At this point though every modeller will know what they want to do with it, but for completeness here's what happened next.
 |
| I laid the contours with cardboard, local newspapers and "The Radio Times" and left a gap either side of the steam so I could put in bushes near "water level" |
 |
| Now you can see why I wanted to be sure I had the right shape when I made it. I used a bit more varnish to help seal the few splits I had made in the production process. |
 |
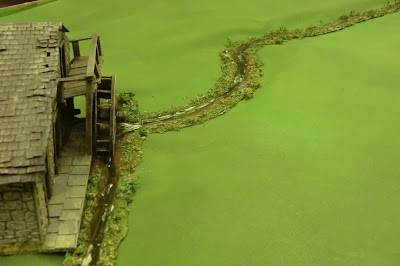
| Close up near the water mill........... |
 |
| ...........and now the bushes have been added for the full battlefield (though some of the buildings got swapped before we played). |
Finally the action of our Rank and File test game 2 - The battle of St Metard, is well under way. This was fought by James and Kevin over two days in late April.


The stream looks great, Chris. Thanks for posting this very useful guide. Now, how did you get your table to float in space? Uri Geller techniques? : )
ReplyDeleteThanks Jiminho. Just thank Adobe Photoshop for the levitation, I didn't think you'd want any more shots of the clutter beneath my table!
ReplyDeleteThat does look good Chris, I think giving it lots of vegetation on the banks really does make it look like a stream
ReplyDeleteLooking very good Chris and a fine instructional on the stream! Looking at painting up some rubber ones of my own shortly.
ReplyDeleteI do like this stream, excellent job, and thanks for sharing!
ReplyDeleteThanks everyone for your appreciation, glad it was useful. Ironically I've gone back to my old river for my next battlefield as it needed to be slightly wider.
ReplyDeleteThe stream is just amazing, Chris. I have a similar task in college now. And I'm very inspired by your guide. Feeling like I do not have time for anything. Neither for study, nor for projects, nor for work in the mastergrades. But I'm trying. Putting together a college list is among the most essential measures in college planning.
ReplyDeleteBianca
ReplyDeleteGlad it was useful, good luck with your project. You might find this post of help too, and may be inspired by the ones on either side of it - building Hougoumont gardens was my biggest challenge so far
http://notjustoldschool.blogspot.co.uk/2016/03/hougoumont-at-13-scale-how-i-made_24.html