Thanks for all the great comments on Abensberg Part One and for your patience waiting for me to start the After Action Report proper. Please have a look at Part One for historical campaign background, the strategic area map, game design ethos and making the terrain. This post will cover the immediate background to commencement, and the Day One action from our weekend which took us over the first two and a half hours of historical battle time.
A setback before we started
As I usually do, the invitations went out months before the game and I eventually ended up with three Austrian players and two Allies on the Saturday (2 were just for the one day) and then a "fullhouse" of 3 players aside for Sunday when more troops and players would be available. But a week before the game Phil had to let me know of sad family circumstances which precluded him from taking part. I had no reserves and a couple who I tried again were not available, so I asked James if he would mind swapping sides and he very quickly agreed. He had a few days to absorb the French/Allied brief but Richard was still going ahead as Napoleon, doing all the map work and deployment plan - phew!
 |
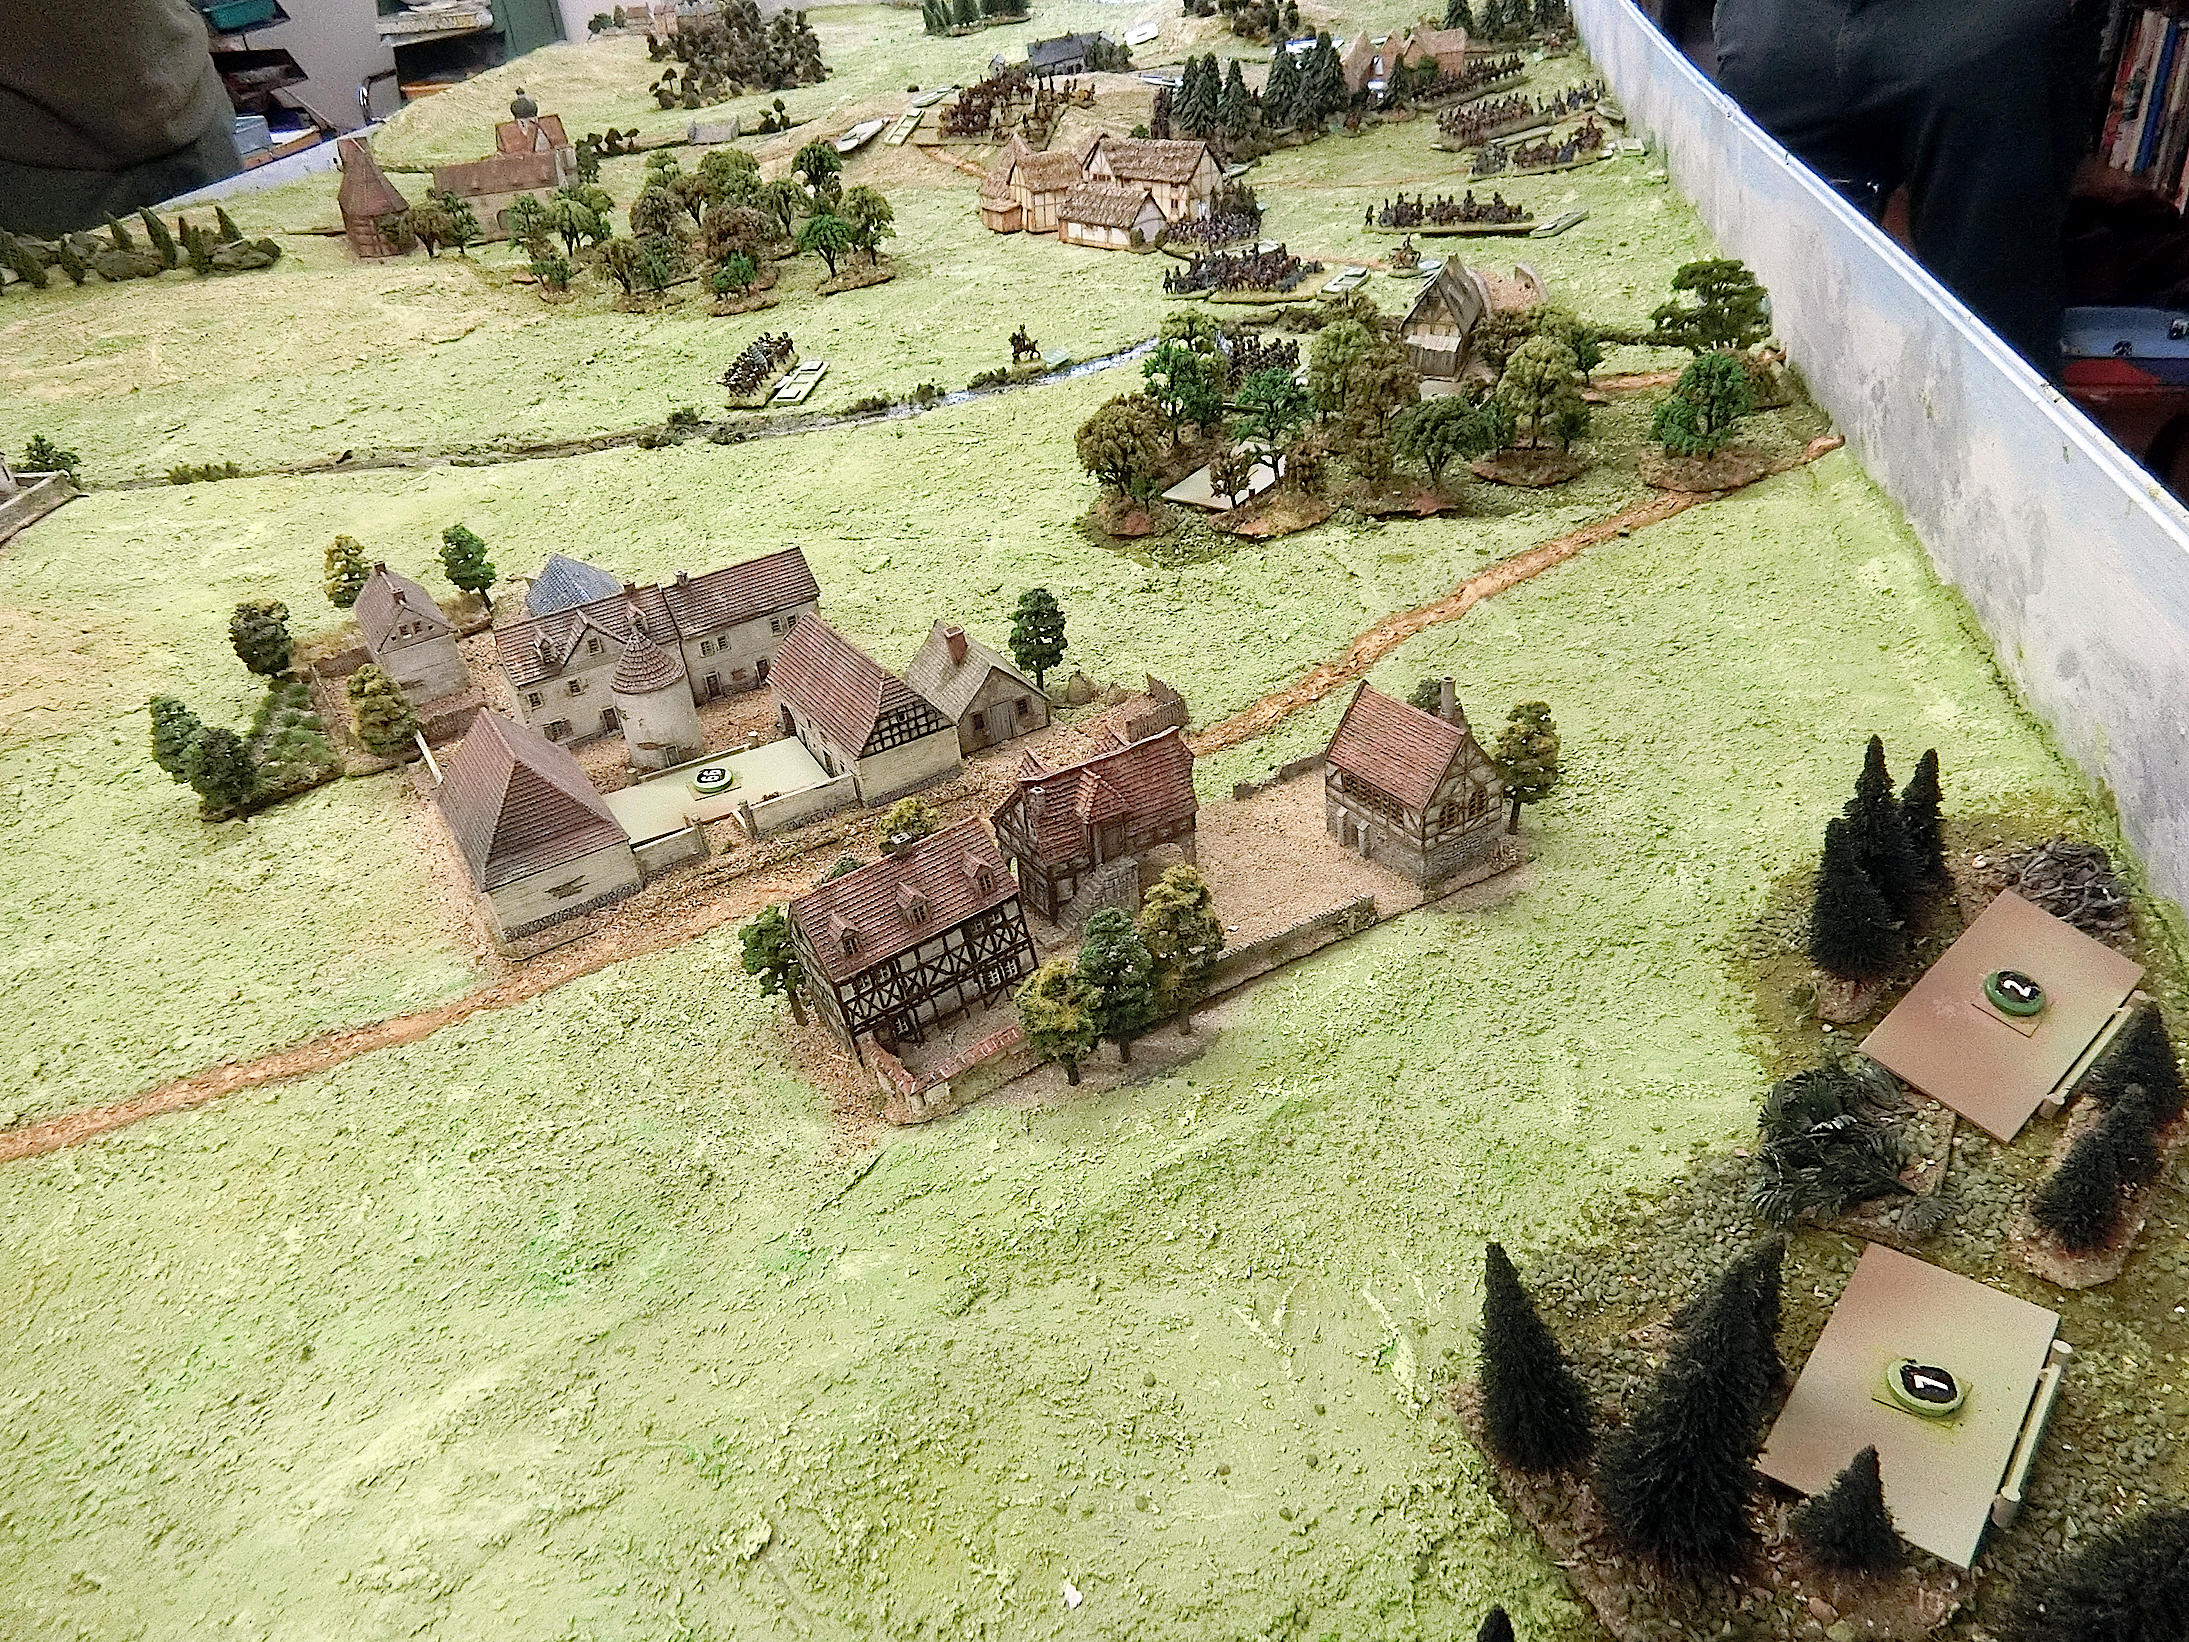
| View of opening dispositions from behind the Austrian lines. The hilly and wooded terrain meant both sides retained their "blinds" for a few moves, not all were real units. |
I received the Austrian deployment map from Paul B and Martin Gane in good time and made a few small Game Masterly alterations due to misunderstanding. Richard had worked hard since returning from his holidays and I received the Allied deployment map and a detailed unit run-down by map square too by Thursday.
 |
| Paul and Martin start with a very positive attitude! |
But then, the day before the game, Richard had to cancel as he had got COVID (Curses - it's still around!). That left me and James to try to figure out not just the Allied on-table deployment but all the off-field strategic stuff too that was going to have a big bearing on the action.
So some of the command "atmosphere" I put in the briefs had to be simplified, with James commanding the Bavarians (in practise just 1st and 2nd Divs on this day) and me as a rather passive Napoleon (so as not to sway the course of the game too much) trying to mastermind all the rest. To reflect the different Corps structure I commanded Hugel's Wurttemburg Light troops.
 |
| And in Move One, at least, James is still smiling |
Deployments and Objectives
Here is the Austrian deployment map (slightly modified by me to reflect the cosmetic misunderstandings referred to above). A more detailed understanding can be gleaned from both sides' briefs, orbats and deployment instructions in the Abensberg Download files here.
 |
Austrian deployment: Thierry's brigade is isolated between Offenstetten and Bachl.
Archduke Louis' Corps defends the width of the table in rows 4 to 8, majoring the defence on Perka, The Horlbachs and surrounding woods and high ground. Hiller has two Divisions available off table around Mandelkirchen but I've restricted their appearance until battle is joined with Thierry. Also available well off table (near Pfaffenhausen) is the small Reserve Corps. |
As mentioned in Part One Hiller's perception of Allied intentions was flawed due to ignorance and poor communication. Pragmatically the Austrians had to retreat in the face of an Allied onslaught. But for our game I set Austrian objectives to hold firm and use Hiller and the Reserve Corps to reinforce as the action developed. A Significant Victory would be gained if they could hold the original line from Bachl down to Siegenburg. A Minor Victory could be claimed for holding the rear areas from the Rohr road near the source of the Sallingbach through Kirchdorf and down to Tollbach.
Now the Allied (Mainly Bavarian) deployment
First the overall map as sent to me by Richard. It's only the Bavarian 1st Div (Prince Ludwig) (Rows 10-13) and 2nd Div (Wrede) (Rows 6-9). See below for detail.
The rest of the army was to be controlled by mainly a preset timeline. A player-Napoleon could have influenced this, but as the reluctant passive-Napoleon I settled for just tweaking it to keep up an interesting and challenging game.
As shown by the Austrian map above, Rows 15 and 16 were unoccupied and represented the distance back (into the morning mists and forests) of Lannes' Infantry and Cavalry awaiting the "off" to commence what they hoped would be a "rideover" down to Rohr through Bachl! The brief allowed them to go once two moves of artillery fire had been heard from the Offenstetten area, but I also despatched Lannes in person from Napoleon's position on the low hill West of Biburg. It would take him an hour to reach his Corps.
Prince Ludwig's Division in the North.
General Wrede's Division in the South.
General Hugel's Wurttemburg light have been split with one infantry regiment near Bruckhof ready to sprint up the Sellingbach valley, and the other, with cavalry and horse artillery, on the extreme South of the line ready to move towards Siegenburg as the opportunity arose.
Over the whole weekend the Allies were in greater numbers and with significantly better leaders (that matters a lot in my A2W rules). They also had a lot of artillery and cavalry and the element of a surprise force of quality troops waiting on their left flank. Set against that the Austrians did have the benefit of a big variety of good defensive positions (though too many to defend with the troops available!). When I set the objectives it was with full teams of players and I expected to get through 14 Moves - from 1030 in the morning of 20th April 1809 to about 5pm. Historically by then the Austrians had departed so it seemed reasonable to set my French and Allies the Objective of sweeping their enemies off the entire playing area!
As we shall see, what resulted was not quite what I expected, but we ended up after two days with everyone seeming to get some satisfaction from their roles, and a slightly surprising result!
Opening moves by the Bavarians
I will try to let the photos tell the story as much as possible.
 |
| Richard had placed all the components of each Division close enough together that they could all be commanded by the Divisional commanders. This sped up the early moves but those blinds of Bavarian 1st Div in the foreground woods were destined not to move straight away as poor James rolled a 1 on Move 1! |
 |
| Mesko's Kienmeyer Hussar regiment stands guard outside Perka, and Grenze Regt Nr 7 holds the dense woods |
 |
| Behind them Archduke Louis' two heavy batteries command the hilltop while down the slope is a battery of light Grenze artillery (this photo taken before Paul arrived with the gun models) |
 |
| The view opposite behind Wrede's main line - a large battery of medium artillery, a heavy battery, two regiments of infantry, a horse battery and Preysing's Chevauleger brigade. In the foreground Minucci's brigade, by Bruckhof, prepares to advance up the Sellingbach valley. |
 |
| A wider view of 2nd Div's position, and the 6th Light battalion can be seen way ahead on a double move now speeding up the river valley. To their right Beckers' infantry are attacking parts of the Horlbach village. See village has been left unoccupied by Thierry and the large Austrian 1st Infantry regiment in Offenstetten has yet to be revealed |
 |
| A close view of von Beckers attack. At left infantry enter Unter Horlbach unopposed. All the guns are playing on Ober Horlbach as the Grenze Light battery is masked by a Bavarian infantry attack. On the far right the Wurttemburg horse battery engages the Kienmeyer Hussars |
 |
| An unhappy outcome for the attack of von Beckers' 7th Infantry Regiment (IR) who were badly weakened by heavy gunfire from the hill as well as musketry from Ober Horlbach in the flank on their approach, and then shattered by Grenze artillery canister fire in the close attack - 6 Hits! |
 |
| Here's a view along Wrede's line with Wurttemburg HA and Bavarian Chevauleger in the foreground. Bavarian 6th IR about to enter Horlbach |
 |
| Ludwig's 1st Division is now moving on Offenstetten where Austrian 1st IR has been revealed and is under artillery fire from just off the table to the right |
 |
| Von Zandt's Dragoons and Chevaulegers emerge from the Seeholz and bear down on the Austrian skirmisher company vedette. Paul had omitted to withdraw them - will they get away in time? |
 |
| More action on the Bavarian right, (above and below): A bold stand by Martin - he had not withdrawn the Kienmeyer Hussars from their vulnerable position. Instead he engaged in a mutual charge against Preysing's 2nd and 3rd Chevauleger, but the Austrians were hit in flank by the Wurttemburg Herzog Heinrich Chevauleger who had been patiently extending the Allied line just off table (and were visible to Martin). |
 |
| The Bavarian cavalry brigade had been weakened this move by those heavy artillery on the hill and was broken in the subsequent combat......... |
 |
| ......However, the Wurttemburg flank attack prevailed and sent the Austrian Hussars packing - back through the gap between the dense woods and Perka village, where they would cause disruption to the Archduke Karl Uhlans who were standing in a reserve position. See also the wider view below |
 |
| Dark smoke can be seen emerging from Mittel Horlbach. Bavarian 6th IR had not gone in with the bayonet but engaged in musketry with the Austrian 5th Infantry garrisoning the upslope buildings of the Horlbachs. Meanwhile the Austrian sapper company with them decided to set fire to Mittel Horlbach as part of Louis' (Martin's) master plan to delay the Bavarian advance here. |
 |
| In the Allied centre the advance is properly underway. Infantry are at the edge of the Bruckhof woods and the Wurttemburg Jager regiment in skirmish order is making good progress up the line of the Sellingbach to support the Bavarian Light battalion. |
The photo below gives a good idea of the activity up to this point.
Nothing is happening yet on the left South of Aicha village.
Martin's Austrians still firmly hold the Horlbach highground and forest down to Perka. But Mittel Horlbach is burning and neutralises control of those hamlets .
Near Martin's corner by Kirchdorf a lot of unrevealed blinds in the woods suggest another Division awaits activation.
Then there is a yawning gap across to Thierry's still intact mixed brigade near Offenstetten and the Keller high ground. It has yet to face the full fury of the Allied onslaught. Paul B is looking after them and, as Hiller, still has lots of troops off-table waiting for their time.
James has a lot to think about, and might miss a few opportunities - such is the stress of a wide command. I'm trying to help out by controlling the few available Wurttemburg units.
The "extra bit" of terrain board is not shown and not yet much in use.
Bavarian progress against Thierry
 |
| Offenstetten is now under heavy fire from Bavarian batteries. Casualties are being caused and black smoke emits from the Western barn as a fire takes hold. Thierry has no artillery in range with which to respond. |
 |
| Eventually even the experienced Kaiser Regiment cracks under the strain. |
 |
| Marshal Lefebvre has come to the front to urge on the attack up the Sellingbach valley. I decided to bring the Wurttemburg Jagers across to the centre where they could do more good as the Bavarian 6th Light Bn was heading unopposed to Sellingberg. |
 |
| In this wider view at top right it's evident that Martin has felt it is time to show his hand and he has brought Reuss-Plauen's Division out of the woods to occupy the Kirchdorf high ground. All of sudden James is no longer presented with hole to push his Bavarians through |
First of Lannes' troops appear
I've said before that I wanted to pep up the command system in Honours of War with my "A2W" Napoleonic version. The dynamism, particularly of French commanders, needs to be reflected strongly, in my opinion, in on-table activity. I've got four levels of command rating. A look at the
Allied Order of Battle will show that theoretically available the Allies have Napoleon and Lannes as "Exceptional", and several others including Jacquinot and Morand as "Effective". Of course it's about getting them in the right place to have a good effect. I've also freed up the structure to allow more upgrading for Initiative rolls and now I had a chance to show it in action. Exceptional commanders have an influence radius of 25 cm and can upgrade two subordinates in the same move. As previously noted I'd got Lannes into position to lead his flank attack so by Moves 3 and 4 he could position himself at the edge of the "extra bit" and influence Division or Brigade commanders as they brought their troops up in succession.
First was Jacquinot's Chasseur brigade of three regiments.
 |
| The brigade got a triple move and the front two regiments have traversed the "extra bit" in one go and are just now on the main table. Of course cavalry can overreach themselves! |
 |
Behind them the 4-gun Horse Artillery battery unlimbered to play
canister on Thierry's 29th Infantry Regiment which was occupying
Bachl. Unlike the cavalry they had to use the bridge
to cross the Bachl stream and that meant going through the village. |
 |
| A wider view shows what remains of Thierrys brigade on the main table - the 4th Dragoons have withdrawn to the rear slope out of artillery range. A battery remains on the crest, and those skirmishers escaped to give a little support. |
 |
| Behind them, and "marching to the sound of the guns", we can see Paul has brought on Hoffmeister's Brigade of Vincent's Division, presumably the vanguard of more of Hiller's reserves. |
 |
| They will be needed as Ludwig's Bavarian Division is now making good progress past Offenstetten |
(NB, in the excitement the attractive round tower has not been put back in its place in the village square)
Hugel attempts to outflank on the right: action at Horlbach and Perka
While James is busy trying to organise the wide sweep of the Bavarians across a 6 Km front, I'm trying to manoeuvre Hugel's light troops on the southern flank of the Allied line to do something dynamic and useful. Historically Hugel's brigade seem to have been awarded "man of the match" at both Abensberg and Eckmühl, so I needed to emulate their performance....here seemed to be a chance.........

As the photo above shows, I took the Wurttemburg Light Infantry regiment through the dense woods in skirmish order and got close enough to the southern end of Perka to engage the defenders in a firefight prior to an anticipated assault. I found Perka had been fortified (I had allowed the Austrians to do that to one village in advance) giving a minus 2 advantage on the combat chart. The Wurttemburg HA were having no luck inflicting hits on the Grenze in fortified Perka. The defenders at this end turned out to be Grenze "marksmen", and I could see it would be a long slog to dislodge them, sustaining casualties in the process....there must be a better use for Hugel's men. The picture also shows Austrian scouts could see this developing flank move and my Herzog Heinrich Chevauleger had come round the woods too.
 |
| Martin had withdrawn the battered Grenze artillery to recover, sheltered by the heavy batteries. Together with a cavalry battery and that strong regiment of Archduke Karl Uhlans, the Horlbach hill looked a tough nut to crack |
 |
| So I legged it quickly with Hugel's LI and Chevauleger into the nearby hilltop woods. Louis' Corps was not really big enough to defend the whole front so they'd gambled wrongly that this part of the table would be a stretch too far for the Allies. Maybe the Wurttemburgers could get up to some mischief here. |
 |
| This photo reveals all was not lost for the Bavarians on the Horlbach - Perka front. The trifling sized sappers offer meagre cover for the fleeing remnants of 50th IR (yellow marker) who have succumbed to, by now, nearly two hours artillery fire. Behind them a heavy battery has a red marker for 4 Hits, and will have to retreat. |
 |
| Here is part of the cause. Bavarian heavy guns in the foreground, but, significantly, the large battery glimpsed at left has manhandled forward sufficiently to, at last, get sights on the Horlbach Hill guns. |
 |
Bavarian 6th IR is still occupying Unter Horlbach.
The wind direction proved stable for some moves so James must
have felt just staying put was safer than trying to come
out and round the burning houses |
Austrian resilience on the road to Rohr |
| Prine Ludwig's troops advance on now undefended Keller farm... (the "blind" marker had been only a dummy unit) |
 |
....But far ahead Hoffmeister's brigade is advancing towards Sellingberg
(AB figures painted by Paul B)........ |
 |
| .....and Reuss-Plauen consults his brigade commanders about how to defend the Kirchdorf high ground and extensive woods; and are watched closely by a scouting vedette from Lefebvre's HQ |
 |
| Bavarian 6th LI have gained a lonely, but as yet unthreatened, outpost in Sellingberg |
At this point I have to own up to my first "failure" due to being a stressed GM and trying to be Napoleon and Lannes at the same time (curse COVID again!). An important cavalry combat took place on the extreme Austrian right flank and I failed to take a single photo - I was having to make the decisions and roll the dice for Jacquinot's cavalry instead! I made a mistake tactically too - underestimating my enemy, the wily Paul B. I'd got the small size (only 450 men present on this day) 1st Chasseurs, closest to Thierry's ridge, just prior to ascending the slope. In his move Paul attacked with the 4th Dragoons and despite attempting the counter charge the 1st were caught down slope and soundly beaten.
 |
| The yellow marker shows the 1st Chasseurs on 6 Hits and broken. To add to the chaos, in the foreground you can see the Austrian 29th IR beating a hasty forced retreat from the artillery fire on Bachl |
 |
| But the foolish Chasseurs had not died in vain as the Austrian Dragoons suffered enough hits to retreat and find somewhere safe in the woods to recover. These woods along the road to Rohr would prove to become a bloody battleground in the coming hours |
More Bavarian success at Horlbach Hill |
| You'll recall the nearest of Archduke Louis' heavy batteries had to retreat, but the fleeing 50th IR caused another Hit and they were broken. Here you see guns being abandoned and the gunners and teams getting out fast. The Archduke is too far away to stop the rot, apparently concentrating on the Wurttemburg distraction near Perka. |
 |
| The Bavarian guns are now better placed to inflict steady damage on the hilltop |
First day's progress
That is where we had to leave it at the end of the first day's play. I've marked the aerial shot above with a rough indication of front lines, so you can see the Allied progress. The central woods are now occupied by a whole regiment of Wurttemburg Jagers. In the far corner of the table Hugel's troops are now advancing fast and unopposed across the valley towards Tollbach village. Austrian hold on the woods and hills above Horlbach/Perka is still strong as the Allies have nothing much there to match them - good units had been lost very early on in the day against such strong positions. As expected, Thierry's troops were too far spread out, and isolated, to offer much resistance so the Bavarians have got as far as Sellingberg with little loss. The temporary check to Lannes cavalry sweep was a shock, but a mere blip in what was to come from the Allies on the morrow.
Look out for Part Three in a week or so - don't miss the next thrilling instalment!!!


What a treat! And your tables are (always) some of the best looking around.
ReplyDeleteKind Regards,
Stokes
Thank you Stokes for the great compliment, you've been a supporter of my blog since the beginning in 2011
DeleteI heartily endorse Stokes’ assessment of your Abensberg wargaming spectacle. I will return again to enjoy and absorb your photos. Great job, Chris!
DeleteThank you Jonathan for your frequent visits and appreciation. There is a lot to take in in one visit only
DeleteAbsolutely brilliant as always Chris. What a great bunch of chaps to play with as well. The 1809 campaign is a particular favourite of mine and your depiction of the battlefield, as always perfectly achieved with your expert artistic and modelling skills, is exquisite. Well done once again
ReplyDeleteCarlo
Glad you've found the time to absorb and enjoy it once again Carlo. Yes very lucky in my various playmates, I manage to herd them into suitable submissiveness! I really enjoyed designing and executing this battle as it's different to the usual. I will summarise at the end of Part Three the good and the less good.
DeleteThanks for a great AAR of Day One Chris, which helped me understand the situation I 'inherited' on Day Two. Plenty of splendid photos to enjoy too which really enjoyed looking at:)!
ReplyDeleteGreat Steve - and descriptions of your illustrious actions to follow in due course!
DeleteWhat a joy to take part in a game of this standard . The terrain was spectacular and the scenarios a genuine challenge. I spent a wonderful two days gaming and came home really inspired to upgrade my own gaming table and games. Anyone who is lucky enough to attend one of Chris’ games should consider themselves very fortunate. I had a brilliant time and 2 days just flew bye.
ReplyDeleteMartin
Martin it was a joy to have your company and wargaming skill at play in my game. Thanks for making time in your jet-setting itinerary. So glad you enjoyed it and got inspired, and I hope a few more will respond positively when they get an invitation from me in future.
DeleteExcellent as always. Makes me want to resurrect my own 15mm Austrians. Thanks Gregg
ReplyDeleteThanks Paul, glad you found it stimulating. Could you kindly remember please I'm Chris, not one those funny people that spell first name Greg with two gs!
DeleteOops! Sorry about that Chris
DeleteNo problem from you Paul , but I don't want anyone making a habit of it, so had to say something on this public blog.
DeleteVery impressive as always, game, preparation, visuals - and some excellent rejigging through unexpected circumstances too, in the best tradition of flexible generalship!
ReplyDeleteSo pleased you stopped by and have taken it all in David. Thanks so much for your positive and supportive vibes
DeleteWhat happened to part 3?
ReplyDeleteGood question , it's been on my mind for weeks but real life as intervened and now I'm having to sort out a computer issue, won't be long hopefully. Thank you for your interest.
DeleteSorry Blogge/the computer has forgotten it's me!
DeleteTrying again, Chris G
Delete