Monday 25 October 2021

Battle of Langensalza: Part 2 - Getting started

Thanks for all the great appreciation shown for the First part in which I gave a bit of historical background, the scope of our game, and a lot about making the customised battlefield. In this part I will give the game context and briefs, orders of battle, opening dispositions and get the troops on the table.

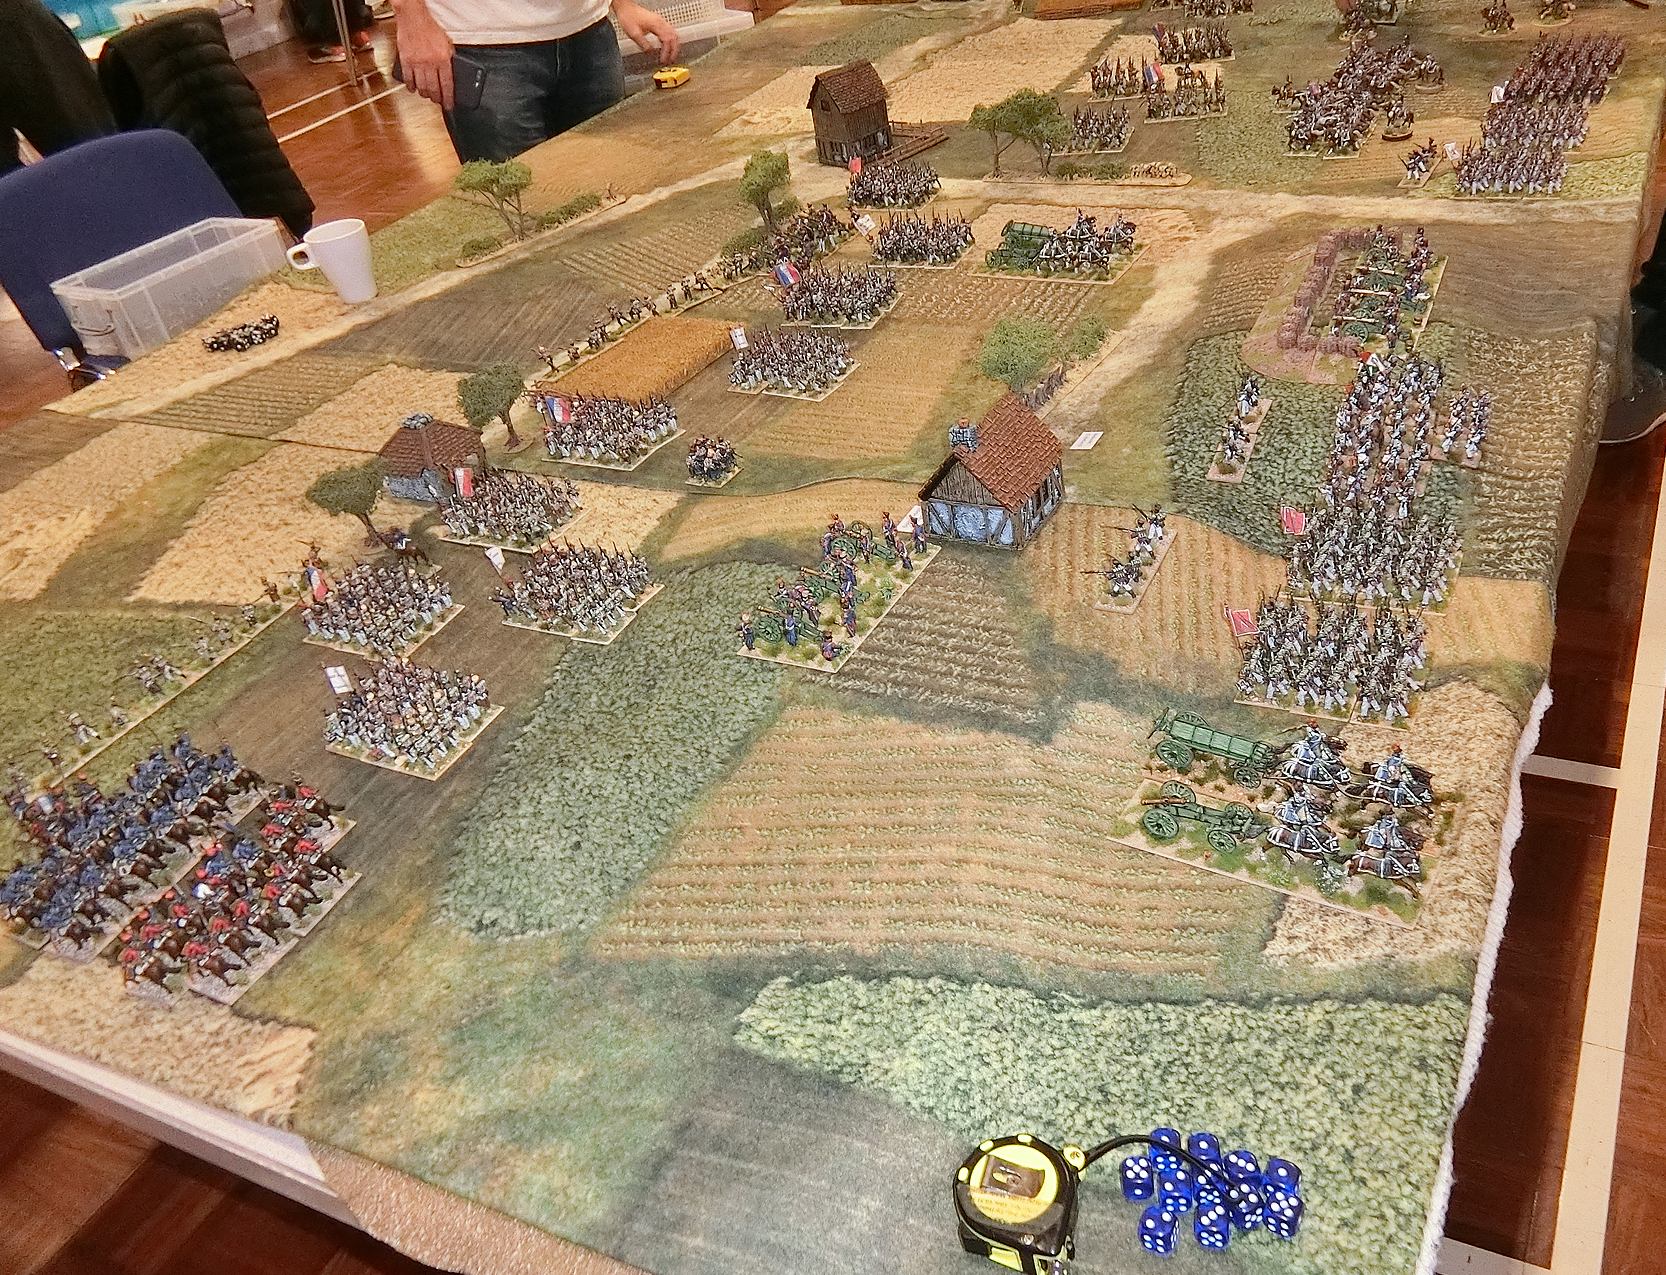
Langensalza in full swing. Richard made us laugh and then took a sneaky photo! Of more interest than me is the magnetic map board behind me on which we tracked the opening off-field movement.
(Photo: Richard Newcombe)

The Armies

As I said in the first part, the Kronoscaf site has more or less all you need for Langensalza 1761. However it is short on actual numbers. I estimated that working on roughly one 28mm figure to 50 actual men should give us between 25 to 30 units per side which was more than enough for 2-3 wargamers per side in one day using "Honours of War" rules. That could represent up to 30,000 men per side. The Prussian force was said to be about 7000 men so should be around 140 figures and was maybe a quarter of the total Allied force. That was the only number I had to go on apart from the histories suggesting the Saxon Corps fluctuated around 10, 000 men, and there were supplementary French units I could call on for balance, such as a corps of Grenadiers. Probably the Saxons/French should be outnumbered (in Army Points anyway) but not by too much. 

HoW works best for us with standard size units of between 24 and 36 figures for infantry and 12 for cavalry: depending on how closely the figures are based we tolerate a width in line formation of 20-25cm for infantry or cavalry.  Anything bigger is a "Large" unit and anything smaller is "Small".  Therefore  (at my ground scale of 60cm = 1 km) the footprint on the table top is around 350 metres wide for a standard unit. So each unit would represent 2 to 3 battalions, or maybe two regiments of cavalry. Since regiments of cavalry could be anything from 2 to 5 squadrons I was not going to beat myself up about accuracy! Within the parameters I had set my aims became:

1. Make sure the overall balance of numbers was about right given we were allowing for all the forces on the Kronoscaf Orbat. Work out sensible "brigade" sizes to match the historical units and generals.

2. Ensure a balance of sizes and capabilities of units taking into account any supposed terrain advantages too. (To my eye although the bridges and marsh would slow the allies a lot, they had a lot of cavalry, and the Saxons did not have the numbers to defend the whole area so were potentially vulnerable to a breakthrough and surrounding as in the historical battle). I am aided in balancing orbats by my sliding scale of "Army Points" depending on size and quality - Inferior Trifling unit is 0.5 through Standard everything at 3 up to Large Superior on 5. I don't use the HoW rulebook system.

3. For the same reason give a balance of commander numbers and capabilities to ensure the right amount of tactical options and the chance of some fun for the players (Too many "Dithering" generals in HoW is not fun however realistic you think that might be!)

4. Use as many of the contributing wargamers' units intact as possible (especially the newly painted ones!) but don't be afraid to reduce them in size if required.

You can find all my documentation in the 18th Century Historical section of Downloads in the right hand side bar, or here Langensalza game documents. For the more casual reader here is a tabulation of the main features:


Maps and Deployments

Saxon/French
I started off by analysing what the account says about the Saxons and came up with a distribution of the generals and the wargame units which would put them in position at 0700 on the morning of 15th February 1761.  Those not on the table at the start were phased to come on at 0700, 0840, 0920 and 1000 in Areas D and E.

Saxon/French allowed deployment zones

Guy elected to put the Comte de Solm's elite troops just below the crest of the high ground NW of Langensalza, out of sight; one unit is poised to enter Langensalza town.  Major General de Borck's 2nd Brigade was in area B heading up towards Schonstedt to extent the line. The Royal Nassau Hussars were placed for good oversight of the Gross Gottern crossing points from near Schonstedt. Lt General de Stainville's large force was available to march on in the First move and was spread out South of the Judenberg with all the infantry to the left and the three cavalry units on the right flank. De Stainville's were commanded by Richard Newcombe, while Guy had most of the remainder of the Army. The C in C , the Marquis de Saint-Pern, was not yet available and would arrive along the Area D road with the Grenadier corps at 10 am game time  (Move 10 as I had decided on 20 minutes per Move).

Saxon/French actual deployments and arrival plans

Hanoverian/Hessian/Prussian Allies
The historical orbat gave the Allies a lot of generals which suited me fine. It meant I could build a hierarchy for swift action without relying too much on "Dashing" commanders. Instead I like using the HoW Lieutenant-General rule - General von Sporcken was the Allied C-in C and I made Lt Gen Count von Kielmansegg his 2-i-c Lt Gen. I was able to put in von Langenheim as a Lt Gen in charge of the Hanoverian and Hessian Cavalry. With General von Syburg as the Prussian commander (played by Martin Gane) the Allies thus had 4 staff groups who could upgrade brigade commanders and could help recover a unit's Hit Points if within 5 cm.

As with the Saxons I had to work out a sensible distribution of my chosen wargame units to make a brigade structure and deployment zones which would help the Allies to make the most of their cavalry and the two river crossing points. You can see Areas F to N in the map below and all the Allies were off the table at the very start

Allies - allowed deployment areas

Paul lined up his cavalry to cross first at Thamsbruck and Merxleben then followed by infantry brigades, led by the most elite units to get them into action as quickly as possible. Von Luckner's Light troops were set to tackle the marsh from Area H. There were a few points of misunderstanding which we cleared up by Move Two:
  1.  I had allowed Von Reden's cavalry brigade to march up the flank off the table and arrive at Schonstedt, but it still needed to start off in Area G at 0700. Given that news Paul opted to bring them on in Square A1 and advance up to Schonstedt frontally from Move One. I think he hoped to put the wind up the small Royal Nassau Hussars.
  2. Any troops except artillery could cross the marshes and river at half speed but Paul assumed they all had to queue up for the road bridges. So I realigned his troops in Areas F and N to make better use of the available baseline entry places directly to their fronts, with the artillery to catch up later via bridges. (I sometimes stretch HoW's "out of command" rule when I think it obvious a follow up order has been left with brigaded artillery.)
  3.  I forgot to remind all the players to do a double move when in march column and more than 60cm from the enemy. That was very relevant in the first few moves and we made up for lost time, so don't be too fooled by the opening photos!

Allied deployment (but see Point 1 above about von Reden)

The Opening Moves

To kick us off to a good start Paul and Guy came the evening before the main game to sort out the figures, most of which they contributed, set up those on the table and do the opening manoeuvring on the magnetic wall map.  The following sequence is a tour round showing the opening move, give or take a bit more for some due to my initially forgetting the 60cm distance rule.

A general view from the western end above Schonstedt village. The Royal-Nassau Hussars in the foreground are well placed to spot any Hanoverian movement off that part of the table so no need to conceal the map from Guy.

Von Hodenberg's cavalry make a fast move from Thamsbruck bridge to the ridge top  and so Guy had to put on the table the formerly concealed infantry of the Comte de Solms. Paul's cavalry now knew they faced Saxon converged Grenadiers and Foot Guards

Guy had sent the other Saxon regiment to occupy part of Langensalza


At Merxleben bridge the Zieten Hussars and Leib Carabiniers did not make such quick progress

A nice view of some of Guy's new Saxons. De Borck's Brigade march towards Schonstedt hoping to create a broader front to thwart the likely Hanoverian outflanking move reported by the Hussar outpost

Comte de Stainville's Division made an appearance.
Baron de Klingenberg's Saxon infantry
(assisted in the representation by some of my Imagi-nations and French troops)
 march on South of the Judenberg hill

The cavalry of Baron La Bruggen hold the extreme right flank of the French line opposite the Merxleben Heights

In the opposite corner to them. Luckner's light troops can be seen crossing the marsh and the Suthbach while in the foreground the front of Reden's Hanoverian cavalry has just made it into "Square A1"

The photos don't help me much to be exact but by 1000 the next day we were fully up to complement of expected players with Martin Gane having come from London and Richard Newcombe from Aylesbury (via a Cheltenham stay) and more troops began to arrive on table and progressing as shown below.

Martin receives his top-up briefing on arrival while the glasses raised on head shows Richard is taking it all in......

A nice view of a good deal of their respective commands. Little did I know that we would be in for a master class from Martin of how to set up and sustain a Wing of a Prussian army, and that Richard would acquit himself admirably in only his second game using HoW (the first was my Lobositz refight in 2019)

Martin's first line of von Syburg's Prussian force. Freikorps infantry,
Carabiniers and Cuirassiers, and a small contingent of the Zieten Hussars
(visually Paul B's heavy cavalry 5-wide don't cross bridges easily! )

I love this photo, I feel as if I'm going through the marsh with them. Beautiful Paul B Minden Prussians act as line Freikorps and my tried and trusted (!) Foundry Freikorps make yet another appearance as light troops

And here they are deploying, with Grenadier battalions following on

On the other side of Langensalza Guy is about to use a double move with de Borck's brigade to extend the Saxon line up towards Schonstedt.......

....while Paul decides charging Grenadier bayonets is not
 advisable and wisely switched the emphasis of
von Hodenberg's cavalry advance towards the right

The cavalry having vacated the crest Guy's Grenadiers evidently think "we'll go up there then, 
but cautiously"

This view of the Hanoverian right wing indicates a big flanking sweep is in the offing around Schonstedt, and Paul will have the historical equivalent of about a dozen regiments of cavalry to try it. Luckner's and von Reden's troops only made slow progress this turn across the marshes.

The players were getting into their stride and we were now around 0740 - 0800 game time, so I think as this post is pretty late already I will publish it now and get to work on Part Three.  As always , your comments and questions welcome.


Tuesday 19 October 2021

Relaxing Hussarette - more on Countess Natasha, 1758


September 1758 

.........The bedroom in Schloss Grunburg was surprisingly warm considering the late hour. Countess Natasha Gruzinskaya slipped off her pelisse and settled into the large buttoned sofa so thoughtfully placed by the servants near the fire. Her skin glowed with the arousal of personal combat enhanced by the firelight.  She was quite relaxed.....what could have been an arduous duel with Count Gregorius' fencing master, Captain Metternich, had ended quickly. She reflected on her deft movements and smirked.  Gregorius had asked her why she was naked and she told him "Better to fight" ....but her only garment, the yellow Gruzinsky Hussars pelisse, was actually the key to victory for she had whipped it off and thwarted Metternich's first strike.....his blade slashed through the sleeve and got tangled in the loops and cords. She pulled it aside and delivered a disabling blow to his sword arm. He would live but the Count would be needing a new fencing master, or mistress... 

Although she was a prisoner, the Count and the assembled guards from the Grunburg Dragoons stepped back in awe and respect, for Metternich was known to be a formidable opponent, and yet here he lay bleeding and looking helpless. 

There was not a scratch on Natasha but now she only had on her hat and her boots and her pelisse was in tatters so Gregorius instructed one of his aides to give her his own blue pelisse. To imply that she needed clothing to recover her dignity would be far from the truth for she stood erect and elegant, the Croat's oriental sabre poised delicately but purposefully in her hand, as if to imply "Any one else want the same?"

"Countess......", Gregorius sounded friendly...." you have done well, and as my prisoner I put you on your officer's parole not to try to escape. Now please give me back the beautiful weapon I lent you and we shall return yours to you. Then you may have a guest room and I will see you shortly."

So, in that guest room, Natasha contemplates her fate. Will she ever return to the Russian Army again? Maybe Grunburg could provide a new home and new adventures throughout Europe in the Count's service, who knows?

>>>>>>>>>>>>>>>>>>>>>>>>>>>>>>>>>>>>>>>>>>>>>>>>>>>>>>>>>>>

But we, dear readers, know better, don't we?

This story, and new painting, is just continuing the saga of the reckless and semi-naked Natasha through the Seven Years War. Here is a link to my original painting and first photoshoot with my Russian model. And as a reminder, the first time she came to be painted chronologically in 1755 plus links to the other incidents concerning her and Grunburg.

Once again an oil painting on canvas, 16 inches x 12 inches and available for sale at around my usual very affordable price for this size. Please take a look at my art website for more detailed photos and a link through to a whole series of photos showing how the painting was created, I hope you enjoy it.

As I have said before, I am open to commissions for military subjects or  your own fantasy Hussarette/Chasseurette/Lancerette etc, just get in touch via the website or direct email and we can discuss.

A skirmish between Prussian infantry and cossacks at Zorndorf, 1758. By Emil Hunten (1829-1862) painted 1862.  No, not the Gruzinsky Hussars, but Natasha was captured near Zorndorf by Grunburg Dragoons fighting for the Prussians


Monday 11 October 2021

Cotswold Wargaming Day 2021 - Better than ever

I was lucky enough once again to get an invitation from Keith Flint for the third Cotswold Wargaming Day, which was held 15 miles from my home, at Northleach in the mid Cotswolds.  Around 30 wargamers came from far and wide but mainly in the South of England. There were seven games on offer and I won't hold back on the photos as I know many supporters particularly value a good view of "shows" vicariously. (As always click to enlarge). This isn't a show in the normal sense it's just a friendly and casual gathering of gamers who want to show what they do and let others participate.

We had the very minimum of COVID precautions and there was plenty of space and air. I had invited myself onto JP's 28mm Napoleonic game along with two of my usual buddies Kevin East and Ken Marshall and I will give you a glimpse of that first but much more later!  It is a relaxed day and JP was very tolerant of me as I had visits at his table by Cheltenham friends Paul B and Glenn L as well as new acquaintance, Eliseo, who would you believe has recently moved into my own little village of Oakridge. Apart from the Cirencester Club game on the next table others came from farther afield like Bristol, Swindon, Newbury and Farnborough. JP is himself a Cotswold resident and you may have seem some of his many super VLOGs on YouTube such as The Road to Waterloo, so with now famous wargame author Keith organising it did feel to me like a "local" show, but very special.

JPs Battle of Dolitz. Part of the first day of Leipzig 1813. Three taster shots much more later.

JP gives Kevin some initial instructions regarding deploying the French army

The French defensive lines - villages of Meusdorf and Probstheyde in the foreground. The Prussians have yet to march on.

Chuckling Kevin and Ken? This is supposed to be a serious Napoleonic refight!

American Civil War in 15mm by Keith McWilliam from Wargames Association of Reading (and Newbury). Their own made up scenario but extremely photogenic in my view.


15th Century Turks versus Poles and Imperial troops, using Tercio rules. Put on by Stuart and the Cirencester club. The first photo is the impressive start lines. I went back at lunchtime and it looked much the same but I was informed the cavalry wings had smashed each other up and both withdrawn to leave the infantry to fight in the centre!


The Battle of Sentinum 295 BC . An impressive game staged by Farnborough Wargames Society with a very professional and informative handout packed with history and wargame info. Evidently a hind and a wolf crossed the battlefield and had a tussle, giving a mystical portent of the outcome....and being modellers these chaps had to include them!


spot the wolf....


A neat "imagi-nations" Napoleonic using 6mm figures in MDF and Keith Flint's new rules (for any scale).  Shadow of the Eagles


Not something you see often - The 1967 Arab-Israeli War in 10/12mm using Cold War Commander rules. Put on by a father and son team from Bristol and Swindon


There were two games in the side room too. One was an interesting looking 28mm skirmish game set in the French and Indian War (1755-63) using Sharp Practice rules. The other, I understand, was a 15mm WW2 but both times I was there nothing was happening and no one in attendance so I did not photograph the table, sorry.


Just after lunch there were speeches and prizes, judged and awarded by the late Stuart Asquith's son (Stuart had been a driving force behind the first two CWDs before he died). Premium prizes were given for Best Game, Best Terrain, and Best Figures, and because CWD is that kind of event (and as if to prove the Cotswolds is the nicest place in England to live) all the game organisers got a prize and round of applause in thanks.

Now another look in a bit more depth at JP's 28mm Napoleonic, Battle of Dolitz.

Below is an extract from a map of the first day from my copy of Osprey's "The Campaign of Leipzig 1813" by Jeff Parker and Peter Gilder (published 1979!).  Kevin had Augereau's Corps and I had Victor's Corps and we were backed up by Guards and heavy cavalry which were only released when Napoleon (JP) decided it was appropriate. You know what a fanatic I am about battlefield scale but I kept quiet and just enjoyed going with the flow; we were fighting on a historical two mile frontage roughly from Connewitz to Dosen; around 9 x 36 figure battalions represented each of the two weak French Corps. Cavalry Divisions were each two large "regiments". So we were fighting with roughly brigade sized units but using battalion scale rules - the ever popular General d'Armee.


At this point a word on my motivation. Kevin has been a long term friend and many readers will be familiar with the wonderful figure showing he made possible for our Waterloos at one to three scale in 2015 and Quatre Bras in 2017/18 (see many, many blog posts on them). JP had bought many of Kevin's French Perry Miniatures and Kevin, as a professional figure painter, continually keeps JP's collection topped up. I was both keen to meet JP and try one of his games as well as be reunited with some of Kev's fabulous figures for a day. I should add that most of the Prussians are Calpe figures and very nicely painted by JP himself.  Also, many eminent wargamers I know are keen on General D'Armee so I got the rulebook for my birthday and resolved to have a go some time. I must say (and I'm not the only one) I find the rule book hard to digest with it's great detail and many exceptions and additions, so with my ageing brain I was not going to tackle it alone. Happily JP and his highly capable 10 year old son, Charlie, have them down to a T and it proved a great demo game for Kevin, Ken and me.

We played from 1000  till 1630 with about 30 minutes for lunch and got through what seemed like about 8 or 9 moves. Bear in mind this was all done pretty much by JP's adjudication to us learners, and with adept players it would have been much quicker. Not much point me giving a full narrative but I hope you will get the  drift from my simple captions, and just enjoy the photos (apologies that I did not make an exact note of which village is which).

At an early stage Kevin occupies the forward village (Dolitz?)

I was given a Hussar "Division" which I put on my left flank,
 just as well as it turned out. No Prussians in sight yet

Prussian commanders Ken and Charlie confer with the umpire
as their first line advances. My Hussars threaten at left

Kevin's French in Dolitz under attack

My Hussars attack Prussian infantry who just managed to
form square and I lost the melee!

Charlie and Kevin discuss the options round Dolitz

A splendid view of Calpe Prussians about to advance on Dosen but my line and artillery fire ("Artillery Assault" ADC allocation) is intimidating them for the moment

As my Hussars retreated from the square to rally I was faced with an impressive array of allied cavalry, so my own infantry formed square, just in case......

....here is a top down view,
I'm trying in vain to bring round more infantry to cover the shaky cavalry

Paul B and Glenn visited our table and took great interest in the action.
Paul is helpfully familiar with the GdA rules

Occasionally, when they could be a***d to get the right activation roll my reserve heavy artillery helped give covering fire

Charlie's Prussians press on beyond Dolitz

My Hussars are getting repulsed piecemeal by Ken's Light cavalry

Oops! There go the others, and the infantry!

But happily the rules seem to allow them to reform quickly
 and fight on (below)

In the centre Charlie is making an advance on Dosen
 and I am countering with a Legere unit that has
already taken casualties

On our extreme right a unit of Prussian lancers had crossed the Pleisse River
and is trying to drive French infantry away from Connewitz

About this point Napoleon issued a no-nonsense order to pull our
 fingers out and released some of the reserves to help.
I was tempted to tell JP he was bullying ,
but that would hardly have been in period!!!

Above and below: What was he complaining about?
 Victor's and Augereau's  troops have a firm grip on Dosen

Above and below: At Meusdorf Ken's attack has been made scrappy by
my concerted artillery fire and now my local counter attack has
 brought him to a standstill

Lots of movement to see now: Young Guard and Italian infantry surge forward (Infantry Forwards order) to secure Probstheyda and an artillery battery from a serious threat by Ken's cavalry (I had knocked one unit back though). In the centre the Cuirassiers "Division" has been released and advances this way.

For the moment my flank looks safe from Ken
 but Charlie can be very proud of the progress he has made against Kevin

Here is a shot of the final move in which we hastily did charges and morale but not all the rest.
From the far side: Probsheyde - secure; Meusdorf - hard to see the Prussians gaining it; Dosen - French have the upper hand but it would be a tough fight; Dolitz - very clearly in Prussian hands and will make a fine base for later progress; Connewitz - French on the back foot but in possession - the umpire claims it is contested, who am I to argue?

At the outset JP had said it was to be the best of 5 villages and at 1630 pack-up time he declared it a draw. A fantastic game, full of incident and, as the moves went on, I began to see the appeal of General d'Armee, especially for those who have mastered the finer points. Thanks JP (and Charlie) for setting it all up and for being so patient with us newbies to the rules.

A bonus-
Although there are no traders Keith always very kindly let's me display some art work for sale and I'm pleased to say one of my very recent acrylic paintings (the French Cuirassiers near the centre of the photo) went off up North to Lancashire and allowed me to meet Norm of Battlefields and Warriors blog.

If you haven't seen it yet please take a look at my Art website chrisgregg-art.co.uk/themes/military

Another Bonus
Subsequent to this hectic day I have arranged a date for JP and Charlie to come to Oakridge and for me to introduce them to the joys of 18th century Imagi-nations using Honours of War. Maybe he will do a YouTube of it?........

And finally

I said it had a local feel - here are a few choice comments from the day:

On introducing myself to JP he said " I feel as if I know you already through your blog"

On introducing Ken to Keith he said " Oh yes, I've seen you on Chris' blog so often you're like a film star!"

And finally:
Having an after action chat with Keith we noticed a small baying mob in the background waving rule books to sign and selfie sticks, he said to me "Got to go, must keep the fans happy, you know what it's like......"
Actually Keith I don't :-).

Thanks though to all concerned for a fun day, and if you haven't yet had enough see more on great blogs by others: