Thursday 24 November 2016

One method of making a stream

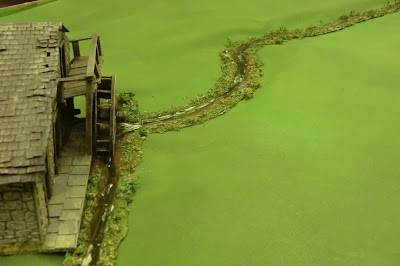
Recently I posted on the AMG Forum a few photos of "My next engagement", which will be the third in our series of test games of the Rank and File rules with a view to refighting Quatre Bras with 28mm figures at 1:20 scale. Here is quick look at the (fictitious) terrain ready.


It includes a rather lazy looking stream and I was asked by one of the members to do a "how I did  it" so I thought putting that on my blog might be of interest to a wider audience.

Some of you will have seen this stream before as it has featured in a couple of my games earlier this year and I'll have to ask your indulgence as I made it back in April and I'm having to rely on photos taken at the time as a memory jogger on the process.

It all started when Kevin devised a map for Test game 2 and I got to thinking about how to do the stream as I was a bit disenchanted with the home made one I had been using, on and off, for about 20 years. I had in store some hardboard strips I had prepared years ago and never got round to doing anything with them.

First of all I laid these down on the table to make them approximately fit Kevin's map. There is a little branch making a millrace.


You can imagine that they were once a single piece of hardboard marked into lengths and cut out. Then with a very sharp craft knife the sides were chamfered to leave about an inch wide flat top and sides sloping down to table level.


Now I'm going through a phase of being irritated by joins in terrain so I decided I wanted to minimise that this time by sticking the pieces together and then reinforcing the joins underneath with masking tape. Then I lightly glued them down onto paper to prevent paint spills on my table top. When it was finished I hoped to remove it as intact as possible and place on top of a books-and-cloth terrain.

Basic undercoat with any cheap water based household paint in some earthy colour
When dry I painted the flat course of  the stream with a
rich brown acrylic
Before the brown had dried completely I went over it with a deep green
(tube above, effect below)

And again while wet, highlights of acrylic white to emphasise the water flow
Below is the branch for the mill in close up
To make the shiny water effect needs at least 3 coats of gloss varnish.
I use the same varnish as on some of my acrylic paintings as it does not take
 too long to dry - even so, be patient
Get a nice even shine that reflects the light
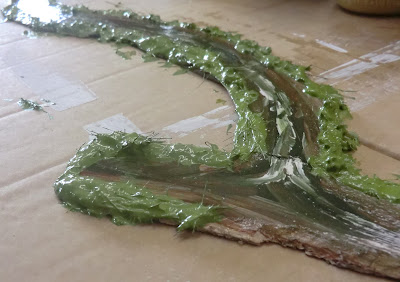
When dry it is time to do something on the banks, and each to his/her own taste on this. You will notice I have prised it off the paper and transferred it in long but manageable sized pieces onto a large piece of cardboard, as this stage is messy. Below are some of the main ingredients I used.
Acrylic Large grain structure gel, some texture - in this case a pot of cheap green
 granules bought at Hobbycraft, and paints of your choice, all put on with an old brush
Be careful to keep your hard earned glossy water reasonably clear of the mixture
I can't remember if this photo is of a lighter colour or just better lighting!
I think it is different as it leads into the next process.......
Some time ago I had scrapped an artificial Christmas tree. I used a lot of it for fir
trees (now long sold) but had evidently kept a lot of the trimmings.
Along with a lot of other kinds of "vegetation brushings" from my store cupboard
(some of it from making La Haye Sainte and Hougoumont no doubt) this was sprinkled
and pressed into the wet acrylic structure gel and paint mix
I appear to have added more dyed sawdust or static grass mixes as the intention is that
 none of the glossy structure gel will still show through. Wait for it to dry thoroughly,
 shake everything off, dry brush with lighter colours if you are not happy with it.
Spraying with matt varnish is a good way of sealing the mess but you will have to
 mask the glossy stream while you do it, or revarnish the water.
Because my stream originated in pieces it was relatively easy to use a sharp knife to cut it at strategic places for moving, and I've since cut it again so it's more like your conventional river sections, allowing some flexibility. At this point though every modeller will know what they want to do with it, but for completeness here's what happened next.

I laid the contours with cardboard, local newspapers and "The Radio Times"
and left a gap either side of the steam so I could put in bushes near "water level"
Now you can see why I wanted to be sure I had the right shape when I made it.
I used a bit more varnish to help seal the few splits I had made in the production process.
Close up near the water mill...........                 
...........and now the bushes have been added for the full battlefield (though some of the buildings got swapped before we played).
Finally the action of our Rank and File test game 2 - The battle of St Metard, is well under way. This was fought by James and Kevin over two days in late April.


Tuesday 1 November 2016

How I paint horses in oils by Kevin East

My wargaming buddy Kevin East rightly has many fans of his superb figure painting style. One suggested he does a tutorial on his method of painting horses using oil paint to get the lovely shading effects. So here it is ......


This is a quick run down on how I paint horses in oils:

 Naturally all the effort goes into the preparation of getting to the oil paint stage (1- 9)  This takes much longer than the oil painting stage itself which is actually the last element. I’ve illustrated a number of different coloured horses in the photos so you can see the progress unfold.

 PREPARATION:

 I use the following method to allow easy access for painting around the whole figure. 
Cut 1" diameter dowelling ( broom stick handle) into 30mm lengths. 
Take hot glue gun and stick model to top of dowelling. ( This provides a great holding implement to gain painting access to all areas of the model). 

ACRYLIC PAINTING PRIOR TO OILS: 


Get the horse ready to the stage where oils can be applied: 
1) Paint/spray the whole model black.( can be done before applying to dowelling) 
2) Paint all the horse furniture in standard paints with all the details - basically finish reins, all saddlery etc. 
3) Paint the whole of the horse skin in a brown 'slightly lighter tone' than your preferred final colour. Leave the socks and black area for leggings. 
4)Paint the horses eyes. 
5)Paint the socks and white on the horse in 3 shades. Only touch white where required.  
6)Paint the black leggings two shades of grey (getting lighter as you go) and then wash over with black ink. (This subdues the blatant shading differences. I practice this routine for all the reins too with its relevant colour wash).
7) Paint the hooves in two shades of buff where there is a white sock next to the hoof. 
8) Paint the hooves two shades of grey where there is a black sock next to the hoof. (Horses will have different 
coloured hooves depending on sock variations.
9) Paint the tail and mane the colour you wish and dry brush the two highlight colours on them. 

The horse is now ready for the oil painting: 

OIL PAINTING METHOD:

Oil paint required:-Titanium white, Paynes Grey, Ivory black, Burnt umber, Indian red (only use a spot of this when mixing the colour you want but it adds great warmth!), Brown Ochre, Raw sienna and Yellow ochre. Also some white spirit is required (unless you use water soluble oil paints – much more environmentally sound!), as well as a mixing palette ( I use the throw away paper ones) Toilet roll is also required
10) Only do the following process on one horse at a time. 
11) Mix a colour wash from the oils that is darker than the 'slightly lighter tone' of the skin colour of the horse. Mix in a lot of turpentine so it is very thin and runny (viscosity of milk).


 Paint the horse skin in this runny mixture so it covers all the areas of the 'slightly lighter tone'. 

Please be careful not to paint the black leggings, white socks, eyes, head stars, saddlery etc.  I use a couple of different sized brushes for this part so I can paint the head and fiddly bits with a fine brush and the rest with a broader brush. Clean your brushes in white spirit. 
12) Once the horse skin is covered take 4 untorn sheets of the toilet roll paper and fold in two. Place the horse in the toilet paper and fold it over the model so both sides of the horse is in contact with the toilet paper. 


Then apply pressure to wipe off excess paint but not too much. Compress the toilet paper under the belly, in between the legs, on the rump and on the face and everywhere (Do not wipe but compress).


The idea is to leave the runny paint in the recesses of the figure and leave smearing over the rest of the horse.
13) Mix a highlight colour from the oils that works with the remaining colour on the model. Mix this paint with a little white spirit. Paint the highlight muscle areas in this colour and merge with the background colour. 


Use of the same two brushes is useful here. 
14) As item 13) - Paint a lighter highlight on top of item 13) and merge. 


15) Leave the horse to dry for at least 3 days.  (Ha! - he should have warned of that in paragraph 1!!! -  now mine won't be ready for Saturday! - CG)


16) Spray gloss varnish. 
17) Spray matt varnish.
18) Paint gloss varnish any metal items. 
19) Remove model from dowelling by use of a chisel under hot weld glue.
20) Base as required.

I find items 10) to 14) in the oil painting section takes me 10 minutes per horse so I am generally getting 6 horses finished an hour. The whole thing sounds long and protracted but it is quick once you get the hang of things.  I hope the photos to support the above have helped in grasping the process. Many thanks to Chris for placing this piece on his  blog.  I hope the viewer finds this interesting and useful enough to try out! Painting in oils is a special experience! 

And here’s some views of the finished models.


Saturday 20 August 2016

Collect and Paint your Napoleonics like Kevin

On one of my blog postings from a couple of years ago, when Kevin East was busy building up his superb 28mm Waterloo collection for our 1:3 scale Waterloo refights, a reader (Suzzette in Texas) has recently asked
<<I am looking for a beginner set. What would you recommend?>>

Kevin has given a very full reply and I thought it worth giving it a wider airing by a dedicated blog posting.
So here is what he said and below it a few photos as a reminder of Kevin's skill and artistic flair.

Are you looking for a starter set of figures or paints?

If its paints I would recommend the foundry paint system (which is what I mostly use) They are useful as each colour comes with three shades for the dark, mid and light tones of any particular colour you want. The Napoleonic paint starter set is ideal for British and French units. It is what I started on. Please see the link: http://www.wargamesfoundry.com/paints/foundry-painting-system/napoleonic-paint-set/

Paint brushes are always the bone of contention as getting good ones at reasonable prices are difficult. Foundry do some good ones but are not the best. They are good to start with though:http://www.wargamesfoundry.com/paints/foundry-brush-sets

I have found Rosemary and Co - Kolinsky sable Series 22 - just the best! Perhaps for future projects though? Please see here: 
http://www.rosemaryandco.com/oil-brushes/pure-kolinsky-sable-oils/pure-kolinsky-designer

For figures, I prefer, Perry Miniatures metal although I do and have painted some of their plastic ranges as they are cheaper especially when you require a lot of figures. Beware as they are fiddly to construct as they are like putting together an Airfix kit for some of the figures. They do French, British, Prussian and Austrian plastic brigade deals. The cheapest being £78. Please see :
https://www.perry-miniatures.com/product_info.php?cPath=66_68&products_id=2537&osCsid=u89o0vjabhgqapekma4b6lndg0

Also Warlord games do a nice if not better starter combination set where you get Allied/British and French protagonists. Some plastic, some metal in the pack as well as the bonus of some cavalry to paint. Please see: https://store.warlordgames.com/collections/black-powder-starter-sets/products/waterloo-black-powder-starter-set

Oh and just for good measure if you want to see the uniform colours of units at Waterloo I suggest this as your first stop: http://centjours.mont-saint-jean.com

Good luck with that long list. If you need any further info please leave another message.
Happy painting and I hope you get to into the hobby as it does become very engrossing! ENJOY!

All the best and kind regards.

Kevin 


And here is a link to just one of the many of my blog postings featuring Kevin's figures

Tuesday 16 August 2016

Clash at Kutzdorf - our second HoW test game

I got very many pleasant comments on my first foray into playing with the Honours of War rules - St Ulrich scenario so thank you to all who visited and commented. Here is my take on the second scenario from the book, aided and abetted by fellow members of the A Military Gentleman (AMG) Forum- Ken and Guy, who travelled to the Cotswolds from Wiltshire and Windsor respectively, with me as organiser and umpire.

Here they are acting up a bit near the start of the game.

As with the first test I enlarged both the battlefield and the forces to make better use of the 8 ft x 6 ft playing area. In doing so I tried to keep to the spirit of the scenario but gave potential Victory Points for various bits of terrain and allowed free deployment within the same start lines as the original.

Here is my map with deployment areas marked.
And an edited version of the briefings for both sides:

FRENCH

The blue line shows your deployment limit and the map gives some idea of the size of standard units, please allow a bit more space for large units. 

Background and objective
The Chevalier de Neuvalee failed twice in his attempt to break across the border into Grunburg county of the Elektorate of Reikland (A vassal of the Empire). That was the two actions at St Ulrich. It is now a day later and Neuvalee has retreated to high ground overlooking the village of Kutzdorf. Some of the St Ulrich units are recovering but his army has been reinforced by more French, and a light infantry unit from Savoy. However, the Reikland forces and their Imperial backers have been emboldened by victory and are pressing on into this area of French influence. Your orders are  to nip this invasion in the bud before things get serious, so you are to take and hold Kutzdorf villlage (1 Army Point) and counter attack the Count of Grunburg's force and drive it away. In case of the need for further reinforcements it is vital you do not lose the high ground (1 Army point for each Hill) or the road North of Kutzdorf (1 Army Point).

Intelligence
Grunburg's force is slightly larger than yours and he has more artillery and more light infantry. Also the Elite units of the Erbprinz Grenadiers and the Grunburg Dragoon Regiment, which inflicted such damage at St Ulrich, are believed to be in the forefront of this invading force. They can be expected to be deployed up to the red line on the map.


IMPERIAL 

The red line shows your deployment limit ................ 

Background and objective
The Chevalier de Neuvalee failed twice in his attempt to break across the border into Grunburg county of the Elektorate of Reikland (A vassal of the Empire). That was the two actions at St Ulrich. It is now a day later and Neuvalee has evidently retreated to high ground overlooking the village of Kutzdorf.  However, the Reikland forces and your Imperial backers have been emboldened by victory and you have been ordered to press on into this area of French influence and cause further embarrassment for the French and Savoy army.  So your initial aim is to take and hold Kutzdorf village (1 Army Point) as a forward base and attack the Chevalier on the high ground to command the terrain beyond (1 Army point for each Hill). Obviously, in order to proceed once the French are beaten, you will need also to command the road North of Kutzdorf (1 Army Point).

Intelligence
Your Grunburg/Imperial force is slightly larger than your opponent and you have more artillery and more light infantry. You can expect most of the regiments that took part at St Ulrich to be recovering some way off by now, but reconnaissance suggests that they have been replaced by even more, and fresh, troops. They can be expected to be deployed up to the blue line on the map, and the presence of small skirmishing parties indicates that light infantry are now present too.  

And the Orders of Battle for each side giving the names of the units from my pseudo-historical Imagi-nation armies and their quality and size for the purposes of HoW.  We have found that, with diffrent figure and base sizes, the number of bases per unit is less important than the frontage falling into a common width (for us between 21 and 26 cm for a standard infantry battalion). For 3 units battalion gun models have been used within this concept.

FRENCH/SAVOY (Guy)

Unit Nr
Unit Name
Quality
Nr of bases
Size of unit
Comments
Commanding General
Chevalier de Neuvalee
Unrated
1


1st Infantry Brigade Commander
Baron Joubarbe
Dependable
1


1
1st Bn Languedoc Inf regiment
standard
4
standard

2
 2nd Bn Languedoc Inf regiment
standard
4
standard

3
Battalion Infanterie de la Marine
standard
5
Large
inc Bn gun
4
1st Royal Artillery Battery
standard
1
standard
Medium
2nd Infantry Brigade Commander
General D’Ancolie
Dependable
1


5
1st Bn La Reine Inf regiment
standard
4
standard

6
2nd Bn La Reine Inf regiment
standard
4
standard

7
Grenadiers of Hainault
Superior
4
small

8
2nd Royal Artillery Battery
standard
1
standard
Medium
Independent Battalion
Arquebusiers d’Argentiere (Light Inf)
Inferior
5
standard


Cavalry Brigade Commander
Comte de Berard
Dashing
1


9
Royal Dragoon Regiment
Superior
7
Large

10
1st Apchon Dragoons
standard
6
standard

11
2nd Apchon Dragoons
standard
6
standard


TOTAL

55


Army Break Point
6


IMPERIAL/REIKLAND (Ken)

Unit Nr
Unit Name
Quality
Size of unit
Nr of bases
Comments
Commanding General
General Count Von Grunburg
Unrated

1

Infantry Brigade Commander
General Von Reife
Dependable

1

14
1st Bn 3rd Grunburg Infantry Regiment
standard
standard
4

15
2nd Bn 3rd Grunburg Infantry Regiment
standard
standard
4

16
Erbprinz Infantry Regiment
Superior
large
6

17
Hessian Inf Bn Canitz
standard
standard
5
inc Bn gun
18
Hessian Inf Bn Prinz Ysenburg
standard
standard
5
inc Bn gun
19
1st Reikland Artillery Battery
standard
standard
1
Medium
Artillery Brigade Commander
Colonel von Kugel
Dependable


20
2nd Reikland Artillery Battery
standard
standard
1
Medium
21
3rd Reikland Artillery Battery
standard
standard
1
Medium
Cavalry Brigade Commander
General Von Kingsegg
Dependable

1

22
1st Finkenstein Dragoons 
standard
standard
6

23
2nd Finkenstein Dragoons 
standard
standard
6

Independent regiment


24
Grunburg Dragoon Regiment
Superior
large
7

Light Infantry Brigade Commander
General von Kotztoter
Dashing


25
Liccaner Grenz Light inf battalion
inferior
standard
5

26
Le Noble Jager Battalion
inferior
standard
5


TOTAL


59


Army Break Point
7


Although the Imperial side was designated the Attacker the original scenario did not make them very significantly larger so neither did I. I did, however, give the Reikland army two large and superior units. The objectives were intended to give both sides an incentive to attack, but the game got off to a hesitant start with both wargamers using up many of their "quota' of "1s" in the first two moves!

These two photos show the position at the end of Move 1, both gamers were, in my opinion, over influenced by the deployments shown in the book.
The Imperial Army at far end has the 5 battalion infantry brigade deployed in the centre with the Finkenstein Dragoons on the right and Grunburg Dragoons as central reserve. The two-gun battery started on the road and the two light infantry battalions started behind the large wood but a fortuitous double move got the Liccaner Grenzers to the far edge in one go.
This is the French right but see the photo above for the rest of the line. The Dragoons occupied the left, but half of the Apchon regiment was kept back under cover of the hill. Guy realised the penalty of this with his first "out of command" initiative so sent the Comte de Berard over to collect them, thus delaying his advance by a move. Baron Joubarbe's 1st Infantry brigade protected the left hand hill and General D'Ancolie's 2nd Brigade took the right hand hill. Using the logical crest line rules I allowed 5 of guy's units to be off table, out of sight (locations shown by the pale grey number chits). His light infantry battalion faced the big woods.
Ken split his infantry brigade with the 2 Reikland battalions "observing" Kutzdorf (had he read his orders?!) and the 3 Hessian battalions, including the large Erbprinz Grenadier battalion, making a bold advance on the near hill.
That had the desired effect as, when command rolls allowed, Guy brought his whole line forward towards the front slope to  meet the threat. Here are one battalion of La Reine and the small Hainault Grenadier battalion with General D'Ancolie and Le Chevalier de Neuvalee prominent.
Second Battalion of Lanquedoc mounted the crest too, led by Baron Joubarbe  
On the left the "dashing" Comte de Berard was biding his time and ensuring that the cavalry and the Infanterie de la Marine, kept pace. (Yes, I guess the battalion gunners should have blue waistcoats but repainting these was a casualty of my overall rebasing schedule!)
Count von Grunburg's view of the Hessian advance. General von Reife watches from the gun position so he can also keep tabs on the other half of his brigade. 
Le Noble Jager Battalion backs up the Grenzers and is now near enough to be visible.
A bit later this was the overall situation. On the left the Grenzers have suffered the first set back, being repulsed by the fire of the Arquebusiers d'Argentiere. All other eyes are on the Hessian advance since both commanders seem content to watch each other warily in the vicinity of Kutzdorf.  Long range cannon fire from both sides is inflicting steady, but not significant casualties, as yet.
Not committing himself but Guy wheels the Royal Dragoons to make any Imperial attack West of Kutzdorf very difficult
Ken is bravely attacking the hill.  Suffering volley fire and canister Canitz regiment has had to fall back, and has been passed through by the Erbprinz Grenadiers. In the distance Le Noble and the Arquebusiers engage in a light infantry exchange of musketry
Don't you just love the strange expressions pulled by wargamers contemplating a knotty tactical situation? :-)
This photo shows more clearly how the Imperial deployment has stretched itself leaving insufficient troops to bring overwhelming weight at any point. I had, only half jokingly, been urging Ken to charge through the centre with the Grunburg Dragoons. He most likely would have lost them but they would have taken the heat off his infantry assault.
A closer view of the Prinz Ysenburg battalion's engagement with the Hainault Grenadiers; the battalion gun enables "infantry" fire at 30cm instead of 20cm.
A close up of the Reikland guns (painted as Austrians) with the two battalions of the 3rd Regiment of Reikland Foot beyond.(painted as British Royal regiment). The second line of these infantry was by now suffering occasionally from the "grazing fire" rule when fired at by Guy's hill top battery. By the way that is Willz' AMG 16 casualty marker figure gift getting shot in the back!
The Liccaner Grenz battalion, being inferior light infantry in accordance with the rules, had to keep retreating to more than 60cm from the enemy before it could start to recover lost hits.
This was the point we decided to repair to "The Butcher's Arms" for a well deserved lunch and a pint. (Alison's vegetarian club sandwich made to my recommended ingredients was a-maz-ing! - thank you)

This proved to be the high point of the game. Ysenburg contains the Hainault Grenadiers while the large battalion of Erbprinz Grenadiers attacks one of the La Reine battalions with the bayonet, supported by the now-recovered Canitz battalion.
Despite being a "superior" status target the volley fire and canister raised its 2 hits to 5 and it was "Done For", routing through Canitz and not able to recover, so lost to this game. Sadly for Ken, Ysenburg also suffered badly and ran. One bright spot was that Le Noble Jagers won their skirmishing contest and had sent the Savoy light infantry battalion retreating two moves. It was difficult for the "dashing" von Kotztoter to leave the Jagers though, to bring back the Grenzers.

So this was the situation during Move 5:
Ken had little choice but to pull back the exposed Canitz battalion, but the Jagers were prevented from pressing further by being attacked by Guy who got a double move that time and was able to complete the manoeuvres. Around Kutzdorf there was bit of a stand-off with neither side feeling strong enough to press an attack yet. Ken's "grand battery" was off putting even to Guy's infantry superiority.

View from the French right hand hill
More thoughtful expressions. Ken has to retreat Canitz even further to rally off their hits and meanwhile he has lost the Jager battalion "Done for" in the fight against the Hainault Grenadiers who themselves have to retreat from losses. Guy is now worried about reforming his right flank in case those Grunburg Dragoons try something desperate. His Marine battalion on the left flank kept suffering hits from the artillery battery but the distance from the enemy enabled the unit to recover quickly.
Close up of the Canitz Regiment just because they and Ysenburg are my new Fife and Drum Miniatures Hessians, obtained from the charming Graham Cummings at Crann Tara Miniatures. The pile of equipment on the casualty base was one of several just nicked for the day from my Waterloo armies to indicate the unit with 4 hits could not advance till it reformed.
The situation during Move 7:
Lots of action this Move as Guy had decided his French would go on the offensive and he got useful command rolls to help.
The left flank Dragoons move on Kutzdorf to cover the advance of the Marine infantry up the road. Royal Dragoons canter along the line of Languedoc to occupy a threatening position in the centre. Both battalions of La Reine now advance to keep the Imperial refused left flank on edge. For the moment their exposed flank to the wood is ignored while the Arquebusiers are gathering strength again on the extreme right.

View from the French left hand hill
At this point Ken had his first stroke of luck. Up to now all dice rolls for casualties among leaders had been negative for both sides but as General D'Ancolie led La Reine forward he was severely injured by a round from a Reikland battery and his place taken by a "Dithering" subordinate. Luckily for Guy Neuvalee was within 15cm so was able to mitigate the ditherer's uncertainty somewhat!

A closer view of the Marine column about to approach Kutzdorf............
...............But fast forward to Move 10! They occupied the village and started to fire at the Finkenstein Dragoons but Colonel von Kugel found that his Reikland battery was within angle and range to play canister on the sturdy buildings of Kutzdorf and it only took two moves of that treatment to get the Infanterie de la Marine on the run. Just to add to Guy's discomfiture a blast of canister cut down Baron Joubarbe as he was urging the Marines to hold their ground. So both French infantry brigade commanders were now "Dithering".
As the French right wing advanced the Light infantry of both sides had recovered and began a fire fight in the large woods
Ken had to redeploy his three remaining infantry battalions to cover the gap across to Kutzdorf, but the Apchon Dragoons were now emboldened to advance on the other side of the village - outside the angle of canister at the moment.
Both Dragoon regiments were evenly matched, being 24 figure units in my old scale which I broke down into two wings for use with HoW, each wing might represent 3 or 4 squadrons (what is the correct word for half a cavalry regiment?). The only difference was that the French cavalry commander was "Dashing" and that his rear wing was getting casualties from one of Ken's guns, now turned to face. 
Despite the losses to the supporting wing the forward wing of Apchon pushed
back the first wing of Finkenstein..........
......but then they in turn were attacked by Finkenstein 2 and failed the counter charge roll. Apchon 2 suffered more from canister and decided to retreat while it could, leaving their colleagues unsupported in the melee.
This wider photo also shows a lot more action: One battalion of Languedoc is now in column approaching Kutzdorf; the Royal Dragoons are teasing the remaining battalion of 3rd Reikland whose sister battalion has fled from artillery pounding (that cursed grazing fire!). However Ken had given as good as he got by seeing off one of the La Reine battalions with artillery. The Liccaner Grenzers have been ejected from the big wood.
At this stage  (Move 11) it felt, visually, like Guy's French had only a slight upper hand, as, except for cavalry, Ken had been constantly giving ground and losing units. I was keeping a private check on Army Points lost and at this time it was French 2.5 and Imperial 4.5, with two French generals now dithering and no one having any terrain points.

As the cavalry melee resolved Apchon 1 broke and were caught up by Finkenstein 2 and slaughtered!

It was now around 6pm and we'd played 12 Moves. Coincidentally that was the amount I had written in my notebook at the start as an aim and it coincided with the time my visitors had to go.  The following two photos give a general view at the end (with the exception of the Canitz battalion which Ken had taken out of line to have a play with frontages compared to his own figures!)  To be honest it was a bit scrappy for both sides. Army Points lost were now - French 3.5 and Imperial 4.5, and neither had anything for terrain since the French were in possession of their hills and road at the start and no longer had Kutzdorf.  Ken claimed that if we had played one more move he could have evened up the points, and no one disputed that so both "Military Gentlemen of the 18th century" called it an honourable draw.


Some more thoughts on "Honours of War"
As a balanced wargame this scenario is a bit strange but as a rules learning game for us all it was great. The deployment used by both sides gave plenty of room for manoeuvre and that's just what they did all day. The command structure rules kept discipline most of the time and each commander had some tough decisions about how to keep the action going with diverse brigades on a wide front. To me it felt like an 18th century battle should, and with two 18th century enthusiasts in charge we had no silly situations or gamesmanship to worry about, they were both in learning mode but both very astute wargamers. Overall a huge plus and I'm loving the games played so far with HoW.

This scenario introduced Light Infantry and past experience in other rules had made me very wary so I gave the French one as well as the two Imperial battalions of the original scenario. However, I was pleasantly surprised that, as long as you make them "inferior" they are far from the super units that reading the rules makes them appear. They cannot easily take on line units, and I'm happy with the balance.

On the down side I'm having a few issues. I don't like that any unit with 5 hits is automatically out of the game; I'd prefer to see some dice chance and/or rallying by a general and then a longer recovery time. Even the "large" and "superior" Erbprinz Grenadiers could not withstand a volley added to a canister salvo. Ken had no chance to withdraw them at 3 hits as the rules suggest. A bit like Black Powder I think these rules are best for really big games where you can afford to lose units quickly as long as you can back them up with successive waves. In this medium sized engagement poor Ken had really run out of winning options once his infantry attack failed.  Guy thought that in reality his army would have stayed on the defensive after that, holding the high ground, but he wanted to make a game of it by counter attacking. That went on to prove what we have seen in other HoW games that he who can stay stationary to shoot before a melee usually comes out on top. That may need fixing somehow as there is little incentive for infantry to attack with cold steel - maybe that is deliberate and it's our tactics at fault? (Think of the French at Quebec!).

I'm not happy that wounded or killed leaders are replaced immediately always with some lower capability replacement. I'd prefer, say, a D/Average number of turns at lower level then dice for the quality of a replacement from the C-in-C's staff pool.

Grazing fire makes it very detrimental to arrange your battle array as historically realistic successive lines. We reduced the effectiveness against third lines but I think we need to do that for second lines too.

Sorry to winge, I love you really HoW!  Any readers thoughts welcome and apologies if these issues have been dealt with on the HoW Forum but I've never made time to peruse it.

Thanks to Ken and Guy for making the journey and giving up a working day to keep this old pensioner entertained!  I really enjoyed it, and this is what wargaming is about to me - a leisurely day playing a historically serious game but in an Imagi-nations context allowing the occasional moment of hilarity. HoW has a basic structure on which layers of imagination can be applied, or pure history if you wish.