Thank you for all the appreciative comments on Guy's Battle of Brampton 1745 received on here and in various social media Forums. It now gives me great pleasure to present to you our other post lockdown game that same weekend, as trailed on Battle of the River Mur. This was organised by Ken Marshall who artfully set it within his 1753 Imagi-nations campaign between the Electoral and Ducal forces. Ken supplied the entire armies made up of 1:56 scale Minden, Fife and Drum and Crann Tara miniatures, and I'm sure you will agree they look very fine.
 |
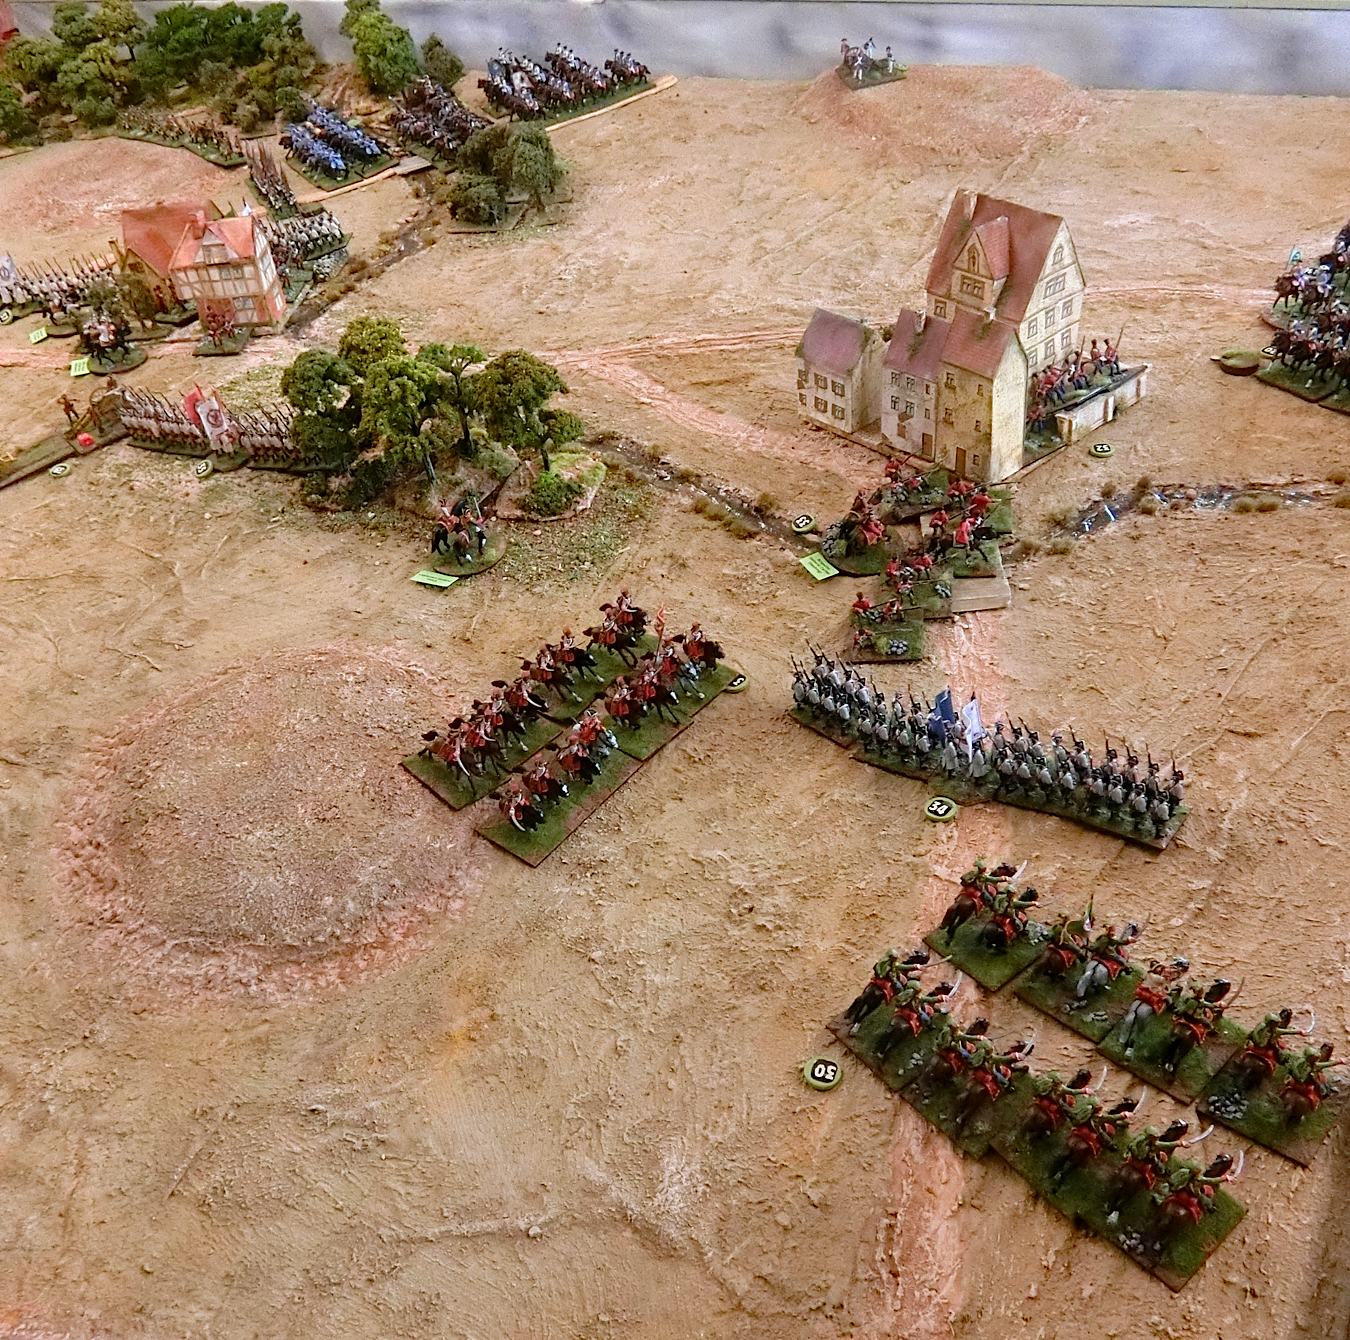
| Here is a reminder of the battlefield in photo-map form |
Our newly-found Cheltenham wargamer, Paul B. joined us for his first Honours of War game playing the role of General von Stutterheim. As the (Prussian and Hanoverian style) Electoral commander, von Sydow, I set him the difficult task of leading the charge for our sole objective at the river crossing of Stadl an der Mur. Guy Barlow handled the opposing force of Austrian type Ducal troops. Ken takes up the story; photos and text by CG.
Those who are interested can find a PDF of Ken's full briefs, maps orbats and objectives in the Imagi-Nations Download section
The Mur Valley Campaign – September 1753.
Stadl - After Action Report
The first moves were made by von Stutterheim on the right flank in accordance with von Sydow’s plan as he pushed the Electoral advance guard and light units towards Paal and Stadl. A rapid advance would take advantage of the confusion in the Ducal forces whilst they attempted to form up.
 |
| Here is the Electoral plan of attack. You can see how little information we were given on the enemy- nothing at all about the Advance Guard round the Polsbach nor the Grenadiers near Stadl. River Mur is impassible and so are the big woods except for light infantry. You can read Von Sydow's plan and instructions here |
 |
| Paul contemplates the task before him...but we were both to be fooled as Guy had to roll dice for the actual dispositions and states of readiness of his on-table brigades. What you see below is not quite how it turned out for the Ducal side |
On the Ducal side, Schirmer’s heavy cavalry brigade was the first to react, moving to block the direct route to Stadl and screen the Ducal infantry and grenadiers who were slower to assemble (Count Guilau’s dice throwing for activation wasn’t as successful as he hoped for – the two infantry brigades were going to take a couple of moves before they were formed up). Behind them, the officers and NCOs of the infantry regiments assembled their men and chivvied them into formation. The Ducal light troops followed shortly after, moving to occupying St Georgen and Paal.
 |
| At left the main infantry brigade is still in column of march |
 |
| Schirmer's cavalry move onto the hill to pose a threat as Stutterheim's Advance Guard crosses the Doppelsbach |
 |
| Ducal Light troops head for St Georgen |
First blood went to the right flank Electoral artillery who had unlimbered on a hill south of Paal and targeted the Schirmer Dragoons, causing 2 hits. The Ducal cavalry brigade retired towards the main road, out of the line of fire but their presence had bought enough time for General Jüngermann‘s infantry brigade to form a defensive line around Paal.
 |
| Schirmers Dragoons scuttle back to the main road line after a taste of Electoral gunnery |
 |
| This is the artillery doing the damage, and the gunners did not hesitate to target cavalry whenever they showed round the edge of Paal farm |
The Electoral advance guard continued their push across the Goppelsbach towards Stadl with the Hacke Grenadiers leading supported by the Barowski hussars and General Czettritz’s heavy cavalry brigade. Regiments from Jüngermann’s brigade attempted to intervene. A short, intense musketry duel followed and an Electoral dragoon regiment charged into the fray in support of the grenadiers.
 |
| Electoral Grenadiers forge ahead followed by Hussars of the Advance Guard |
 |
| At this point the Ducal forces are a bit cautious and giving way to Stutterheim's advance |
 |
The Hussars, Jagers and Grenadiers have made some progress in the direction of Stadl but Ducal General Jungermann now sends forward two musketeer battalions to match them. But note that General Czettritz has now arrived with his Heavy cavalry brigade and faces an open flank on the musketeers
|
 |
| A distant view from the local Stadl garrison artillery position....... |
 |
| ......and from the Ducal Heavy cavalry, still shy of showing themselves past the Paal BUA |
 |
| This top down view shows the infantry firefight to the left of Paal and the nicely open flank presented to the Electoral cavalry, which are still in column of march. Paul would need a Double Move roll to take advantage though...... |
 |
.........and that is just what he got!! In our best move of the game he was able to change formation, position himself along the Goppelsbach and charge. The receiving infantry failed to score high enough to react and were rolled up. Taking the second battalion along with them due to the extra "hit" loss from fleeing friends.
|
When the smoke cleared, only Hacke’s grenadiers remained on the field. General Jüngermann was the most notable casualty but also with two of his infantry regiments routing and the Electoral dragoons retreating.
 |
| This shows the two Ducal musketeer battalions fleeing; and luckily for Guy he had moved his Heavy Cavalry out of their way just in time! Rettenburg's Grenadier brigade moves forward in the foreground |
With Jüngermann’s infantry in disarray, Rettenburg’s grenadiers took on the challenge and advanced to fill the gap. On the Electoral side, von Hülsen’s infantry brigade advanced towards the Goppelsbach.
 |
| Here is a nice close up of Ken's Prussian style infantry being used as von Hulsen's brigade deployed in line to come across the Goppelsbach fighting! But those cavalry of Czettritz are in their way. |
On the Electoral left, von Sydow was also active. Aware that several of his brigade commanders were not known for their initiative, he had been encouraging them forward in accordance with the plan. The thunder of hooves south of St Georgen announced the first arrivals on the table, von Bohlen’s dragoon brigade aiming to pass to the west of the village.
 |
| Pretty but dithering - von Bohlen's Dragoon brigade arrives. Ken had restricted the Electoral Army to only two initiative units per Move so I put off anything on this flank till Move Three. By then the enemy light troops had gained all the cover, as seen below |
 |
| In accordance with our plan it seemed to make sense to "sacrifice" these cavalry to give my two infantry brigades some space and time to arrive |
General Cartier commanding the Ducal advance guard on the right flank had been enjoying the sun as his brigade waited for something interesting to happen. The general was quick to react (aided by some good dice rolling). Passing close to St Georgen, the leading Electoral dragoon regiment strayed too close to the buildings and suffered musketry fire from the grenze battalion occupying them. The Effern Infantry Regiment took up a blocking position north of the village, facing them down and the dragoons came to a sudden halt whilst their commander, von Bohlen, dithered about what to do next. The decision was made for him when the infantry opened fire, their volleys emptying many saddles in the leading regiment. The Werner Dragoons recoiled back through their supporting regiment and retired to lick their wounds. The Bohlen Dragoons hardly had any time to grasp what had just happened before the Effern Infantry gave them the same treatment and they also retired.
 |
| While Paul is focused on making Stutterheim's advance work on the far side, in the foreground my Dragoons are suffering and you can just see the head of Lattorff's column |
Following onto the table behind the dragoons was General Lattorff’s infantry brigade in column of march, his troops leaving St Georgen to their left and heading towards Paal.  |
| General Lattorff's lovely vignette model looks dynamic but he's just "Dependable" for this game. |
General Cartier’s skill with the dice continued and presented with the flank of the infantry columns, his brigade rolled for a compulsory advance and charged any Electoral forces within reach. Faced with a mass of hussars and grenze swarming towards them screaming various obscenities, Lattorff’s troops reacted according to their training and with the exception of the leading regiment caught in march column, formed line and turned to face the oncoming tide.  |
| Some of Cartier's light troops have an open flank in their sights but not quite enough move distance to get there even with the double move |
 |
| This view from above shows one battalion being assailed by Grenzers from St Georgen. Hussars line up for a charge and more Grenzers start to skirmish against Stutterheim's infantry. Ducal infantry musketry is finishing off one of Bohlen's Dragoon regiments in the distance. |
The hussars and grenze piled in but the odds were against them and the rigid discipline of the Electoral troops served them well. By the time the smoke cleared, the Electoral line remained intact and the Ducal light troops were retreating or dispersed. However, they had brought the Electoral left flank advance to a halt.
 |
| Above and below: Lattorff's disciplined redcoats see off the enemy light troops |
 |
| Hussars are repelled by musketry |
Back on the right, von Stutterheim was struggling to deploy his additional troops. (CG Note: Paul rolled a 1 for von Hulsen's initiative on his first chance to advance over the Gopplesbach. All he could do was shuffle a bit to make better use of the space. Something similar happened in the next move and by that time, Guy, never one to be tardy, had pressed his own troops forward along the stream)
 |
| Above and below: Guy is on a roll now, inspired by Cartier's initiative on his right flank he is moving the whole army forward,Wellington-like! |
The advance of Rettenburg’s grenadiers was pushing Stutterheim's troops back towards the woods and with von Hülsen’s brigade blocking passage back across the Goppelsbach, they had no way out. He ordered the only two regiments immediately available to him forward in an attempt to create the necessary space.
 |
| Electoral Jagers have been forced back and the Ducal infantry come forward relentlessly |
 |
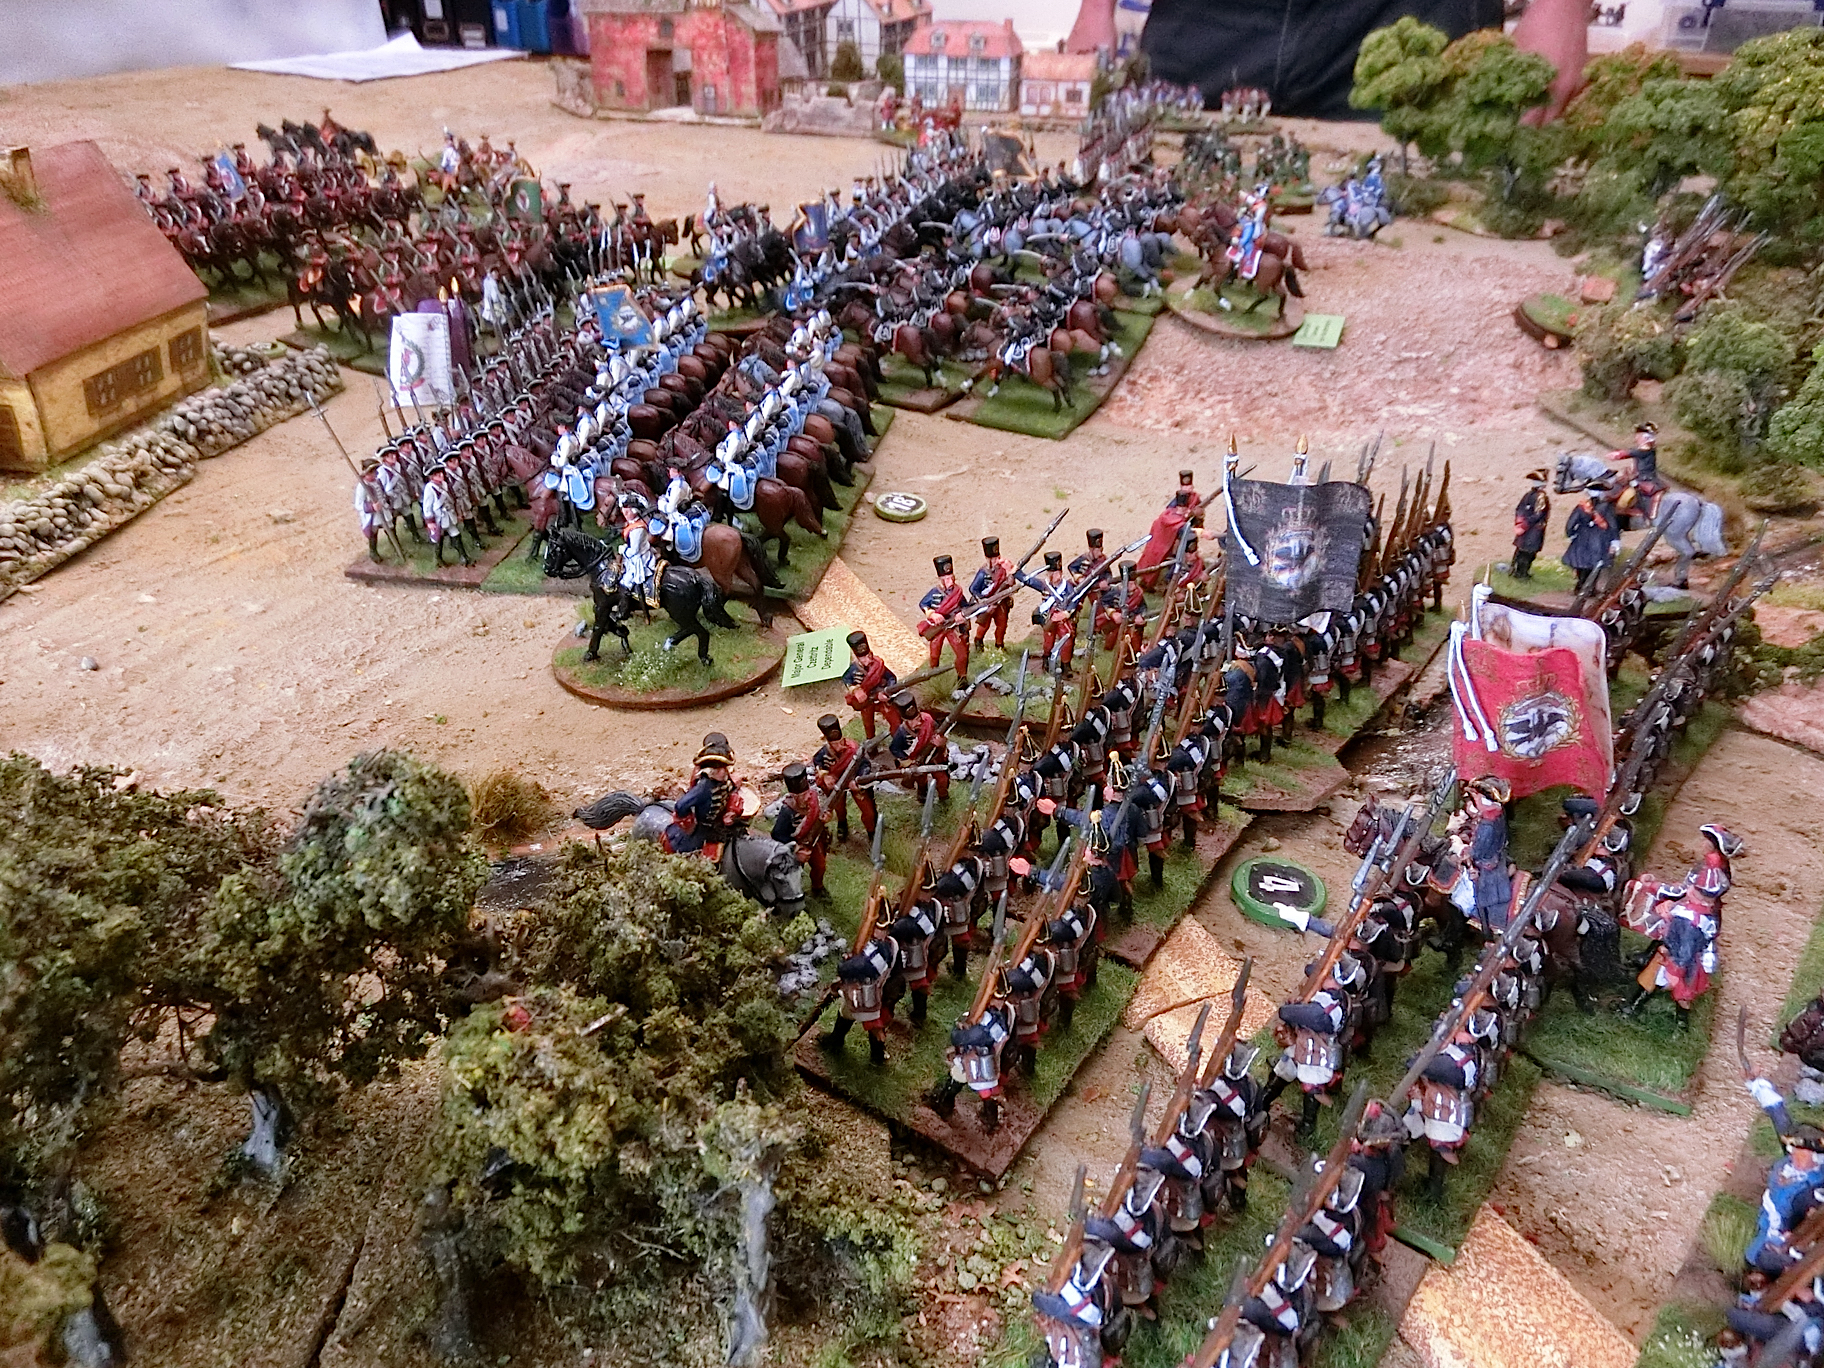
| Hussars and Kurassiere are Stutterheim's only hope now as his infantry are blocked |
 |
| In go the Krockow Kurassiere. Count Guilau stands nearby to urge on the "dithering" substitute for the lost General Jungermann |
 |
| And the Linsingen Kurassiere move forward to match the Osetenreich Hussars |
 |
| In the foreground this battalion of Grenzers had moved forward to skirmish against the Electoral infantry, who charged to try to sweep them away. The plucky chaps knew they were blocking the access route so just stood their ground and fought a melee against the formed troops |
The attempt failed. The two cavalry regiments were met by the Linsingen Kurassiere and Malsberg Regiment and pushed back onto the reforming Electoral second line.
 |
| But the Grenzers were defeated and finished off. This photo also shows the Electoral cavalry pushed back with no way through to Stadl |
The last action and final insult to the Electoral troops happened on the far right of their line. Kleist’s Jager battalion has spent most of the game infiltrating through the woods to the south of Stadl, although some unkind observers noting how long it had taken them to get there might suggest that faced with the prospect of imminent action they had dawdled or even stopped off for a post lunchtime nap. They eventually emerged alongside the Mur where they moved north to support the Anhalt Jager and faced off against one of Rettenburg’s grenadier regiments. Seizing their opportunity, the Stadl militia opened fire on them.
 |
| Kleist's Jagers receive frontal and flanking fire |
The shock was too much for the jager who headed back for the shelter of the trees and created a legend amongst the militia forces throughout the Grand Duchy. Some might say that close range musketry from a superior grenadier regiment had a lot to do with why the jager ran, but that part of the story gets glossed over in the local histories. (In years to come, the editor of the local paper assessed the number of militia who claimed to have taken part in the action at Stadl at over twice the total population of the town, so popular was the legend).
(CG Note: On the Electoral left the pesky light troops still proved to be a problem - another regiment of Hussars hurtled forward only to be repelled by the Werner Dragoons and light gun canister fire, as shown below)
 |
The Von Rebentisch brigade finally made an appearance but Guy had done such a good job of
keeping the Electoral forces pressed back they had no room to do anything other than march along
the baseline towards Stadl! |
And that is the point at which we leave the battle, with it having reached a natural break. West of Paal, the Ducal light troops are retiring, their impetuous actions having disrupted the Electoral advance and caused significant delays. To the east, Electoral forces are in retreat, hemmed in by the woods and General von Hülsen’s troops still blocking the road.
Outcome
It’s going to take a while for the Electoral generals to sort that out and get moving again. Overall numbers still favour von Sydow providing he can create the space to use them but for now Count Guilau has satisfied his victory conditions. Hard luck on von Sydow and von Stutterheim but they just ran out of time.
If we had played out another 3-4 moves, I could see the Count pulling the remains of his advance guard back to Paal and the Ducal forces coming under increasing pressure to hold the Stadl – Paal line against the Electoral infantry. Ultimately, the Count has not got the infantry he needs to hold everything against a determined advance so is going to have to make some decisions. If he was lucky, there was a possibility that Dickmeis’s infantry brigade would make an appearance as the first of the coalition troops heading to the forming up area but that’s not something he knew about.
In truth, that brigade was a contingency to be deployed at the umpire’s discretion if the Ducal forces failed to activate or collapsed within the first couple of turns and it looked as though the battle would be over by lunchtime. In the end they weren’t needed so stayed in their box.
As to our protagonists, aware of dust clouds heralding the arrival of Ducal reinforcements and not liking his chances of forcing passage across the river at Stadl, von Sydow gave the order to retire.
 |
An overall view at the high point of Cartier's light troops attacking by Saint Georgen,
and the final cavalry clash beyond Paal |
Overall, I’m happy with how the game played out. The mix of forces was reasonable, and the Electoral player had to think hard about what to bring on the table, where and when. Paul wasn’t familiar with the rules so it provided an introduction with a mix of movement, combat and the frustration of getting subordinate commanders to do what was needed. It’s a scenario I’ll revisit because the unit activation on both sides gives some interesting challenges.
A big thank you to Chris for the terrain and hospitality over the weekend, and to Guy, Chris and Paul for entering into the spirit of the game. The campaign will continue in the background over the summer and no doubt reappear the next time I need a game.
 |
| Guy and Ken are listening intently to important points being made by Paul to help him understand some of the finer deatils of the Honours of War rules. He was picking them up well. |
Aftermath
The discomforted Electoral forces staggered back into the main army’s lines south of Tamsweg over the course of the next week, observed at a distance by the Ducal light cavalry. Von Sydow spent most of the trip back in his coach drafting and redrafting his report to the Marshal, highlighting those successes that he felt the Elector needed to be aware of and those areas where his subordinates had failed him.
It was a well crafted report, with nothing that would be considered factually inaccurate yet in von Sydow’s mind, highlighting the overwhelming opposition he had faced and exonerating him from any criticism about his martial abilities. He submitted his report to headquarters and retired to the nearest gasthaus for a well deserved bath and meal. There were only two things he had not allowed for.
- The natural inclination of the soldiers from his weary regiments to speak a different version of the truth when questioned about their experiences
- Stadl’s Lutheran church minister who witnessed the whole day from the church tower and who’s accurate, highly descriptive and believable letter including sketches had found its way to the editor of the Tamsweg Inquirer and been published on the first four pages of that week’s edition.
Von Sydow was summoned back to Marshal Falkenhayn’s headquarters building the following morning and instructed to wait in an anteroom whilst a succession of aides and officers were summoned into the Marshal’s office. Some of the officers he knew from their recent shared experiences, others were new to him. All looked at him with grim faces, suggesting that what was coming was not going to be a pleasant experience.
Eventually an aide in the uniform of the Electoral foot guards invited him into the office and he was shown to a chair. Across the desk in the Marshal’s high backed chair sat the Elector with a face devoid of emotion, busy reading a newspaper The Marshal sat off to one side, an observer unable to control what was about to happen. On the desk von Sydow recognised a copy of his report and what looked to be half a dozen hastily written statements. This clearly was not going to be a normal interview.
After an interval slightly longer than would be considered polite, the Elector laid the newspaper down and looked at von Sydow impassively.
“Thank you for coming General. There are a few details of your recent excursion to Stadl that I am hoping you can explain to me. You had no complaints about the troops I arranged for you?” there was a fraction of a pause to allow the general to nod agreement before he continued “If we can start with why this claims your light infantry were beaten back by the town militia…”
Von Sydow emerged from the room an hour later with a searing headache, wanting to put as much distance between him and the building as possible.
 |
| Guy, Ken, Paul, CG |
(By CG: The way Ken portrays it I can really imagine the Elector's interview starting - "Mother o' God, fella, I refer to exhibit 1 in your folder - article in the 'Tamsweg Inquirer'. You've given the press a field day..........")
Caveat by CG
"Don't try this at home!
No, seriously, do try this (read the briefs etc linked near the start) but I must caution that it proved as difficult as I feared when I first saw the Electoral objectives and the veiled threats from Marshal Falkenhayn in the event of failure. I would suggest that all or some of these points could be modified if it were to be refought
- Allow the Electoral player to bring on troops much earlier, say at least 3 Initiative units per turn
- Make the rIver Mur passable by at least light troops
- Make the big wood navigable by at least Light infantry and Light cavalry (We never actually faced the Hussars being driven into it but they would have been "Done For" in that case)
- Spread out the Electoral terrain objectives in some way. Having the only objective (Stadl bridge and town) as an insurmountably difficult location on the extreme right flank made a lot of the table rather superfluous and discouraging for the Electoral players as unachievable, certainly in the time available.
But nevertheless thank you Ken for all your hard work in organising this, As the narrative shows it was full of hard fought excitement and surprising opportunities.


