Once a year, if I can, I try to do a sculpted terrain on the extended table. Many readers will remember the 12 feet x 8 feet setups for Waterloos x 4 , and four days of playing Quatre Bras, and the two big games in The Raid on Vestisle. COVID lockdowns put paid to that in 2020 (though I have still to blog on the excitement I got up to that year!) So in 2021, after the Brampton terrain and all the spin-off games on that 8 x 6 table in May and June it was time to Go Large again. But what to do?
As usual I asked my mates and it emerged that Guy wanted to use his new modest-sized Crann Tara Saxon Army, and I was keen to exercise my newly painted RSM95 Hanoverians. I looked in the masterwork on the Saxon Army "Between Scylla and Charybdis" by Helion & Co, and found in Part II page 78 The Combat at Langensalza. This battle had manageable numbers of Saxons and French fighting an Allied force of Hanoverians, Hessians and Prussians, it seemed ideal. Emails with Guy and a bit more digging revealed that the same description of the battle was in Kronoscaf but with the great advantage of full orders of battle of all the units on both sides which were within marching distance of the battle area. There was also a difficult-to-read old map reproduced there. Combat at Langensalza
Very handily you can click through for the majority of regiments to find their uniforms too. This was particularly useful for me as I had to work out which units from our collections best represented the scaled down formations we needed to make a balanced game. Paul B had kindly offered his Prussians and Austrians to help out as required.
 |
| Just as a teaser - Paul and Guy with the first Move's units on the table at Langensalza, about 50% more were still to arrive in due course |
Historical setting
I try not to do too much boring history on the blog but a bit of background is necessary for this. The Prussians captured and dispersed a lot of the Saxon Army in the Autumn of 1756. What was not absorbed into the Prussian army got away to fight either alongside Austria in Bohemia and Silesia and Saxony or across Germany to become part of the French Army. By February 1761 it appears that a corps of around 10,000 Saxons was a formal part of the French order of battle within a French-officered hierarchy and holding a key part of the front line against the Western Alliance in Hesse/Thuringia.
As the Kronoscaf account tells, by mid February the Hanoverian/Hessian/Prussian Allies assembled a force across the River Unstrut from the town of Langensalza where the Saxons were based, and managed to bridge the overflowing river and the marshes either side to try to take the Saxons by surprise. It seems evident that the Saxons weren't caught completely napping as by dawn they had a strong infantry brigade on high ground overlooking the river.
To summarise briefly - the Allies were dominant in cavalry which they sent across the river first, by two or three routes; the Saxons began to retreat but were eventually surrounded. Another Saxon Division under French control arrived but did not stick around. A lot of the Saxons were cut off as they tried to retreat through a flooded gorge at Ufhofen and around 2000 were taken prisoner, although they gave a good account of themselves first. That only took about two hours and involved no more than a few thousand men on each side so no wonder no one (in the general wargaming community anyway) has ever heard of it!
But taker a closer look with your Games Master hat on.
Here is the map:

The high ground to defend and the difficulty crossing the Unstrut should have provided the Saxons with a better chance. And then looking at the OOBs I could see that they could make a balanced game with the following two changes:
1. The French high command have the will to fight and not just retreat to live to fight another day
2. Both sides can call on up to the whole available forces if you allow a few more hours marching time.
So I came up with the following list of figure requirements calling on elements from our 3 collections of 28mm miniatures.


This was using, as usual, "Honours of War" as our basis but the scale needed to be more or less halved (I hate the term "bathtubbing" but many will know what I mean). That was because the ground scale had to be manageable on the 12 x 6 table so I settled on 2 feet (60cm) being about 1000 metres and therefore we could simulate approximately 6 kms of frontage. I altered the weapons ranges better to simulate the decreased ground scale from the normal HoW battalion game, more on that next time. So, with help from Google Earth, and using Photoshop, I interpreted the historic map to arrive at my tabletop battle area with enough surrounding territory to give us a run-up for the reinforcements. (I have invented names for the 3 x BUAs just North and East of Langensalza town)

I'll just refer you back briefly to the customised terrain for the Battle of Brampton. Several readers have expressed dismay or sadness to me that these art installation terrains are temporary and are "destroyed" after use. But don't worry, I've said it before and I do try to discard as little as possible, and much of it is simply cut up, stored in the garage and reworked later.
Disposing and repurposing the Brampton terrain for Langensalza
The 8 x 6 feet table top has the small polystyrene-based hills cut off and stored for another time. You can see them on the table by the window
Using a serrated blade and a tenon saw I carefully cut out the streams, including the marshy tufts, and will work them into another terrain in the future


No problem that the corrugated packing material is now exposed I'll be building over it
Significant holes in the surface are filled with papier mache. The supporting tables are slightly re-arranged and the tabletop pushed towards the big window. Then I have added my two reserve 6 x 2 foot MDF boards, here seen with my standard green-brown texture
There is a lot of high ground on the Langensalza map so I got hold of the large hills and ridges I had built for previous terrains and started to saw them up to rough shapes. You can see I have used a black marker pen to transfer basic contours from my map onto the surface
This steep valley around Schonstedt village is cut through the hill I used for (among other things) the Lobosch berg at our West Country Lobositz
I had to call on some of my store of expanded polystyrene for a few ridges which needed a new build. But in this year of COP26 hosted by the UK I'm now disgusted by my big stored pile so all the unused poly has been taken to the tip and from now on I'm only re-using and forming new hills from cardboard, wood and paper
Sawing up and piecing together pre-loved ridges
Here you can see the papier mache effect being applied to seal and conceal the joins
And that Schonstedt valley in close up using thick textured packing paper and PVA glue


Basics of the river and marshes


Before I got any farther I had to get a reasonably flat basic surface down on which to paint and build the River Unstrut and the surrounding fields inundated by flood water, and effectively becoming marsh areas. I called on the store room once more for old black vinyl which I had used many years ago as the base for my sand table in Cheltenham. Interestingly it still had a coating of some darkish green powdery paint which I could put to good use as an undercoat.

So this was cut to shape and the basic river and streams painted on before the final hill contours were placed on top.
 |
| If you want to do this and have the space I recommend flattening and keeping all the very large boxes you get with, for example, flat pack furniture. "They will come in handy one day dear!" |
 |
| The masking tape does not give a permanent fixing but holds it long enough till you can get the glue and paper covering in place. |
 |
| Yes, I am mad, but the NHS says I don't have autism, ADHD or a personality disorder........! |
 |
| I love the papier mache moulding as it really begins to take shape |
 |
| The blending doesn't have to be universally accurate as there is more processing still to come |
 |
| Strategically placed weights help to prevent warping as the PVA dries out |
 |
| Still shiny while it is wet. |
 |
| A Stanley knife or similar is necessary to get through the thick cardboard |
 |
| Once cut out I painted the streams with a thick mixture of filler, PVA and dark acrylic paint. Lower streams were given a coat of a thinner lighter mixture as they would be more turgid and muddy |
 |
| Then it was time to mix up my usual "gunge" to cover the contours. This was household filler, sawdust, sand, PVA glue, water and cheap school-quality acrylic paints to taste! |
 |
| The BUA areas were painted with a less textured mix of a different colour. This is Langensalza town |
 |
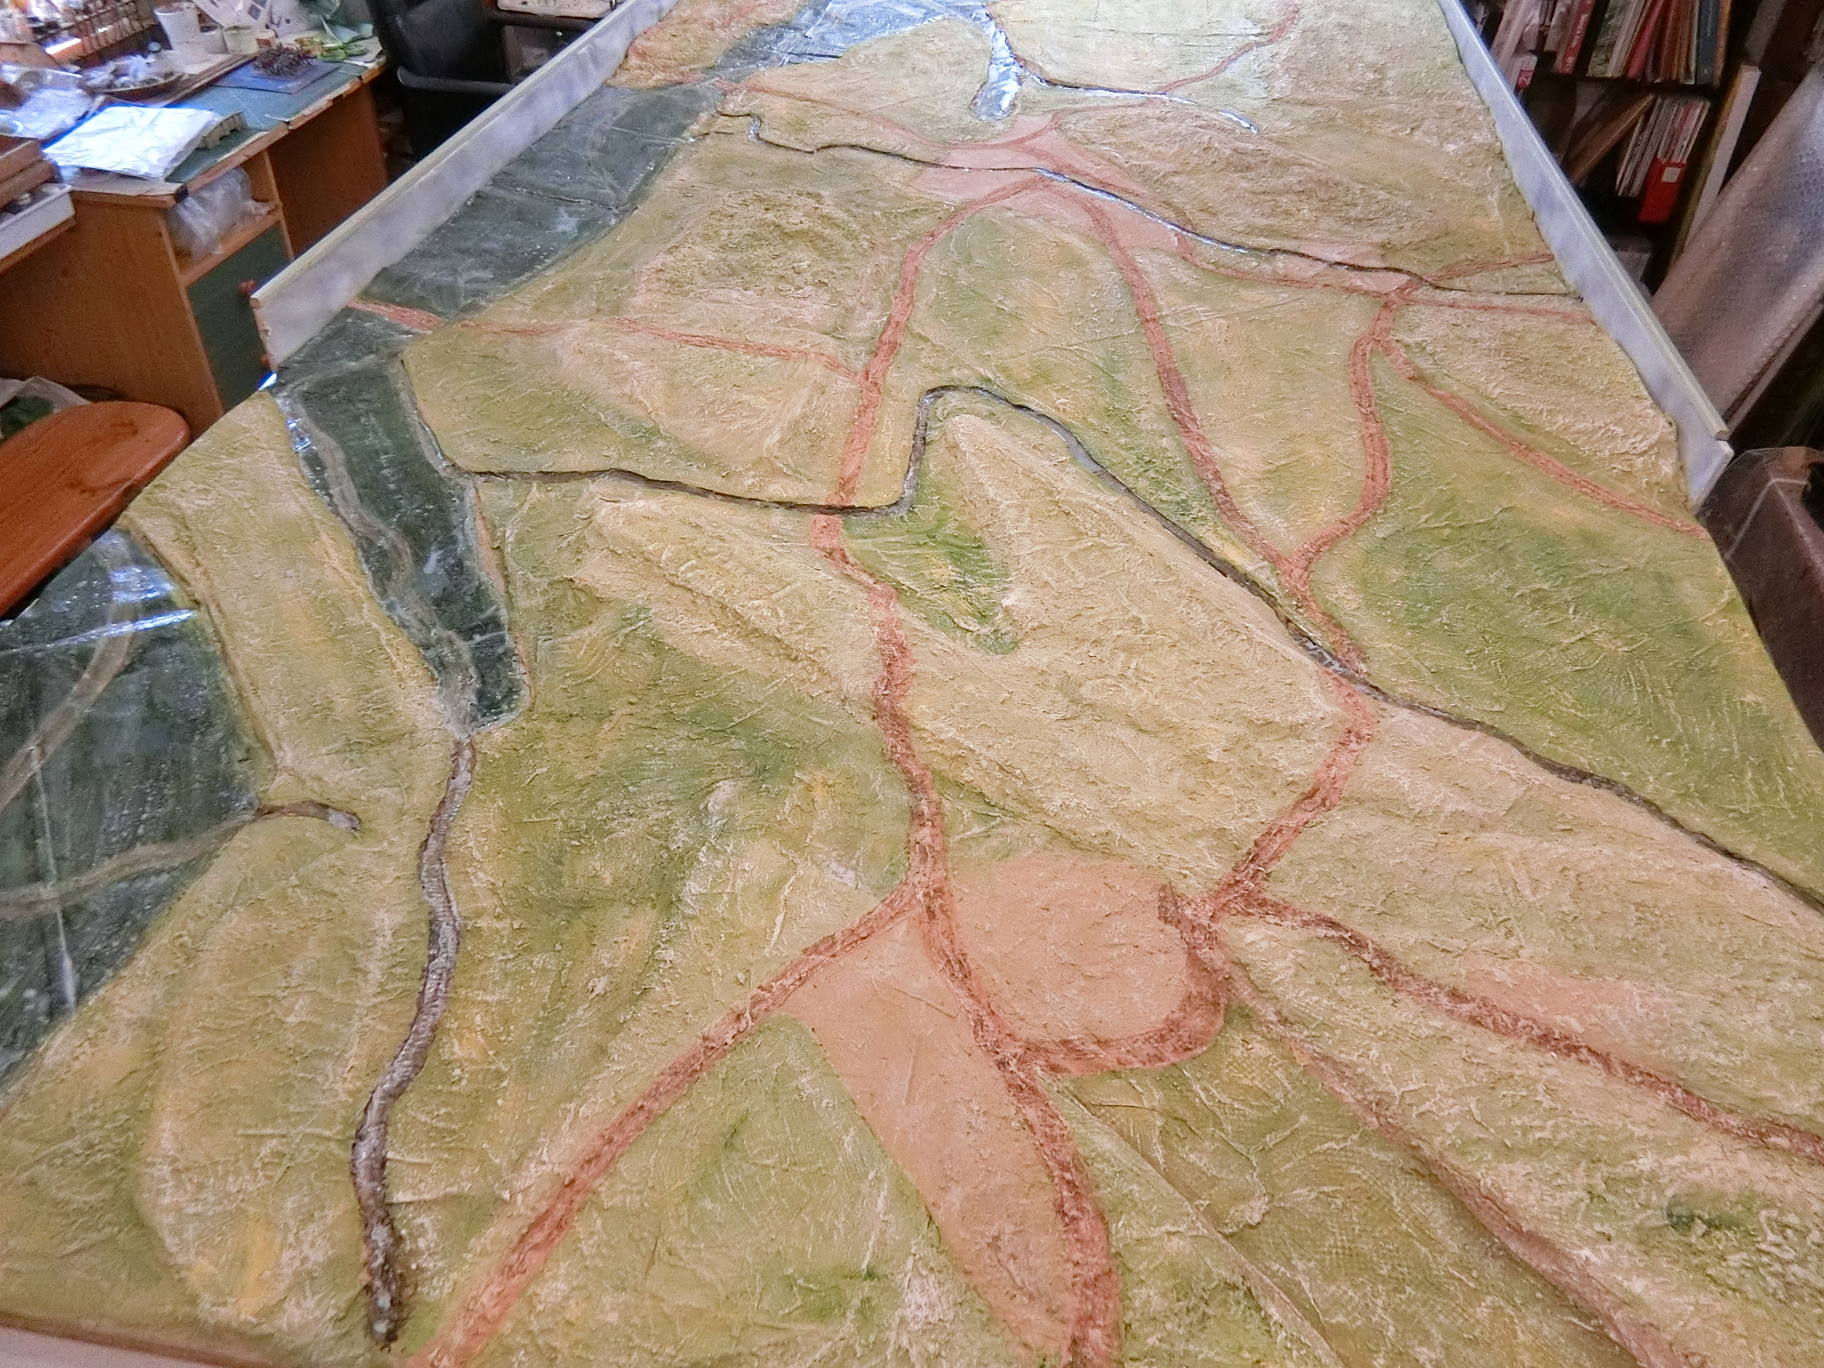
| Now I have everything coated with at least something. That lighter green on the higher ground (Two contour) is mostly the pre-existing green from matching my usual flat boards. Roads have been marked out but not yet textured |
 |
| Here is the Schonstedt valley now with a khaki brown shade of gunge along with the rest of "One Contour"....but that is just an undercoat |
 |
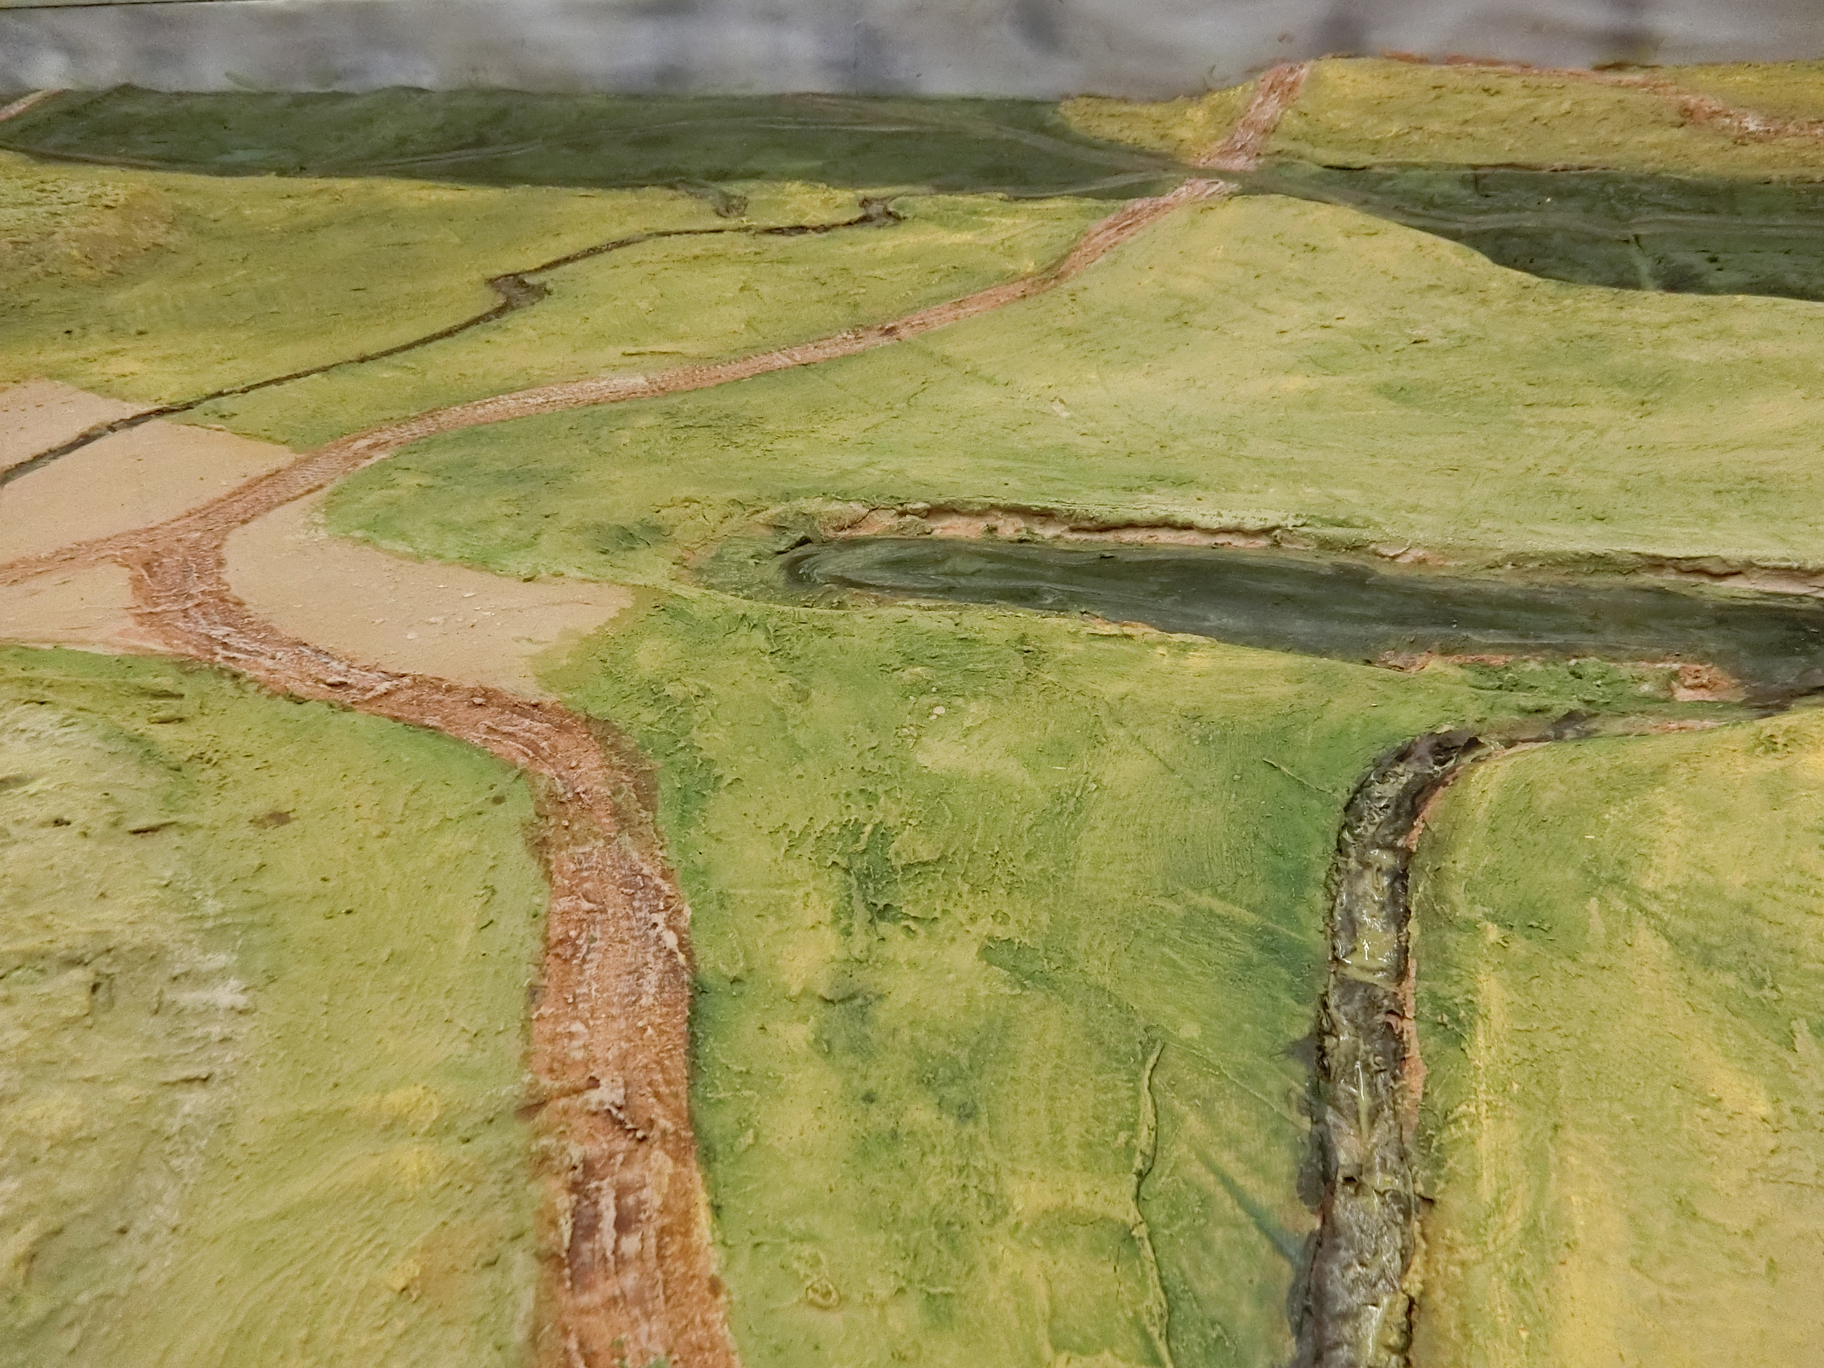
| I painted all the roads with a fairly creamy mixture of filler, sand, sawdust, PVA and mid brown paint expecting it to dry lighter. Before it hardened I went through with two coffee stirrers to simulate wagon tracks. That solidifies to have quite high ridges so I went all over the roads (and the terrain too!) with a surform rasp tool to smooth out the lumps. |

 |
| A thin dark brown wash fills up the ruts with a shade colour. That has to be allowed to dry completely |

 |
| The roads can then be dry brushed with one or more coats of light cream coloured acrylic to bring out the highlights and create definition |
 |
| That big wetland was beckoning to be given a proper water shine with a couple of coats of Winsor and Newton Acrylic Gloss Varnish. To some extent overkill as most of it will be covered up .... but I just know that inundated marshland is wet below the surface! |
 |
| Applying different green and brown washes of thin acrylic to the contours helps to differentiate the levels. This is that Schonstedt valley again |
 |
| The original light green highest contours are beginning to blend in |
 |
| It's meant to be central Germany in February so I think this is much too green yet....... |
 |
| This is going to be where the bridge crosses the Unstrut at Merxleben - a key approach for the Allies |
 |
| The same area from the opposite direction. In the foreground I have started to paint lighter green and brown highlights on the streams |
 |
| This step makes a big difference. Time to get a reasonably wide brush and dry brush all over with a light cream. Sandtex ultra smooth Masonry Paint - Sandstone finish, is ideal |
 |
| That unifies the whole set up making it seem less artificial and more like viewing from an aircraft. |
 |
| Yet by dry brushing more intently along the dividing lines between contours you can make a practical visual signal to players to deduct move distance for going up or down hill |
 |
| Top and bottom: really pleased with how this is beginning to look now. I sort of wish I needed a big wide river....but it's going to be marsh |

 |
| I always intended that the Unstrut would be crossed by the two bridges and the remaining inundated area was to be crossable with difficulty to all but artillery |
 |
| So the "marsh" was represented by all sorts of low profile foliage from my store boxes; some loose scatter and some previously formed bases and bushes |
 |
| Commercial tufts were used to border the marsh areas but everything else, as usual, was scratch made by me from cheap materials. Scatter foliage pieces were added randomly to give extra emphasis along the hilly streams |
 |
| A home made stone bridge nestles in nicely. At left I have stuck on to the backdrop some low-relief wooden houses bought from Hobbycraft many years ago. More buildings will be found to make up Merxleben |
 |
| Test buildings on the site of Langensalza. Ufhofen BUA is yet to appear on the foreground open patches |


 |
| Schonstedt village, now with a fir tree wood in the valley |
 |
| The Ufhofen gorge is just off-table towards the camera so we can see Ufhofen village leading on to Langensalza town |
 |
| Looking down on Judenberg Hof. If it seems familiar you will have seen the grey roof building as a tavern in "Brampton" and a hamlet in the Auden Hills battle |
 |
| Langensalza is an eclectic mix of card buildings (some new for this game) and plaster and china ornamental charity shop/car boot sale type buildings given a new lick of paint |
 |
| I imagined an old 17th Century pump house bordering the marsh, now fallen into disuse and the complex taken over by a brewery and tavern for commercial gain by the bridge to Thamsbruck. It's a china gift shop ornament with a cardboard scratchbuilt rear extension and thick canvas-board garden wall. That foreground marsh is some "distressed" Astroturf formerly loved in Darkest Africa jungle scenarios. |
 |
| View overlooking Langensalza from the Allied artillery position |
 |
| Shallow, wet and a formidable obstacle for Allied troops who don't use the bridge |

Most impressive. Cracking looking terrain, as always, and it takes a really good eye for colour to achieve that level of verisimilitude, as well as a lot of hard work. I also think I recall Langensalza figuring as a semi-fictional location in one of Charles Grant's books?
ReplyDeleteThanks Doug. You have a very good memory! I've just searched my Grant volumes and found it on a map on Page 7 of "The Siege of La Crenoil". Ours is firmly rooted in history and geography though!
DeleteNow that looks like something very special. Really good. I do enjoy your "how to" articles. Excellent Chris. Excellent.
ReplyDeleteThanks a lot Paul, hope some of it may be useful.
DeleteThe amount of effort that goes into your games never ceases to impress me Chris. The map you produced, for example, is terrific.
ReplyDeleteThanks for making all this available.
Keith.
Thank you Keith. It's all a part of the creative fun of this hobby for me. If others can get stimulation from it for their own hobby time then that is great. The briefs etc to be linked from the next part should enable folks to have a go at this game themselves, even scaled down.
DeleteThis is an outstanding blog.
ReplyDeleteThanks very much Roger. There is lot to explore going back 10 years if one has time and inclination. There is a list of labels for subjects at the very bottom
DeleteLove your terrain. It looks so organic and I am fond of any scratch built scenics. In an age where you buy anything, your terrain looks unique and wonderful. Thanks for the extensive tutorial.
ReplyDeleteThank you Chris, I couldn't agree more. I used to scratch build all my buildings too until I realised downloaded and printed card buildings can be modified ad nauseam and painted to look weathered etc so they are unique if required.
DeleteAmazing work, some just brilliant looking terrain!
ReplyDeleteThanks for taking a look
DeleteA masterclass in terrain making, superb!! Looking forward to seeing the battle report, it will be nice to see the Saxons in a game and Hanoverians, my favourites!! Always a joy to spend some time on your blog Chris.
ReplyDeleteThank you very much for your praise and support. Yes I'm looking forward to telling the story, but there are a lot of photos to process!
DeleteOne of your best set-ups yet! I love it.
ReplyDeleteBest Regards,
Stokes
Thank you Stokes, I'm inclined to agree; there was a great deal of satisfaction in designing and creating this without any wargaming precedent as baggage.
DeleteIt certainly was a cracking and fun game and I will say no more on that until you post the report on the battle itself. It is always fascinating to see how the building of the terrain and I can confirm that in the 'flesh' it is superb.
ReplyDeleteRegards,
Guy
PS Off to Valencia tomorrow as Lindsay is doing her race on Sunday. During the preparations, when I am surplus to requirements, I intend to visit a toy soldier museum there with apparently 80,000 model soldiers. I will report back.
Thank you Guy for your support and for not revealing the ending! Hope you and Lindsay have a great time in Valencia and I can see those museum exhibits in due course CG
DeleteWonderful seminar on how you make your terrain , always fascinating to read your reports - another gem.
ReplyDeleteThanks so much Martin, glad you enjoyed it, and thank you for your excellent part in the game.
DeleteWonderful terrain Chris ! You never cease to amaze me . Have a great time in Valencia and hopefully you will put some photos of the collection on the blog
ReplyDeleteThanks Graham - but more haste less speed - it's Guy in Valencia, not me!
DeleteThis is extraordinarily good Chris - masterful -I can't believe the trouble you go to and then to think that it gets cut up again Kerry
ReplyDeleteHa ha! Well that's just part of the creative fun for me, never stand still for too long artistically, Kerry. Thank you for your appreciation as I know you have some fantastic terrain efforts yourself
DeleteFolks - take look at Kerry's blog https://valleyboyinnz.wordpress.com/ for wonderful and varied figures and terrain. I've only just noticed I had not linked it in my Blog sidebar, but it is there now.
DeleteFantastic! Beautifully made and helpfully informative. I have been collecting ,material to build my own modular table and you now have me rethinking my whole approach.
ReplyDeleteThank you for your enthusiasm. I used to have 2 feet square terrain boards and although they were attractive I got fed up with the restrictiveness, especially for historical scenarios. I then adopted the idea that I am the master of my terrain not the other way round! Let me know how you get on
Deletechrisgregg173@gmail.com
First, studying the battle in detail... Second repurposing old terrain and showing all the how-to job, so inspiring... The final result was amazing! Many congratulations for your efforts, so beautiful terrain, an excellent 2D painter makes masterpieces in 3D, too!
ReplyDeleteThanks very much Dinos for your praise. I hope that an accomplished historical scenario writer like yourself will find the next part even more interesting where I talk about game balance and deployment and then the game itself.
DeleteThank you!
DeleteI am happy to announce that the Combat of Langensalza at Kronoskaf has now a more readable map I made after a 1761 German engraving.
http://kronoskaf.com/syw/index.php?title=1761-02-15_-_Combat_of_Langensalza
Now I think it is easier for the reader to follow the movement of the troops.
Wow, amazing Dinos, that's a lovely map. I wish I'd had it when I was designing my game. Had not realised Langensalza had a citadel in the town; why did the Saxons not just retreat in there and hold out?
DeleteChris, thank you for your kind comments!
DeleteI'm sorry the map came a bit late.
Frankly, the map for Langensalza was not in my to do list, until I read your comment above, about the difficult-to-read map at Kronoskaf.
Why the Saxons did not defend themselves in Langansalza? I'll try to give my personal interpretation.
-It seems that the Saxon Corps was widely strung out and difficult to assemble.
Also problems of communication and harrassment of units, according to the narration
-What you see as a citadel is the core of the walled city of Langensalza, surrounded by suburbs with cultivated fields.
-We do not know the condition of the city walls. Moreover, Langensalza could be shot by cannon from Mercksleben heights.
-The Prussians could easily approach the walls using the suburb houses as cover.
-The Saxon had few cannons to keep the attackers at bay, we also do not know if they had enough ammunition and other supplies to sustain a siege.
-If the Saxons did not retreat as quickly as they could, they would be completely surrounded, as it almost happened.
Also, their intention was to link with the French and they had no cavalry to cover their flanks.
Finally, the Prussians managed to make a surprise attack, followed by the Hanoverians and Hessians.
Under these conditions, whatever were the Saxon initial plans, they had to be hastily revised :-)
Eagerly waiting to enjoy the Second Part! Cheers!
Thanks Dinos for that well reasoned and highly logical explanation. Perhaps my low walls in my model Langensalza are not too far off then! Part Two is in process but unfortunately I have a lot on at the moment. Yesterday's Cotswold Wargames Day blogging will need to take priority and I hope you will enjoy that too.
DeleteFine! Waiting for your Cotswald report first, then!
DeleteTo your low walls in your Langensalza model, you could possibly add some trees/orchards or a few low rural houses/farms around the city (the suburbs). This could simulate the fact that the Prussian cavalry managed to sneak into the town unobserved and suddenly appear at the other end and attack the Saxon right flank.
Ha ha , I've done it now - you are the ace scenario man so I will leave that detail to you. But in the interests of scale fidelity it's worth noting my model could not have any bigger footprint for the town doing it my way.
DeleteWonderfully obsessive work (in the best sense). :-) I lke your abandoning of plastics too. Looking forward very much to the battle itself...
ReplyDeleteCheers,
David.
Obsessive, hopefully due to a desire to give a reasonably complete and accurate picture for the benefit of fellow hobby enthusiasts. Much like your wonderful blog of beautiful flags, Sir. Working on Part Two currently.
DeleteOh yes, the best sort of obsession, of course! :-) Thanks; yes, flags are a bit of an obsession of mine, I admit. (I have coined the term vexillomaniac! ;-)) And as I say, I'm very much looking forward to Part Two so good luck with all the work on that.
ReplyDeleteCheers,
David.
Understood. And you did so wonderful work on this one-piece terrain!
ReplyDeleteThanks a lot
Delete