Wednesday, 23 March 2016

Hougoumont at 1:3 scale: How I made the Terrain, Part One


Thanks to everyone who commented on the previous post describing making the terrain for  La Haye Sainte at 1:3 scale as part of last year's Waterloo wargaming celebrations. While I'm on a roll I thought it would make sense to do something similar for our refight of the action round Hougoumont, which we played over 3 days in mid September 2015 at my house in the English Cotswolds, and which I will relate in due course.
But for now the terrain making.

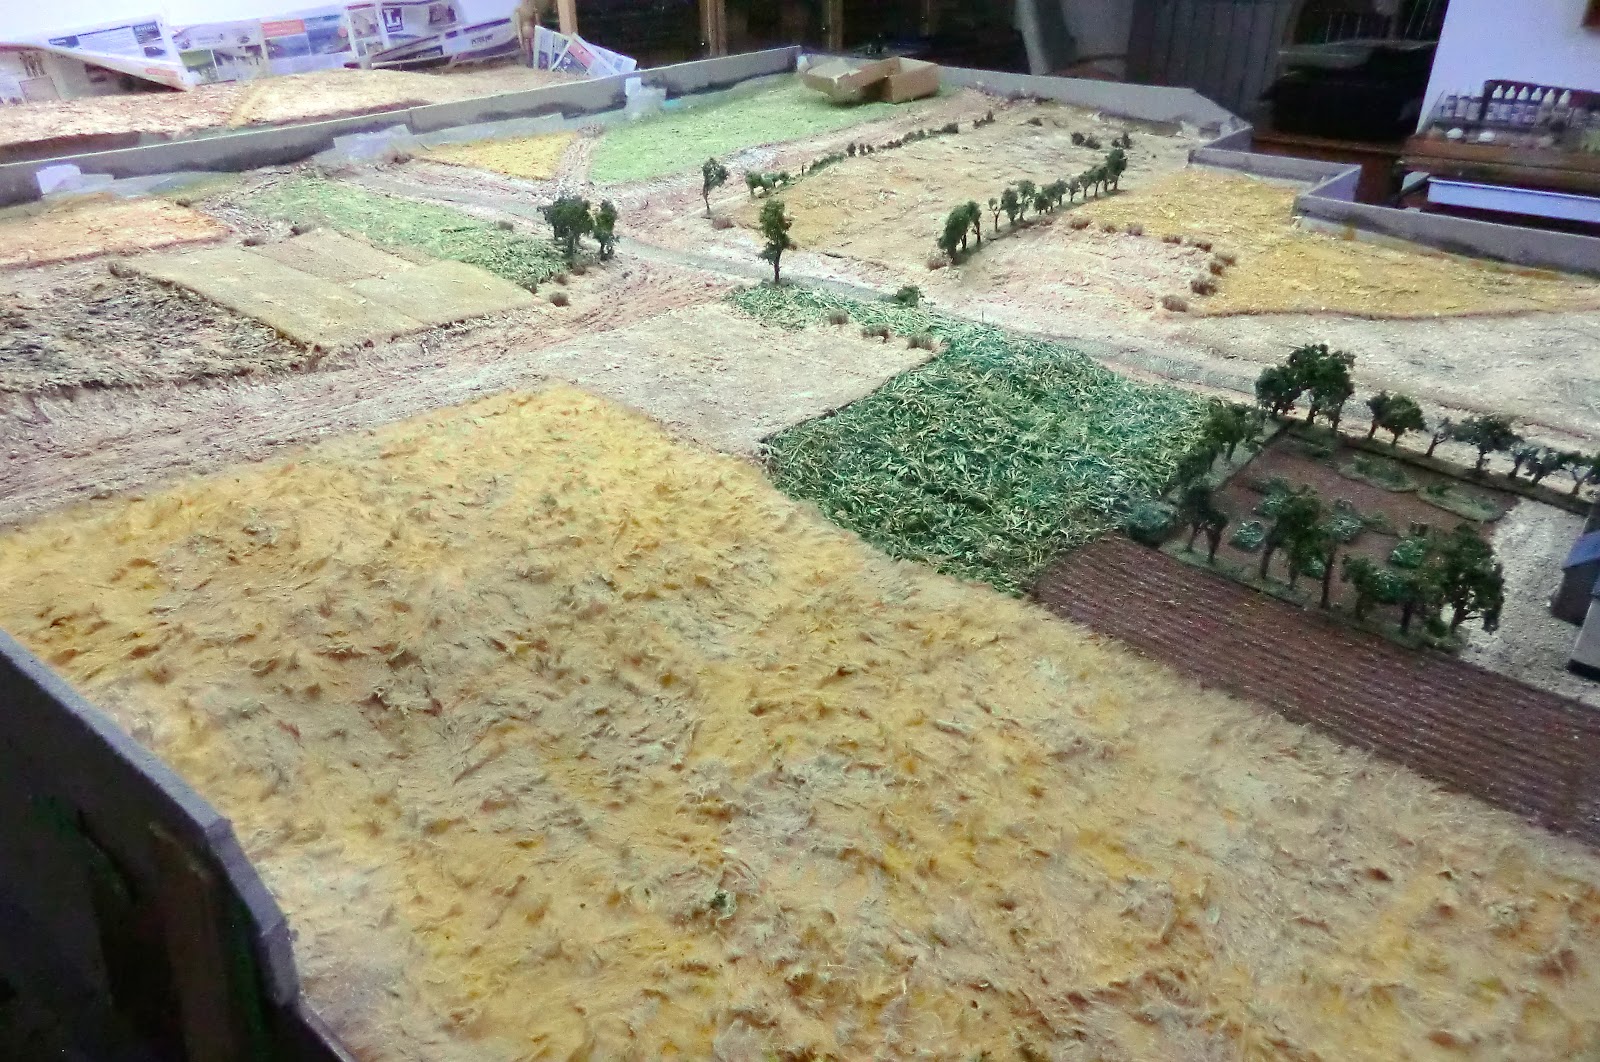
To start off, here is a view of the finished terrain before it got spoiled by having 3000 little tin men trampling all over it. As you can see there are similarities to my LHS terrain, for obvious reasons, but this proved much more of a challenge and I'll be describing, among other things, ponds, vegetable plots and formal lawns and shrubbery!


Just a reminder that these magnificent resin buildings by Hovels were painted by Kevin East of Bristol in 2013 and so enthralled Paul D and myself that we told Kevin he had to organise a game with it in 2015 when the necessary armies had been assembled. I took on making all the surrounding landscape. The buildings are 1:1 for 25mm figures, but we are using 28mm, and when mounting figures on bases they tend to take up more space than if the figures were real and jossling shoulder to shoulder, so I figured we could do it at 1 figure = 3 men. Using this ratio with scale unit frontages seemed to work at approximately 1 inch = 3 metres ground scale.  Turning to the maps in ''the bible" - Mark Adkin's Waterloo Companion, we tried various combinations to fit our notional 96 square feet of terrain. For reasons I'll go into when I describe the game we settled on this one.
 The whole context was necessary to allow for the big ranges of
"off-field" artillery and the squares are each 2 feet giving our
12 feet x 8 feet playing area.
This is a close up of the table area which I used to design the model, supplemented by
studying other maps, contemporary illustrations, and the work of earlier model makers.
The heavier squares are the "extra bit" of terrain used as a side table for player access.
The dark fuzzy bit is the Farm and Chateau but see below for my reality check!
This is a photoshopped composite from 6 aerial photos and thus is not quite square and symmetrical in every respect. But you can see that despite my confidence over scale reduction I had to fudge the farm placement a lot.  We wanted to make sure the Great Orchard was wide enough for two battalions in column-of-attack formation. To do that the buildings had to be shunted more westwards with knock-on effect for that end of the table. Also, once I assembled the component buildings and walls it was apparent they were much bigger than I had allowed in the map interpretation, taking up about 8 square feet.
So I had to start by destroying the La Haye Sainte installation art by salvaging whatever I could and dumping the rest, then building up again
Back to the original Waterloo 1 and 2 landscaped surface and putting polystyrene
pieces just to fill up the biggest troughs as I'd need a fairly flat surface.
Now adding all the cardboard, magazines etc, to get the levels according to the
contours on the map. Higher ground was needed at the nearest (West) edge and the main
area sloped gently down to the South-east.
Once that was done it was time for the large pieces of paper and PVA glue to make a papier mache covering that would dry fairly hard.


At that point I needed to place Kevin's model buildings in situ and experiment with the exact placement of all those wall pieces he had painted.

When the correct positions were decided I was able to mark the surrounding features
 in felt pen according to the map so work could begin on the landscaping surfaces.
Above and below: You will recognise much of this from parts of the LHS set-up. I was interested in preserving work already done on texture and colour where possible, but with the expectation of renovating and improving and blending in wherever appropriate.
At this point things were about to get messy so I removed the resin models and marked their positions. Where they had been I pasted the shapes with a thick "gunge" of acrylic paint, PVA and sand/fine sawdust. Over the entire remaining area of the enclosed farm/chateau and the walled formal garden I painted with a few mms deep layer of the same cream coloured silicone exterior wall coating that I used for the LHS farm base. It has 2mm grit suspended in it so dries with a texture resembling course gravel on a model of this scale.
Some of the road strips reclaimed from LHS are being used and will be blended in later
My photo record shows that I made a start on the pond by the North gate about now but I will show creation of that later so as not to interrupt the flow.........on with the fields.

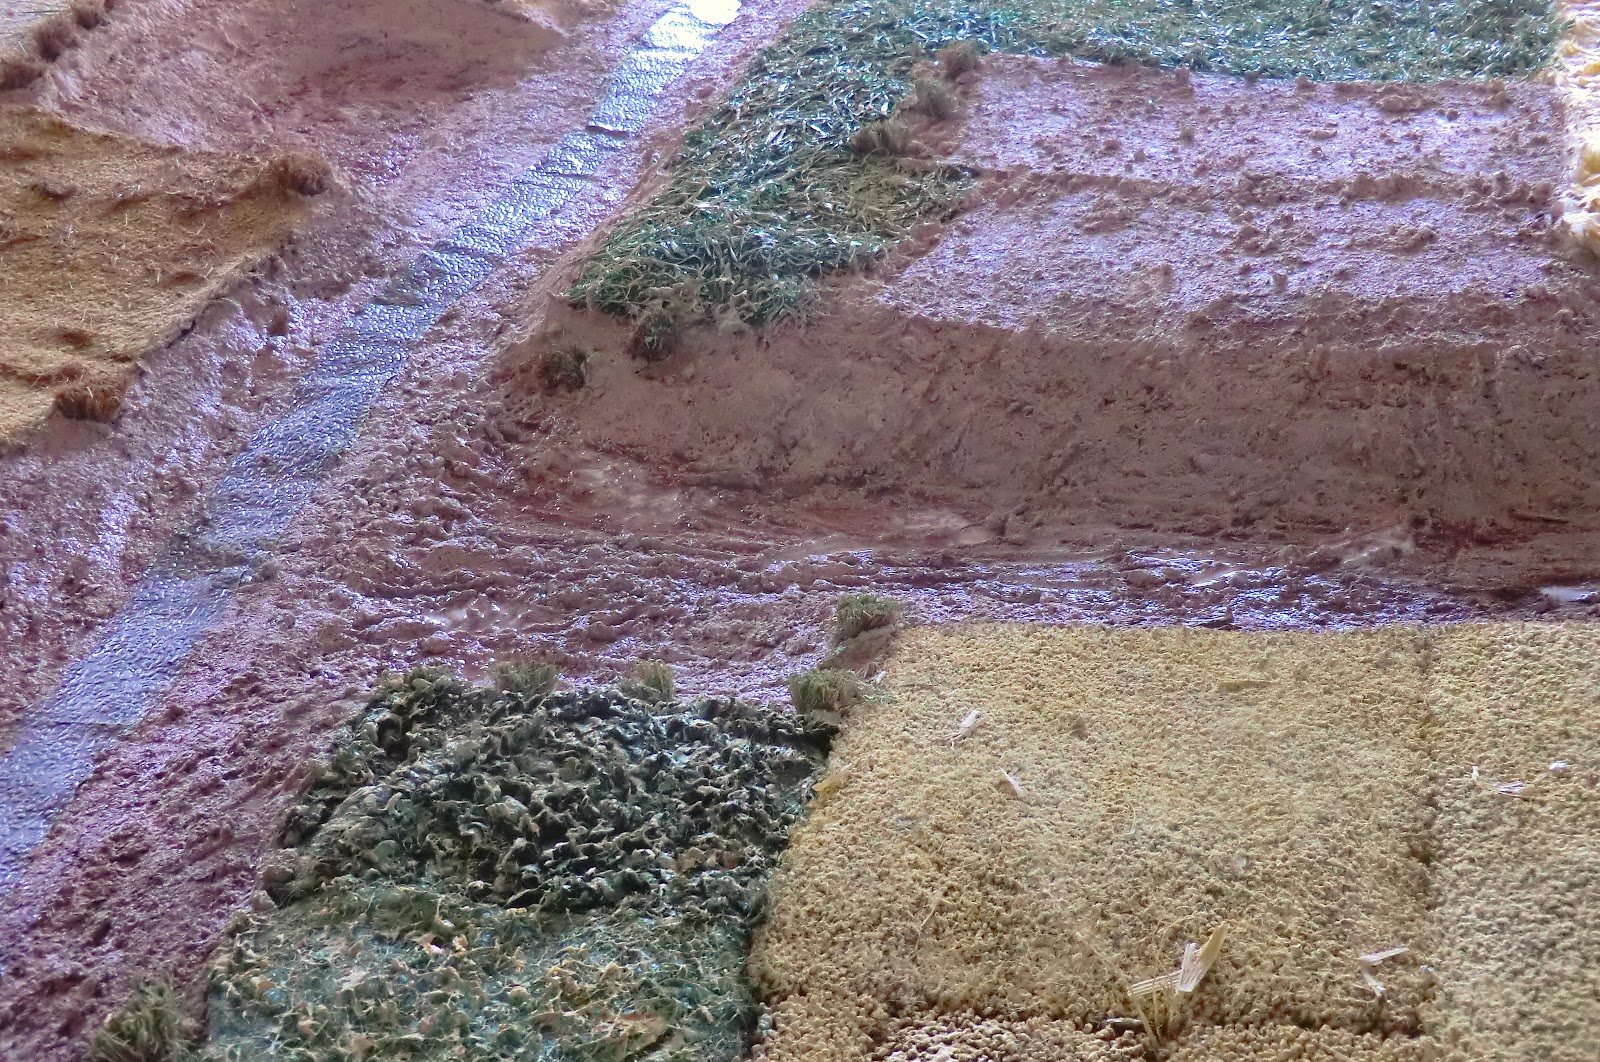
I've obviously changed my mind about some of the bits of carpet at the far end, but by now I have cut, reshaped and recoloured enough to cover the entire surface with something. In the foreground I'm creating the big kitchen garden held at the start by the British Guards. It is going to be grassy areas containing vegetable plots, some which will be ripe being June (yeah, I know the troops would have stripped them clean for the cooking pot!). Similar strips are down the line of the South garden wall. Where I didn't have enough pre-loved road pieces I have painted with thick, sandy coloured gunge.
Quite a transformation. Lots of green and brown acrylic paint/PVA/sawdust mix applied to get the fields the colours I wanted. Notably, a lot of wash, followed by dry brushing, has stained the "gravel" and blended in with the darker areas where the buildings will go.
 Above and below: Close up photos of the area near the South gatehouse. A hay field was necessary here and I've used paint and PVA over one of my old LHS course trampled crop fields then sprinkled with sawdust through an old plastic sieve (don't use a clean one from the kitchen or it will lead to domestic strife!).  Ribbed carpet offcuts have been drybrushed with highlights for the vegetable plots

Putting back the resin models brought it to life. Here I have practically finished the fields and stained the new gunge roads to match the old ones. There is still a long way to go and I will cover very shortly the ponds, crops and formal garden.
The photo on the table is from the Hovels website showing the stimulating photo that started us off in 2013
I'll leave you for now with a photo of my busy work top showing a wide selection of materials I used for this project.


Monday, 14 March 2016

La Haye Sainte at 1:3 scale: Building the terrain

I hope by now you will have all read my 5-part report  on our wargame refight of the action round La Haye Sainte (LHS) on 18th June 1815, which we played here in the Cotswolds last July. I had promised, when time allowed, to give some insight into how I made the terrain, so here goes.

Just a reminder of the LHS game, not long after the start.
(Pat is already looking longingly at the box of more French reserves)
Many readers will recall that we fought the whole of Waterloo at 1:100 scale in June twice, and I made a custom built battlefield for that and reported the "how to" information in several blog posts. You can link back to them, if you wish, through this one:  making the trees. And here is a reminder of what that table looked like, as it was a piece of installation art that was destroyed and formed the basis for the LHS build.
Intense activity round the main table in our second Waterloo game
 nicknamed "Le Woteef" scenario.
So let's start off with showing me destroying the first edition of the Waterloo terrain.

 Above and below: two views where I have salvaged everything usable and got down to the basic old contoured terrain. I cut out the two pieces of paved chausee as I knew that would be useful later in the LHS setup.
You can see I have completely rebuilt what was the lower side of the table background border, and built it up even higher at the wider end.  This is intended to accommodate the heights of Mont St Jean and allow a nice long slope to the far narrow end for the French to fight up. My maps are on the table to work from and you can see them in detail  here

Now I built up the rough idea of the contours using polystyrene packing blocks, cardboard boxes and then layers of thick cardboard, occasionally cut or torn to make the shapes I needed.

 These two photos show white polystyrene covered with cardboard. I used very little glue but find that masking tape is very quick and versatile in modelling projects where you are only using a temporary hold until later layers. Hopefully you can just about discern the sunken roads and the sandpit. I had to compromise a bit on height as I should have gone even higher but I needed to preserve a lip around the high ground so figures would not risk being knocked off during play (it was a long way to the floor if you are 28mm tall!)
Ok, so you spotted those odd shapes where you'd expect LHS farm to be? I found a big piece of grey polystyrene about an inch deep, and big enough for all the farm buildings, so thought it would make a good level base. Trouble is I had not allowed for contours and ended up packing it and then having to PVA glue it and then use 3 antique 7 pound weights to secure it while the glue dried.  
You can see things slightly better in electric light:

Even then it was not level. However, if you look at the original LHS the slope is still evident, but all model buildings have horizontal bases, so I was going to have to compromise on this aspect too and fudge the final modelling detail to give the right impression, read on....
View of the La Haye Sainte area from the Lion Mound, in 2014.
Elm tree crossroads at extreme left; orchard marked by the hedge line at right
I love this bit. Get a pile of big sheets of white packing paper; bowl of slightly watered PVA glue; a wide brush, and put on rubber gloves. Then just build up a beautiful layer of papier mache effect that allows you to roll up bits of paper and pack up or round out wherever necessary and cover with another sheet, and so it goes on. It's sufficient to put only two or three sheets thick as the PVA makes it dry fairly hard and more layers will go on top anyway.
 Now you can see why building up the side "walls" all round was necessary to provide an anchor for the edges of the paper which produces a nice firm terrain for heavy metal figures even though the inside is quite light.
The following photos shows the dried contoured landscape which I have started to populate with crop fields.
  More detail in this one. All the beige fluffy stuff in the foreground is carpet offcuts I had  intercepted from the skip (dumpster) when parts of our house were being carpeted in 2014; I knew it would come in handy for this. Various treatments will be added later. The green patch in middle distance is imitation grass mat used for display. These are actually remnants I inherited from my mother who was a keen doll maker; she used them to display cute stuffed felt animals. I think she would have been proud to see them being used for a different kind of model display.

Around that are beige felt sheets that I salvaged from an old cooker hood - they are unused filters. The pale yellow fluffy stuff is standard teddy bear fur, provided by Kevin, and probably proved the most realistic of all my attempts to represent trampled crops, once treated. In the distance there is dark brown stuff and that is also teddy bear fur bought by me on Ebay and was left over from the fun I had making a fur colback headgear for my Hussarette (full size) modelling, such as:
                                          With "M":

                                 and with "Ella":

Right, that's enough furrivolity for now - let's get back to serious miniature modelling! 
We move on to some close ups of various treatments of surfaces.  The basis for a lot of the muddy roads, rough crops and grasses is my own recipe "gunge". This is art not science so I can't give a formula. It is always an intuitive mixture of PVA glue, acrylic or other water-based paints, plaster type filler (with water to mix it), sawdust or wood shavings - size dependant on the task, and sometimes sand or very small stones.
By the farm I decided to place a ploughed strip. This was formed by a rich brown carpet
 offcut with a ribbed design, and I exploited the ribs by coating them with PVA and fine brown scatter.
This was my home made tea leaf scatter. One Summer I had collected and dried an 
awful lot of used teabags. Although I dyed some this box is in the natural state, and a 
sieve came in useful for giving a smoothish finish for the plough lines and the back garden soil. 
At top right is my "gunge" mixture forming the base for the orchard
The ploughed area and back vegetable garden have been brushed with a wide soft brush
 to remove excess scatter. At left is the artificial grass given a base coat of PVA and paint.
While adding PVA increases the expense it usually gives a reassuring hardness to surfaces when dry.
At right is the corner of the LHS farm base. I gave it several coats of a ready made silicone filler
with small bits of grit embedded in it. This was excess from coating the walls of our house
 on top of the 60mm of external polystyrene insulation so is extremely hard when dry
(though this thickness took a few days to dry properly). A sand/grit/paint/PVA mixture would work instead.
This is the sandpit area. Small tufts of rubber-backed doormat have been embedded
in the wet gunge to give some definition to the transition between sand pit and crop field.
Beyond that is the reused wallpaper chausee and the opposite sides of the artificial
grass area and LHS back garden.
The crossroads area with a close-up of the embossed wallpaper dry-brushed
"cobbles" and gunge as the base for muddy tracks. At right is a bit of the brown teddy
 bear fur intensively treated with various greens and PVA which dries to suggest
to me some green-leaved crop like "Brussels" sprouts or potatoes.
 To the right of that a yellow crop "carpet" has base coat and the other green is a
 thick fluffy felt that started life as a drainage liner for a hanging basket.
A general view at this stage. So far none of the beige carpet has any treatment but all the roads and tracks have gunge surfaces roughed up and poked with a stick to make wheel ruts and puddles
This field has been covered with offcut bristles from doormat all mixed up with
 PVA and paint. It proved a moderately good looking crushed crops effect. 
This one was fairly disastrous. Same technique but with plastic spines cut from an old broom.
Not only were they too long but they did not take the paint at all well, hence the original
blue-grey colour is still present. Needed a lot more work to blend it in. Across the road is the
orchard base where I have left patches non-gunged and painted them as earth.
Beyond the orchard I tried wood shavings salvaged from our carpenters' work on the house
OK effect except these were too long, I should have found a way to cut them down before mixing
Behind the Mont St Jean crest the right hand field is also large wood shavings.
At top left is the brown teddy bear fur field on which I had to use many layers of
paint/PVA/filler as it proved so absorbent. Got there in the end but I would
not recommend dark brown teddy bear fur for this...stick to making fur hats
with it  (so I can't resist showing another of the girls, sorry).
"Yara" looking suitably fierce; she took her acting seriously
Above and below: Now I applied a wash of acrylic burnt umber over all
the potential earth areas, and applied PVA  to run naturally into the ruts to make
 puddles; eventually they would dry glossy. Above right is the base coat green gunge
 for a field on the rear slope of MSJ which I was rendering as trampled grass.
Most of the green mentioned earlier was now hard enough to give several dry
brushing coats of yellow/cream highlights.


Much more gunge and/or wash application and dry brushing later I had achieved an overall effect I was happy with.

I had got the cream coloured base for LHS farm reasonably level and stained it
to tone down the colour. The Hovels buildings were put in place (but only
the walled sections were stuck down). In the foreground you can see that the
paint/PVA treatment had hardened off the yellow teddy bear fur and enabled
dry brushing highlights to give it quite a realistic look.
 I've begun to add trees particularly in the orchard and along where the hedges
will go. Right at the back you can see the "extra bit". That's not in its correct place
merely being worked on in a convenient area.
I had to extend the extra bit from the last game to 7 feet long and build up the
 sides to conform to the slope of the main terrain. I used the same technique and
here it is at the PVA and paper stage.
And now indoors having the base coat gunge, this time sprinkled with a roughly
 correct size of wood shavings. I then pressed them down into the sticky gunge and shook
 off the excess when dry. They were then painted and dry brushed till I was happy with
 the match to the main table. With such big plain areas offset from the main action I needed a
constant point of reference for players and umpires, so built in a slanting single-figure-wide
path which matched across to the main table.

From now on I was adding detail. First of all I didn't need to make any more trees as I had about 150 from which to choose from Waterloos 1 and 2 (see link above). So used the larger ones for the orchard and smaller ones on straight bases as the core of some hedge lines. The final hedges were a mixture of just bush or trees with bushy hedge material in between. I used the same techniques of paint, dry brush and commercial foliage clumps and scatter as in the earlier terrain.
A couple of the bags of clump foliage I shredded up to stick on the hedge cores.
I evidently finished my photo recording of the process at this stage, knowing that I had shown the techniques in the earlier posts. So I will finish off with some more photos of the game in progress, choosing some in which the terrain details come across best. 

1st Light Battalion KGL and RHA limbers around the rutted crossroads (part of my "cabbage patch" has become some big bushes!) 
 Above and below: the mound by the Elm Tree crossroads (Wellington is still there). This and most of the other sandy coloured soil had been coloured and flocked to be sympathetic to Kevin's basing style, of which these RHA guns are a good example.

 Above and below: The LHS orchard showing trees and hedges as well as some field effects and the paved chausee

More trees and hedges at the rear of LHS . For the vegetable plots I used small pieces of flocked wood and sisal string grass effects that I already had by me from many years ago. You can also see the highlighted ploughed area at right and the artificial grass in foreground
A good view of the crossroads and sunken road cresting Mont St Jean with their lining of hedges. I made cavalry base width gaps at certain points as apparently Wellington had ordered such access points to facilitate mounted support.
Last but not least, the painted backdrop. I left this until the very last thing after I'd done the terrain as I was not sure how to blend it in till that stage.  Bearing in mind that in our scenario everything off field was said to be shrouded in smoke I opted to do the whole thing as smoke filled grey sky. I painted it all with white gesso  and then blended acrylic colours in gently while it was still not dry.  Other effects were painted on after drying such as the multi- coloured shell bursts, which some viewers have already commented on - many thanks.  (This photo by Kevin East).
So I hope this has been interesting or useful, please let me know. Feel free to ask any questions via the Comments box below.