Monday, 15 June 2015

West Country Waterloo: The First Refight - Part 1

I've given the introduction to the game in waterloo-project 1:100 refight and followed that with several posts on how I made the terrain. Now on to the first of our refight wargames at 1 figure represents 100 men. This took place over 2 days on the first weekend in June 2015.  Paul D of Cheltenham did all the organisation, wrote the rules and provided all the figures (just part of his 28mm Napoleonic collection). Players came from Cheltenham, Gloucester, Stroud (Gloucestershire), Bristol, and Aylesbury (Buckinghamshire) and it took place at my house in a secluded Cotswold village.

Maps
I'll repeat the simplified map which I used to construct the terrain
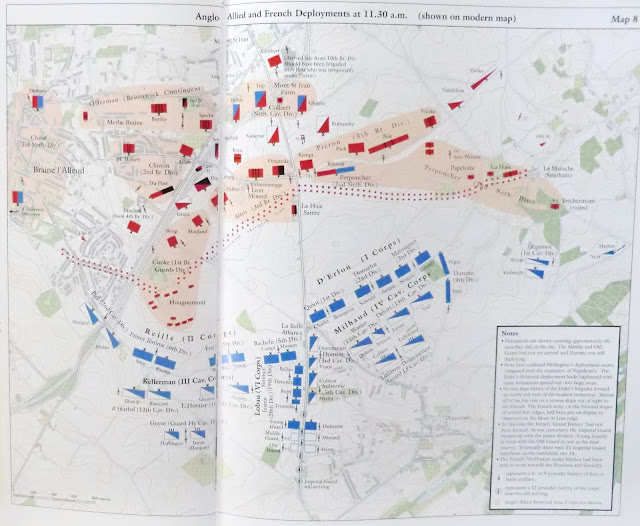
 And this one from Mark Adkin's "The Waterloo Companion" shows the historical dispositions which we more or less followed. Refight 1 is based on the premise of historical deployment followed by wargamers trying to use it to advantage. Our second one, this coming weekend, is "Le Woteef" scenario giving commanders a freer hand.

The Rule system
Paul's rules have been honed and simplified over many years and have standard unit sizes of  24 infantry and 9 cavalry representing coherent bodies of troops roughly 2,500 and 1000 men in historical size. In a similar way that Charles Grant translates historical strength to match his "regiments", Paul adapted the historical orders of battle to match the size of his "brigades". In each case the figures represent some of the more iconic units within a brigade, for example Scots Greys are used to represent the Union Brigade. Compromises also have to be made to fit the command system, so for example the 4 Divisions of D'Erlon's Corps were represented by D'Erlon and 3 Divisional commanders but still had 8 "brigades" of infantry and 2 of cavalry. The aim was to get armies that still had all the character of the originals, covered the same scale area, and had similar battlefield problems to overcome.
Fitting in with the rules and their deliberately adaptable ground scale Paul had sited the French grand battery further back than its historical counterpart but gave reasonable visibility, making some allowance for French troops in the valley below and the good concealment of Allied troops on Mont St Jean (MSJ). I had misgivings, having designed the battlefield to scale, but to Paul's credit the result worked very well and felt right to the players. 
The game goes along on an initiative system whereby the Commanders in Chief choose subordinate commands to go alternately. The Command figures are important to activate Corps and Divisions and keep them attacking or recovering. Tactical actions are very simple "hits" and representative, having a morale test for every "Fatigue" point suffered and a diminishing scale through Fresh, Tired to Exhausted, with Morale status of Shaken, Disorganised and Broken. As brigades are broken the "Fatigue" level of the senior commander also diminishes till unfortunate results occur for the rest of his command. Paul introduces random event cards into his games to add flavour and he wrote some special ones for Waterloo.

Positions at 1130
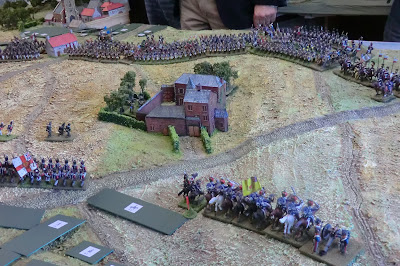
Here are some photos of the troops visible at the start
Overall view from the French right flank. Units not yet visible are
represented by appropriate sized cards
Looking West along MSJ towards La Haye Sainte (LHS)
The infantry of D'Erlon's I Corps with La Belle Alliance (LBA) beyond
Paul allowed the Grand Battery to be in place at 1130 , but further back
Nassau troops and British Guard Light Infantry in Hougoumont
The back table holding French Guards and Reserve troops
near Rossomme farm
Wellington above LHS.  Each figure on a command stand
represents the Rank and therefore number of orders a commander can 
issue per Move. Order range is 6" per rank so Wellington can influence the battle
up to 24 inches away representing both his tactical ability and aides with messages.
Divisional commanders usually only have 2 = 12 inches
Reille's II Corps is massed above Hougoumont

Objectives and Plans
Victory Points and special conditions for this game
I was making the coffee while each side made its plans so I was told later, in my note taking capacity, that the French had recognized the value (given by the umpire) to Hougoumont and would try hard to take it while shifting Reille's corps to the left flank and rolling up the Allied right (the left hook of "what-if" fame). They would refuse their right where terrain was very broken up. With Ney in charge for the opening sequences it did not quite work out that way!

I was also advised that Wellington had emphasised the importance of holding the good position on MSJ ridge but Hougoumont was more expendable. Instead the Allies would shift a lot of their reserve to their right and make an all out attack on the French left flank. The expectation was, as historically, that the Prussians would arrive to safeguard the left flank. This plan too proved subject to change in due course.

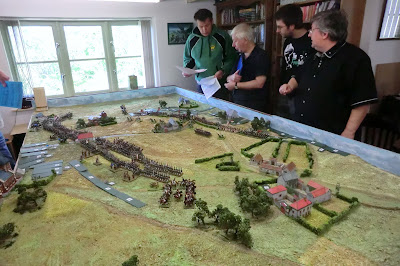
The umpire provides some clarification to the Allied generals
The Earl of Uxbridge receives his orders from Wellington
Now it is Napoleon's turn to receive some encouragement from the umpire
Day 1 Players
Allies
Wellington - Richard Newcombe
Earl of Uxbridge - Owain Atkins
Prince of Orange - Tony Woodman
Lord Hill - Mike Tovey

French
Napoleon - Kevin East
Ney - Peter G
D'Erlon - James Fergusson
Reille - Pat Burden

That's enough scene setting, next time the action starts

Wednesday, 10 June 2015

Waterloo Project: Making the trees for the "big battle" terrain

I promised to finish off this set of four "how-to" posts with how I made the trees. For newcomers please see the previous post and its predecessors for the background.

Once I had mapped out the potential areas for woods and orchards and painted them in on the textured terrain, I did some rough size calculations and then took a step back rather staggered at the amount of trees it would take if I made them at a size which would look "right". The effect needed for them to be sufficiently small to look, collectively, like woods and orchards, yet large enough  not to look silly when peopled by 28mm miniatures. So they would be varying heights from 2 inches to 5 inches and hence, to fill the areas, I would need something like 160 trees.

For the basic armatures I still had a large number of Supertrees which I had bought in bulk from the USA about 10 years ago for my French and Indian War forests. Here is an old photo of my Supertrees in action during the 1756 risings on the Pennsylvania frontier.

And a link to the website 
Instead you can always use twigs and add wire armatures for smaller branches

The Supertrees are a natural product that come in bunches from which you break off individual spays to make large trees, much too big for my purpose. So my first job was to cut them up to make  a variety of shapes and sizes within my parameters. I tend to start the construction from the base and for the Waterloo project I wanted a firm definition for woods so players wouldn't be frustrated by displaced trees yet so they could still get the little men into the foliage. I used strong glue to fix flat headed "drawing pins" to the underside of plastic bases. These bases are made from old membership and store loyalty cards which my family have saved for their mad Dad over the years. They are thin enough to have a low profile yet still fairly strong and slightly flexible.

I had prepared three sheets of expanded polystyrene covered with PVA and paper to use as my working surfaces for the various processes as they involve lots of glue and spray paint. So, when the paper covering was dry I stuck all the bases with the pins into the polystyrene surface. In this way I could handle up to 50 trees in one hand! The eventual role of the pins will become evident later but I hadn't realised how useful they would be in stopping the light trees blowing away in the wind, as it was an outside job.

The next task was to get a selection of nails, preferably with fairly flat heads but of varying lengths. These would form the strengthening bases of the tree trunks to attach the Supertree pieces. In this scale fairly small nails were best but if you do standard sized trees for 28mm figures then galvanized nails such as for nailing waterproof covering on shed roofs are ideal. These were stuck to the bases using glue gun and generous amount of glue to form a kind of root. That dries quickly and now it's time to get your tree armature pieces and match them to each nail with more glue gun glue. This forms a solid trunk that is wider at the bottom and thinner as it goes up and in no time you have a forest of bare trees standing proud. Sorry no photos but please bear this in mind when looking at the next stages.

Above and below: trunks treated with coloured acrylic structure gel

The above photos illustrate what could be an optional or different stage in that the only aim is to smooth out the combination of nail, tree armature trunk and hardened glue to make it look like a reasonably authentic tree trunk.  I used brownish acrylic paint mixed with acrylic structure gel and continued this up onto the lower branches. If you like you can model this to make textured bark surfaces and roots but with 160 to do I was content to keep it basic. Any of your favourite fillers would do for this but I love the plasticised feel you get with hardened acrylic structure gel.

Now I got the spray paints out and had fun just spraying various shades starting dark with black or dark brown and moving through a lighter brown to a cream highlight.
Completed trees covered with spray paints
For the mass effect that is good enough for me and I moved on to the foliage stage. If you just want Winter trees these are superb right now with just the bases to be textured, but as we are needing fully grown trees for a June battle my date with rubberised model foliage lay ahead.

I'd managed to buy packets of Javis Scenics in bulk at a reasonable prices and this is what I used.


These chunks need to be shredded into smaller "leaf clump" sized pieces that I could use with the shaker bottle. This is a bit laborious and messy but OK if you do it with your hands and the foliage inside a cardboard box to catch all the bits. Obviously if you don't mind the expense you can buy  leaf style scatter in all kinds of sizes and use that. I even added in some home made green dyed tea leaves I had had for some time. Whatever you use the next bit is the most interesting and I'm grateful to Conrad Kinch on his blog a few years ago for putting me on to Woodland Scenics Hob -e-Tac for adding tree foliage. I got mine from John at  http://www.track-shack.com/ and I would recommend him for good price and excellent service.

Next just get a big brush and a pot of Hob-e-Tac or use the brush they supply and coat all the bits you want to stick with foliage. It doesn't matter whether you use a shaker or by hand or dip the tree in box of  "leaves" the result is the same. Just make sure you are doing it in box or over a surface where you can shake off the excess and reclaim it.

The Hob-e-Tac stays tacky for quite some time so there is no mad rush and you can add bits later if you miss some but it does dry clear and gives a pretty good bond. 


The above photo shows my items finished for my purposes. When the Hob-e-Tac dried I went round touching the tops with PVA and throwing some light coloured scatter on them (a bit like my hedges). This is intended to catch the light and give a greater effect of depth. Finally the bases were coated with  structure gel mixed with an earth colour acrylic paint and dipped in scatter mix to harmonise with my table textures and colours. The whole thing was then sprayed with a couple of coats of matt varnish to seal it all in as well as possible.

Just a warning which doesn't come across from the photos. I've been using Supertrees for years now and love the realistic effects you can get but they are not robust in the same way as those specially designed for wargames. I don't travel with my games so this is fine for me and when the bits of foliage inevitably get knocked off or a limb breaks I just gather them up and reuse later. So if you need to take them to the club or for a show demo game please wrap and protect them well.

Those drawing pins? Well, apart from assisting me greatly in keeping the tree bases secure during the making process, with the kind of terrain structure I described earlier I could push them into the cardboard/gloop surface and get the players to take them out when that space needs to be occupied by troops. They can then be pushed back in without damaging the surface when the troops move on.

Finally some views of the woods in action in our game
Vivian's Light Cavalry Division seen through the Frischermont woods
La Haye Sainte orchard is very small in this scale of game
The Prussians arrive stage left before advancing through woods towards Plancenoit.
French Guard Light Cavalry have seen off Vivian
I hope you have enjoyed this series of four posts on how I made the terrain and I look forward to hearing if anyone found it useful in their own projects. It will be a few days yet before I can find the time to report on our two-day "Waterloo 1" I'm afraid - there are over 200 photos to select from!


Tuesday, 9 June 2015

Waterloo Project: Making the buildings for the whole battle

Here is the follow up to my previous post on making the Waterloo terrain colouring the big-battle terrain.

Completed up to the buildings stage
This was hard for me as an artist and very visually stimulated wargamer, but any scaled up wargame has to make a lot of compromises over size versus history versus playability. We did a lot of homework on the sizes and shapes of the built up areas and the ground scale for the game. We concluded that I could just about get away with buildings sized to go with 15mm figures provided I took into account the immediate surroundings of woods, orchards, gardens etc in the the total footprint. That also meant that representing the exact configuration of the farms and chateau buildings would be impossible so I had to settle for something with the right character and look that also did the job. I had no pre-conceived ideas about what to use. We pooled resources but the collection of 15mm buildings we had contained very few that were suitable.

The lightbulb moment came when I remembered I had two sets of each of the series of 15mm Waterloo card buildings produced by Pireme Publishing and marketed by Miniature Wargames magazine quite a few years ago. They produced one for Hougoumont, one for La Haye Sainte (LHS) and one for La Belle Alliance (LBA). These are 1:1 scale at 15mm so you got a lot of buildings for your money and the LBA set was padded out with an indeterminate Waterloo style farm too. So, going back to the premise stated above, I did not get obsessed about following the instructions to produce lovely, but hopelessly oversized replicas, and instead treated it as a creative activity just cutting and sticking the nicely printed components as I needed in order to match the required size and character.
Pireme's Hougoumont pack unopened, but the little diagram shows how extensive it is
My version of Hougoumont from the South East. Yes I know I've got an extra gate
and no North side courtyard but the aim was to accommodate 8 bases of
figures according to Paul's rules.
My version of LHS from the West. Gate and farmhouse are in the correct relationship
 but all the other buildings were too big so represented here by a high wall
The LBA model was also too large so I cut it down to retain the shape but
smaller footprint on the tabletop
Above and below - two views of Plancenoit village
The church is a Hovels 25mm resin model beautifully painted by Kevin East
As you can see from these photos, apart from the church and the small stone cottage in front of it, all the buildings have come from the Pireme kits. What isn't obvious is that across the battlefield all the buildings are glued down to avoid inevitable shifting during the games and some of the roofs come off but others don't. Everything I made had to bear in mind sensible deployment of units in standard base sizes of 60mm x 40mm. That included all courtyards and roads passing between buildings, but I also made some roofs to come off if the building was big enough to put a base inside. As you will see from the game photos it mostly worked out OK. The card the houses are printed on is not very strong but easy to cut. So, especially where roofs came off, I had to reinforce the walls with balsa cut to shape.
Due to the base size necessity and overall footprint Papelotte and La Haie
farms have been combined by using a 15mm resin model, presumably based on LHS
but is made in handy sized components for different configurations. Sorry I've
 forgotten the maker as I bought it at a show many years ago.
 It's beautifully textured so dry brush painting is a dream. Beyond is a
combined Frischermont and Smohain village from Pireme card.
Mont St Jean Farm is made from spares from LHS and shows something I
 did throughout which was to touch up the printed walls and roofs with
thin acrylic paint to make weathering and staining as they are too pristine for
my liking.
Just for fun here is a photo of what MSJ Farm looked like in 2014 when Kevin and I did our battlefield tour.

So you can see mine is nothing like it and I just fall back on the concept of deviation for pragmatic purposes rather than ignorance!
The same kind of resin buildings were used for Merbe Braine and Mon Plaisir
but with different paint jobs
Hougoumont with hedges and orchard now in place
Just a few words about the hedges as they were pretty simple.  They were of two types. Many, particularly around Papelotte, were converted from ones I had made from rubberised horsehair for 20mm scale World War Two games. I split them in half making them slimmer but still fairly tall as we were putting 28mm figures behind them. The rest were made by cutting strips from some green sponge packing I happened to have kept (Yes - hoard it - they always come in handy for something!!!).  All of it was painted a darkish green acrylic base coat and then when dry highlighted with lighter greens. Finally all the upper surfaces were coated with PVA and sprinkled liberally with light green scatter to give the effect of light catching leaves. On various stretches of hedge I altered the profile with the addition of extra foam or bits of tree (see later) so it wasn't too uniform. In fact the hedges leading down the hill to Papelotte should really have been lines of trees and fairly dense foliage but we compromised on practicality by using hedges with a few trees and then declared the enclosed land within as rough ground (see my map in part one of this "how-to")

I was going to go on to talk about the trees but I think this has got long enough now so I'll leave you with a parting shot of more hedges but with troops too. Trees next time.
Start of the battle showing the hedges behind Papelotte
The Prince of Orange gives a Nassau brigade the benefit of his superior wisdom!